> For the complete documentation index, see [llms.txt](https://docs.xorosoft.com/llms.txt). Markdown versions of documentation pages are available by appending `.md` to page URLs; this page is available as [Markdown](https://docs.xorosoft.com/whats-new/release-notes/current-release/august-2026-release.md).
# August 2026 Release
{% hint style="warning" %}
This is a Custom Release. Feature availability depends on configuration and rollout status. Some features listed above may not be visible in your environment if they are part of a staged or custom deployment. Please contact your support representative to confirm enablement.
{% endhint %}
### **Enhanced Pricing Rule Criteria for Catch Weight Items**
**Overview**
The Pricing Rule module has been enhanced to [support **Catch Weight** items](broken://pages/Jpyv9a0AgTRElheI5AhJ#applying-pricing-rules-to-catch-weight-items). Users can now define pricing rules based on an item's weight by configuring a **Weight Range** and selecting weight-based Cost Types.
When a Pricing Rule matches the configured **Weight Range**, the system automatically calculates the **Billing Rate per Weight Unit** by applying the configured pricing adjustment. The calculated Billing Rate per Weight Unit is then used to derive the final **Unit Price** for the Sales transaction.
***
**Key Enhancements**
* Added a **Weight Range** field in the **Pricing Rule Criteria** section to define pricing rules for specific item weight ranges.
* Added two new **Cost Type** options:
* **Billing Rate per Weight Unit** – applicable for Sales pricing rules.
* **Purchase Rate per Weight Unit** – applicable for Purchase pricing rules.
* When **Weight Range** is enabled, the appropriate weight-based Cost Type is automatically set to **Billing Rate per Weight Unit**.
* Pricing rules are evaluated only when the item's actual weight falls within the configured Weight Range.
* The calculated Billing Rate or Purchase Rate per Weight Unit is automatically used to determine the item's Unit Price in the respective Sales or Purchase transaction.
***
**How It Works**
**Step 1:** Navigate to **Menu → Utilities → Pricing Rule** and create a new Pricing Rule.
Configure the required **Pricing Rule Header** fields, including **Rule For**, **Recipient**, **Item**, **Rule Type**, and **Priority Number**.
Under the **Pricing Rule Criteria** section, select the required **Price Adj Type**, enter the adjustment **Value**, enable the **Weight Range** option, and specify the minimum and maximum **Weight** values for which the Pricing Rule should apply.
The system automatically sets the **Cost Type** to **Billing Rate per Weight Unit**. Click **Save** to create the Pricing Rule.
**Step 2:** Go to **Menu → Admin → Item → Item Centre** and open the required inventory item. Enable the **Catch Weight** option and configure the **Price per 1 kg** and **Purchase Rate per 1 kg** values.
**Step 3:** Open the **Weights & Dims** tab, enter the required **Weight** for the item, and click **Save**.
**Step 4:** Create a Sales Order for the configured item. If the item's weight falls within the configured **Weight Range**, the system applies the matching Pricing Rule and calculates the **Billing Rate per Weight Unit** using the selected **Price Adj Type**.
The calculated **Billing Rate per Weight Unit** is then used to automatically derive the item's **Unit Price**.
***
### **Added Apply Customer Rebates Module**
**Overview**
A new **Apply Customer Rebates** module has been introduced to simplify the settlement of **Accrual** customer rebates earned through sales transactions. The module provides a centralized workspace where users can review eligible rebate transactions, apply available rebate balances, and maintain a complete history of rebate settlements.
Users can filter rebate transactions by customer, earned date, rebate definition, and rebate status before selecting the rebates to settle. Depending on the selected **Rebate Method**, the system can generate General Ledger entries, create a Customer Credit, or mark the rebate as applied without creating accounting transactions.
The module also maintains the complete lifecycle of rebate settlements, allowing users to review applied rebates and unapply settlements when permitted.
***
**Key Enhancements**
* Introduced the **Apply Customer Rebates** module under **Rebates and Promotions**.
* Supports filtering eligible rebate transactions by **Customer**, **Earned Date**, **Rebate Name**, and **Rebate Status**.
* Provides three rebate settlement methods:
* **Direct Apply**
* **Customer Credit**
* **Mark Applied (No GL)**
* Allows users to apply full or partial rebate amounts against individual rebate transactions.
* Automatically calculates the **Available Balance** and **Selected Total** during rebate settlement.
* Automatically creates General Ledger entries for settlement methods that require accounting postings.
* Includes an **Applied Rebates** section to maintain a history of completed rebate settlements.
* Allows eligible rebate settlements to be **Unapplied**, restoring the available rebate balance where permitted.
***
**How It Works**
**Step 1:** Navigate to: **Menu → Admin → Item → Rebates and Promotions → Apply Customer Rebates.** Select the required **Customer**, **Start Date**, and **End Date**, then click **Filter Rebates**.
The system retrieves all rebate transactions that satisfy the selected criteria and displays them in the **Customer Rebate Transactions** section.
Users can further refine the displayed transactions using the **Rebate Status** and **Rebate Name** filters.
**Step 2:** After selecting the required rebate transactions, configure the settlement details in the **Rebate Posting Details** section.
Select the required **Rebate Method**, specify the **Rebate Date**, **Store**, and **Exchange Rate**, and enter any additional **Notes** if required.
When the selected settlement method creates General Ledger entries, users must also select the required **GL Offset Account**.
**Step 3:** Review the eligible rebate transactions displayed in the **Customer Rebate Transactions** grid.
Users can select one or more rebate transactions and specify the amount to apply against each transaction. The entered **Apply Amount** cannot exceed the remaining available rebate balance.
As rebate transactions are selected, the system automatically updates **Selected Total**, showing the total rebate amount that will be settled.
**Step 4:** Click **Apply Customer Rebates** to process the selected rebate transactions.
After the rebate settlement is completed, the resulting records are displayed in the **Applied Rebates** section, providing a complete audit trail of all rebate settlements performed within the system.
{% hint style="info" %}
Each applied rebate record also includes an **Unapply** action. When permitted, selecting **Unapply** reverses the rebate settlement for the associated customer rebate transaction, restores the applied amount to the available rebate balance, and updates the rebate transaction status to **Unapplied**.
{% endhint %}
***
### **Added Rebate Billback Centre**
**Overview**
A new **Rebate Billback Centre** has been introduced to simplify vendor reimbursement processing for rebate amounts earned through customer sales transactions. The module provides a centralized workspace where users can review eligible vendor billback transactions, generate Vendor Credits, and maintain a complete history of all billback claims.
Users can filter rebate transactions by vendor and earned date before selecting the billback amounts to include in a Vendor Credit. During processing, the system automatically creates a standard Vendor Credit, links it to the originating rebate transactions, and updates the claimed and remaining billback balances to prevent duplicate reimbursement claims.
The module also maintains a complete history of generated Vendor Credits, allowing users to review previously processed billbacks and navigate directly to the corresponding Vendor Credit transactions.
***
**Key Enhancements**
* Introduced the **Rebate Billback Centre** under **Rebates and Promotions**.
* Supports filtering eligible rebate billback transactions by **Vendor** and **Earned Date**.
* Allows users to generate standard **Vendor Credits** directly from eligible rebate transactions.
* Supports full or partial billback claims by allowing users to specify the **Credit Amount** for each rebate transaction.
* Automatically calculates the **Selected Total** based on the selected billback transactions.
* Creates standard **Vendor Credits** using the specified Vendor Credit details, including Store, Accounts Payable, Exchange Rate, Reference Number, and Memo.
* Links every generated Vendor Credit to its originating rebate transactions to prevent duplicate reimbursement claims while preserving any remaining claimable balance.
* Includes a **Created Vendor Credits** section to maintain a complete history of generated Vendor Credits with direct access to the corresponding Vendor Credit transaction.
***
**How It Works**
**Step 1:** Navigate to **Menu → Admin → Item → Rebates and Promotions → Rebate Billback Centre**.
Select the required **Vendor**, specify the **Start Date** and **End Date**, and then click **Filter Billbacks**.
The system retrieves all rebate transactions that are eligible for vendor reimbursement and displays them in the **Pending Vendor Billbacks** section.
**Step 2:** Configure the **Vendor Credit Details**. Specify the required **Vendor Credit Date**, **Store**, **Accounts Payable** account, and **Exchange Rate**. Optionally enter a **Reference Number** and **Memo** that will be stored with the generated Vendor Credit.
**Step 3:** Review the eligible rebate transactions displayed in the **Pending Vendor Billbacks** grid.
Select one or more rebate transactions and specify the **Credit Amount** to include in the Vendor Credit. The entered amount cannot exceed the **Remaining** billback balance available for each transaction.
As rebate transactions are selected, the system automatically updates the **Selected Total**, displaying the total reimbursement amount that will be included in the Vendor Credit.
**Step 4:** Click **Create Vendor Credit**. The system generates a standard **Vendor Credit** for the selected billback transactions and automatically links the Vendor Credit to each originating rebate transaction.
During billback processing, the system debits the selected **Accounts Payable** account and credits the configured **Expense Account**.
**Step 5:** After the Vendor Credit is created, the resulting transaction is displayed in the **Created Vendor Credits** section.
The generated **Vendor Credit** number can be selected to open the corresponding **Vendor Credit** transaction directly. The same Vendor Credit is also available in the **Vendor Credit Centre**.
Each generated Vendor Credit remains linked to its originating rebate transactions, ensuring previously claimed rebate amounts cannot be claimed again while allowing any remaining balance to be included in future Vendor Credits.
***
### **Renamed Unit Price/Rate Label to Unit Cost in Purchase Orders**
**Overview**
The **Purchase Order** module has been updated to improve terminology consistency across the Purchase workflow. The line-level **Unit Price/Rate** label has been renamed to **Unit Cost**, providing terminology that more accurately reflects the cost of items being purchased from vendors.
The updated **Unit Cost** label is now displayed consistently throughout the **Purchase Order** module, **Purchase Order Centre**, and **Purchase Order** popup window.
***
**Key Enhancements**
* Renamed the **Unit Price/Rate** label to **Unit Cost** in the **Purchase Order** detail lines.
* Updated the **Unit Cost** column in both the **Purchase Order Centre** and the **Purchase Order** pop-up window.
* Improved terminology consistency across the Purchase workflow by using **Unit Cost** to represent the vendor's purchase price.
***
#### **Added Order Type Column to Purchase Order Detail Views**
**Overview**
The **Purchase Order Centre** has been enhanced to display the **Order Type** column when the **Purchase Order Detail** option is selected in the **Search By** filter. The **Order Type** column is also available in the **PO Subform Detail Lines**, providing users with visibility into the order type associated with each purchase order detail line.
***
**Key Enhancements**
* Added the **Order Type** column to the **Purchase Order Centre** when **Search By → Purchase Order Detail** is selected.
* Added the **Order Type** column to **PO Subform Detail Lines**.
***
**How It Works**
**Step 1:** Navigate to **Menu → Purchase → Purchase Order** and set the required **Order Type** in the **Purchase** tab.
**Step 2:** Open the **Purchase Order Centre**. In the **Search By** dropdown, select **Purchase Order Detail**. Use the **Columns** option to locate and enable the **Order Type** column, if it is not already displayed.
The **Order Type** column displays the order type associated with each purchase order detail line.
**Step 3:** Click on a Purchase Order record and navigate to the **PO Subform Detail Lines** section. The **Order Type** column is also available in the detail lines and displays the order type associated with the respective purchase order line.
***
### **Added Quantity Update Support for Child/Sub Manufacturing Orders**
**Overview**
Child/Sub Manufacturing Orders can now be updated with higher **Manufacturing Order Qty** and **Qty to Produce** values after the Manufacturing Order has been created. Previously, these quantities could not be changed for Child/Sub Manufacturing Orders.
The update is allowed only when the new quantity is **greater than the existing value**, providing flexibility to increase production requirements while preventing reductions to quantities that have already been established.
***
**Key Enhancements**
* Allows users to increase the **Manufacturing Order Qty/Qty to Produce** for a Child/Sub Manufacturing Order.
* The new value must be **greater than the existing quantity**. Updates are restricted when the new **Manufacturing Order Qty** or **Qty to Produce** is **less than or equal to the existing value**.
* If the entered **Qty to Produce/Manufacturing Order Qty** is **0** or a negative value, the system does not allow the update and displays an appropriate validation message.
***
**How It Works**
**Step 1:** Navigate to **Menu → Manufacturing → Manufacturing Order → Manufacturing Order Centre**. Locate the required **Child/Sub Manufacturing Order** and double-click the record to open the Manufacturing Order.
**Step 2:** In the **MO Header** section, locate the **Qty to Produce** field. Click **Edit** to make the quantity editable.
**Step 3:** Enter a new **Qty to Produce** value that is greater than the existing value and click **Update**. The system updates the **Qty to Produce** with the new value.
**Step 4:** In the **Manufacturing Order Qty** field, enter a value greater than the existing quantity. The system allows the quantity to be increased and updates the Child/Sub Manufacturing Order accordingly.
***
### **Added Vendor Price Batch Update in Item Vendor Mapping Centre**
**Overview**
The **Item Vendor Mapping Centre** has been enhanced to allow users to update the **Vendor Price** for multiple selected item vendor mappings at once. The **Vendor Price** field is now available in the **Batch Update** window, eliminating the need to update vendor prices individually.
***
**Key Enhancements**
* Added **Vendor Price** as an option in the **Batch Update** window.
* Allows users to update the **Vendor Price** for multiple selected item vendor mapping records simultaneously.
***
**How It Works**
**Step 1:** Navigate to **Menu → Purchase → Item Vendor Mapping → Item Vendor Mapping Centre**.
**Step 2:** Locate and select the required item vendor mapping record(s). Review the existing value in the **Vendor Price** column.
**Step 3:** From the header-level **Options** menu, select **Batch Updates**.
**Step 4:** In the **Batch Update** window, select **Vendor Price** from the **Column Name** dropdown. Enter the required value in the **Value** field and click **Update**.
The system updates the **Vendor Price** for the selected item vendor mapping record with the entered value.
***
### **Enhanced Bulk Customer Statement Delivery**
**Overview**
Customer statements can now be delivered in bulk through the customer statement delivery process, allowing multiple customer statements to be processed and emailed in a single delivery run. Users can track the processing and delivery status of these statements through the **Customer Statement Delivery** and **Email Queue Centre**, providing visibility into whether statements were sent, skipped, or failed and allowing delivery issues to be identified and addressed.
***
**Key Enhancements**
* The **Customer statement scheduled recipient rule** app configuration has been introduced to provide greater control over which customers receive scheduled customer statements.
* The **Customer Statement Delivery** page displays the delivery status and provides the reason when a statement is skipped.
* Successfully delivered statements are recorded in the customer's **Communications** tab and **Email Queue Center**, along with the statement attachment.
***
**Configuration Details**
* **App Config Name:** Customer statement scheduled recipient rule
* **Configuration Location:** Menu → App Config → Sales → **Customer statement scheduled recipient rule**
* Available options:
* **All opted-in customers**
* **Non-zero net balance only**
***
**Functionality**
* When the **All opted-in customers** option is selected:
* To send scheduled customer statements **automatically by email**, enable the **Enable Automatic Monthly Statements** toggle under **Customer → Notifications** for the required customers.
* When the **Non-zero net balance only** option is selected:
* Statements are sent only to opted-in customers with a non-zero net balance.
* Manually selected customers with a zero balance are recorded as **Skipped** during delivery.
***
**How It Works**
**Step 1:** Go to **Menu → App Config → Sales** and select the **All opted-in customers** option in the **Customer statement scheduled recipient rule** app configuration.
**Step 2:** Open the Customer Statement module. Select the bulk of customer statements for the configured customers.
**Step 3:** Click on the header options and select **Email Statement**.
**Step 4:** A confirmation popup is displayed asking whether to email the selected statements. The popup displays the number of selected customers and informs you that the statements will be queued for delivery. Click **OK** to proceed.
**Step 5:** A **delivery-queued** confirmation popup is displayed after the statements are successfully queued. The popup indicates that manual customer statement delivery has been queued and that customers without a non-zero statement balance are recorded as skipped.
Click the **Click here to track the delivery status** link to open the **Customer Statement Delivery** screen.
**Step 6:** In [**Customer Statement Delivery**](/xoroerp-1/sales/customer-section/customer-statement/customer-statement-delivery.md), review the delivery status of the queued statements. The screen displays details such as **Run #, Run Date, Queued At, Queue Source, Type, Statement From, Statement To, Run Status, Customer, Email, Delivery Status, Attempts, Sent, Email, Last Status Update,** and **Error**.
**Step 7:** Statements that do not meet the delivery criteria are recorded with a **Skipped** delivery status. For example, when a customer has no non-zero statement balance, the statement is skipped, and the reason is displayed in the **Error** column as **“Skipped because the customer has no non-zero statement balance.”**
Statements that are successfully delivered are displayed with a **Sent** status, along with the number of attempts and the corresponding email reference.
**Step 8:** Open **Admin → Email Queue Center** to review the emails generated from the customer statement delivery process.
The **Email Queue Center** displays the email's **Sent At, Created At, Status, From, To, Subject, Entity/Related Entity, Reference Type, Reference, Attachments,** and **Source**.
When the email is successfully delivered, the email details display a **Sent** status, and the generated customer statement PDF is available under **Attachments**.
**Step 9:** Click the customer statement email in the [**Email Queue Center**](/xoroerp-1/admin/email-queue-centre.md) to view its email details. The email details display the **To** and **CC** recipients and the attached customer statement PDF. The email body uses the configured customer statement email template.
***
**Validation Rules**
* **No Printable Pages:** If the customer statement PDF rendering produces no printable pages, the delivery row is marked as **Failed** with the error message **`Customer statement PDF rendering produced no printable pages.`**
* **Failed Email:** For failed deliveries, **no email is sent**; the error remains visible in the **Error** column, and the corresponding delivery run is marked as **Failed**.
* **Zero-Balance Customer:** When the applicable recipient rule requires a non-zero balance, a customer with a zero balance is marked as **Skipped**.
* **Run Status:** The **Run Status** represents the status of the entire delivery run. If at least one customer fails, the run is marked **Failed**, even if other customers in the same run are successfully sent.
***
### **Added Alert When Changing Customers Across Presentations**
**Overview**
An alert has been added to prevent users from changing the customer in a presentation when the currently selected customer is already associated with items added to the cart in another open presentation.
When a customer is selected in one presentation and items are added to the cart, the same customer is automatically associated with other open presentations. If the user attempts to change the customer in another presentation while the customer has items associated with an open presentation, an alert is displayed, and the customer selection remains unchanged.
This helps prevent inconsistencies when the same customer is being used across multiple open presentations with items already added to the cart.
***
**Key Enhancements**
* Added an alert when a user attempts to change the customer in a presentation while items have already been added to the cart in another open presentation associated with the currently selected customer.
* The selected customer remains unchanged when the alert is displayed.
* When a customer is selected in one presentation **without adding any items to the cart**, the customer is not automatically selected in another open presentation
***
**How It Works**
**Step 1:** Open a presentation from the **Presentation Centre** and select the required customer.
**Step 2:** Add one or more items to the cart in the presentation.
**Step 3:** Open another **Presentation**. The same customer is automatically selected because items for this customer are already present in the cart of another open presentation.
**Step 4:** Try to change the customer to another customer. An alert is displayed indicating that the customer cannot be changed because items have already been added to the cart for the currently selected customer in another open presentation.
**Step 5:** Close the alert using the **X** icon. The customer remains unchanged, and the currently selected customer continues to be displayed in the presentation.
{% hint style="info" %}
If no items are added to the cart in the first presentation, selecting a customer in that presentation does not automatically select the same customer in another presentation. You can select a different customer in the second presentation.
{% endhint %}
***
### **Refund Remaining Vendor Credit Balance**
**Overview**
The **Refund Balance** option allows you to refund the **remaining unused balance of a Vendor Credit** directly from the Vendor Credit page.
Previously, a Vendor Credit could be applied to bills or partially refunded. With this enhancement, you can select **Refund Balance** from the **Options** menu to refund the remaining credit amount to the vendor. The system opens the **Vendor Refund** window with the available balance populated as the refund amount.
This provides a convenient way to clear the remaining balance of a Vendor Credit without manually creating a separate refund transaction.
***
**Key Enhancements**
* A new **Refund Balance** option is available under the **Options** menu on the Vendor Credit page.
* The option allows you to refund the **remaining unused amount** of a Vendor Credit.
* You can select the **refund method**, **deposit account**, **refund date**, **refund store**, and enter other required refund details.
* The corresponding **Vendor Refund** transaction is created and can be viewed from the **Vendor Credit Centre**.
***
**How It Works**
**Step 1:** Open an existing **Vendor Credit** that has a remaining unused balance. Click the **Options** menu in the top-right corner of the Vendor Credit page.
**Step 2:** Select **Refund Balance** from the drop-down menu.
**Step 3:** The **Vendor Refund** window is displayed. The system automatically populates the **Refund Origin Type** as **Vendor Credit** and the **Refund Origin Ref#** with the reference number of the Vendor Credit.
The **Refund Amount** is also automatically populated with the remaining balance available on the Vendor Credit.
**Step 4:** Click **Record Refund** to process the refund.
**Step 5:** The system creates the Vendor Refund for the specified balance and updates the Vendor Credit to reflect the refunded amount. The refunded amount can also be viewed in the [**Vendor Credit Centre**](/xoroerp-1/purchase/vendor-credit/vendor-credit-centre.md) under the **Refunded** column.
Since the remaining balance has been fully refunded, the Vendor Credit status changes from **Partially Applied** to **Applied**.
***
### **Unique and Mandatory Ref No. for Vendor Credit**
**Overview**
The **Ref No.** field in Vendor Credit can now be configured as a **mandatory and unique field**. When enabled, users must enter a Ref No. while creating or updating a Vendor Credit, and the entered Ref No. must be unique across Vendor Credits.
This ensures that vendor-provided reference numbers, such as credit memo numbers, are captured consistently and prevents duplicate reference numbers from being used.
***
**Configuration Details**
* **App Config Name:** Allow unique RefNo in Vendor Credit and mandatory RefNo
* **Configuration Location:** Menu → App Config → Purchase → **Allow unique RefNo in Vendor Credit and mandatory RefNo**
***
**Functionality**
**When App Config Is Enabled**
* The **Ref No** field becomes mandatory when creating or updating a Vendor Credit.
* A Vendor Credit cannot be saved without entering a Ref No.
* The Ref No. entered for a Vendor Credit must be unique.
* If the Ref No. is not entered or does not meet the uniqueness requirement, the system displays a validation message and prevents the Vendor Credit from being saved.
* When the configuration is disabled, the Ref No. field continues to behave according to the existing Vendor Credit configuration, where it is optional.
***
**When App Config Is Disabled**
* When the configuration is disabled, the Ref No. field continues to behave according to the existing Vendor Credit configuration, where it is optional.
***
**How It Works**
**Step 1:** Go to **Menu → App Config → Purchase** and enable the **Allow unique RefNo in Vendor Credit and mandatory RefNo** app configuration.
**Step 2:** Open the Vendor Credit module and create a new Vendor Credit. Enter the required Vendor Credit details, including the vendor, account, and credit details. The **Ref No** field is now required.
**Step 3:** Try to save the Vendor Credit without entering a Ref No. The system prevents the Vendor Credit from being saved and displays the validation message **“Unique Ref No. is required.”**
**Step 4:** Enter a Ref No. in the **Ref No** field. If the entered Ref No. does not satisfy the uniqueness requirement, the system prevents the request from being completed and displays a validation message asking the user to enter a unique Ref No.
**Step 5:** Enter a unique Ref No. and save the Vendor Credit. The Vendor Credit is successfully updated, and the entered Ref No. is retained with the Vendor Credit.
***
### **Added Product Category as a Xoro Data Field for Product Metafield Mapping**
**Overview**
The **Product Category** field is now available as a selectable **Xoro Data Field** when configuring **Product Metafield Mapping**. This allows the Product Category assigned to an item in Xoro to be synchronized to a configured Shopify product metafield.
When the mapping is configured, the item's **Product Category** is written to the mapped Shopify metafield and is also synchronized to the Shopify **Product Type** field. This keeps the product category information consistent across Xoro and Shopify while allowing the value to be accessed through both the Shopify Product Type field and the configured product metafield.
***
**How It Works**
**Step 1:** Configure a Shopify product metafield to store the Product Category value. Go to [**Shopify Configuration Settings**](/xoroerp-1/connected-apps/shopify/installation-guide/configuration-settings.md) **→ Products & Inventory → Products**, enable **Sync item metafields**, and under **Product Metafields**, select **Product Category** as the **Xoro Data Field** source and map it to the required Shopify product metafield.
**Step 2:** Open the synchronized product in Shopify and verify that the Product Category value is available in both the configured **product metafield** and the **Product Type** field.
**Step 3:** If the Product Category is subsequently updated in Xoro, synchronize the product again. The updated Product Category value is reflected in both the mapped Shopify product metafield and the **Product Type** field.
***
### **Support for Product Dimensions and Vendor Part Number in the Data Export Centre**
**Overview**
The **Inventory By Item** filter in the **Data Export Module** now includes additional item information, allowing users to view and export the **Vendor Part Number, Length, Width, Height, and Weight** for inventory items. These columns provide easier access to vendor and physical item details directly from the Data Export Centre.
***
**Key Enhancements**
* Added **Vendor Part Number, Length, Width, Height,** and **Weight** as selectable columns in the **Inventory By Item** filter.
* These columns are also included in the exported **CSV file**.
***
### **Decimal Quantity Support Across B2B and Customer Portal**
**Overview**
The **B2B Portal** has been enhanced to support **decimal quantities** for items based on their configured **UOM Type**. This allows customers to enter and order fractional quantities for items sold by **Size, Weight, Volume, Time,** and **Energy**, while maintaining the existing whole-number restriction for items using the **Count** UOM type.
The enhancement applies to **B2B Presentation, Order Apparel, and Customer Portal Order**.
***
**Key Enhancements**
* Added support for **decimal quantities** for items with the following UOM types:
* **Size**
* **Weight**
* **Volume**
* **Time**
* **Energy**
* Maintained **whole-number-only quantities** for items with the **Count** UOM type.
* Decimal quantities support a maximum of **2 decimal places**.
* Decimal quantities are supported across:
* Product Detail
* Variant Matrix/Grid
* Search Products
* Cart
* Order Apparel
* Customer Portal Order
* Decimal quantities entered through **CSV upload** are retained and are not truncated.
* The entered quantity remains consistent when the item is added to the cart and when the **Sales Order** is created.
***
**How It Works**
**Step 1:** Go to **Menu → Admin → Item** and create the required item SKUs. Configure the **Default Sell UOM** for each item in the **UOM** tab. Verify that the items are created correctly in the **Item Centre**.
**Step 2:** Open a **Presentation** that displays the above-configured items by selecting the required showroom.
**Step 3:** Log in to a customer account and double-click the product you want to add to the cart.
**Step 4:** Enter the required quantity for each available item variant. The quantity can be entered according to the item's configured **Sell UOM**.
Since **Cycling-Socks-WHT-medium** and **Cycling-Socks-GRN-medium** have a **Weight-type Sell UOM**, decimal quantities can be entered for these items.
**Cycling-Socks-BLK-medium** has a **Count-type Sell UOM**. Therefore, if a decimal quantity is entered, it is converted to a whole number when you click **Add to Cart**.
**Step 5:** Open the cart and verify that the selected item SKUs, their quantities, and the **total price** are calculated accordingly.
***
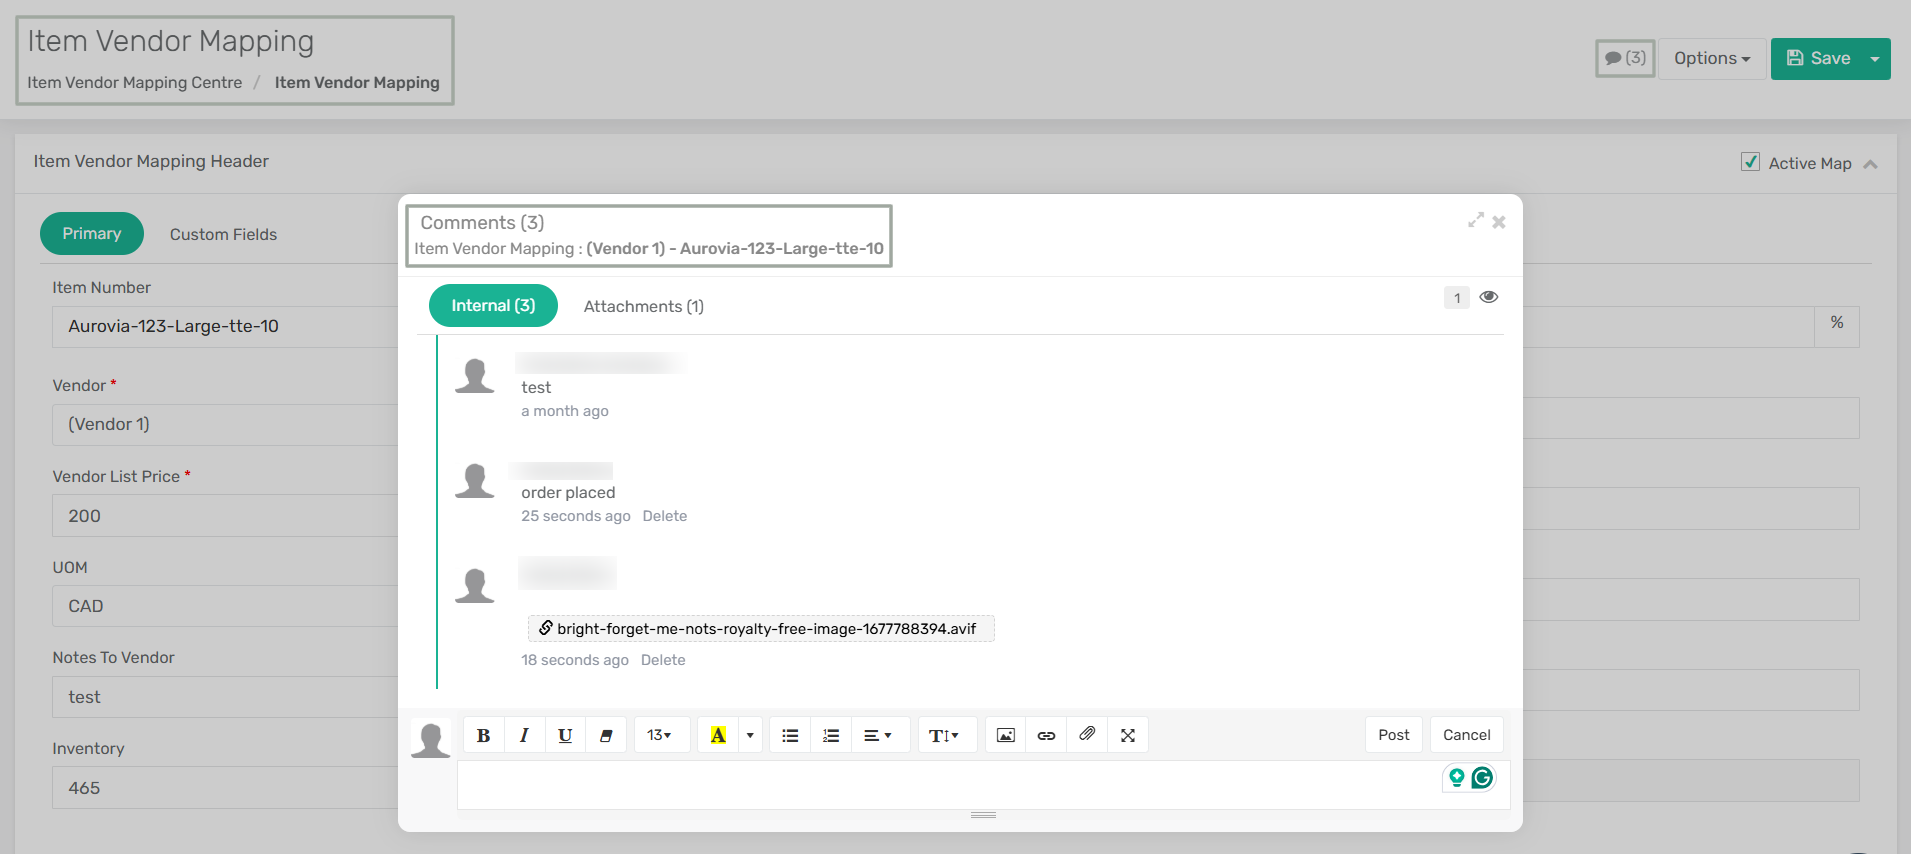
### **Comments Support for Items and Item Vendor Mappings**
**Overview**
Comments are now supported in both **Item** and **Item Vendor Mapping** records. Users can add and view comments directly from the respective records, providing a centralized way to capture notes, updates, and relevant information without modifying the record's primary fields.
***
**Key Enhancements**
* Users can access the Comments option from an Item record to add and view comments associated with the item.
* Users can add attachments to comments, including images and files, directly within the comment section.
* The comments added can be deleted by the respective user whenever required.
* The Comments icon displays the number of comments associated with the record, making it easy to identify records with existing comments.
---
# Agent Instructions
This documentation is published with GitBook. GitBook is the documentation platform designed so that both humans and AI agents can read, navigate, and reason over technical content effectively. Learn more at gitbook.com.
## Querying This Documentation
If you need additional information that is not directly available in this page, you can query the documentation dynamically by asking a question.
Perform an HTTP GET request on the current page URL with the `ask` query parameter, and the optional `goal` query parameter:
```
GET https://docs.xorosoft.com/whats-new/release-notes/current-release/august-2026-release.md?ask=&goal=
```
`ask` is the immediate question: it should be specific, self-contained, and written in natural language.
`goal` is optional and describes the broader end goal you are ultimately trying to accomplish on behalf of the user. GitBook uses it to tailor the answer towards what is most useful for that goal.
The response will contain a direct answer to the question and relevant excerpts and sources from the documentation.
Use this mechanism when the answer is not explicitly present in the current page, you need clarification or additional context, or you want to retrieve related documentation sections.