# October Release
{% hint style="warning" %}
This is a Custom Release. Feature availability depends on configuration and rollout status. Some features listed above may not be visible in your environment if they are part of a staged or custom deployment. Please contact your support representative to confirm enablement.
{% endhint %}
### **Addition of “Split Term” Payment Term Type**
**Overview:**
This release introduces a new **Payment Term type – “Split Term”**, allowing invoices and bills to be automatically divided into multiple child documents based on configured day intervals and percentages.
This enhancement improves flexibility in payment scheduling, supports instalment-based transactions, and ensures accurate accounting treatment for both **Sales Orders / Invoices** and **Purchase Orders / Bills**.
***
**Feature Added:** Payment Term Type – **Split Term**
**Location:**
`Menu → Admin → Payment Term → Create Payment Term`
**Description:**
When this type is selected:
* A configuration table appears at the bottom of the Payment Term page.
* A **Preset** dropdown menu is displayed, allowing users to quickly generate predefined split structures (for example, 2-part split, 3-part split, etc.).
* When a Preset is selected, the system automatically populates the configuration table with the corresponding day intervals and percentage values.
* After using a Preset or choosing to configure manually, users can define: **Day intervals** and **Percentage allocation per interval**
**Example:**
| Days | Percentage |
| ---- | ---------- |
| 30 | 50% |
| 60 | 50% |
As users add rows:
* The system automatically recalculates the remaining percentage.
* Saving is allowed only when the total equals **100%**.
***
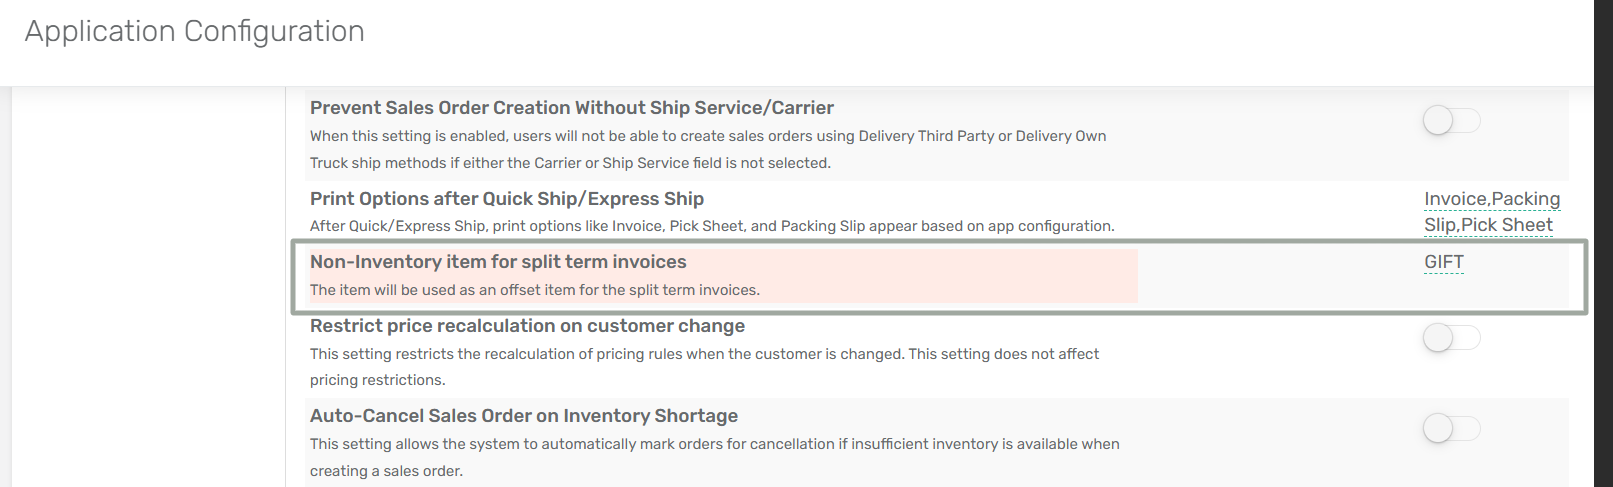
**App Configuration Requirement for Split Term Invoices:**
A new mandatory configuration "**Non-Inventory Item for Split Term Invoices"** has been added. The item specified here is used as the **offset line** in the parent invoice.
**Configuration Location:** Sales → Non-Inventory Item for Split Term Invoices
**How It Works (Split Term Invoices):**
**Step 1:** When a parent invoice with the Payment Term Type **“Split Term”** is created, a negative non-inventory offset line is added to the parent invoice for the split amount.
**Step 2:** The system automatically generates **child invoices** based on configured day intervals and percentage allocation per interval. Each child invoice represents one instalment.
***
**App Configuration Requirement for Split Term Bills:**
A new mandatory configuration has been added "**Expense Account for Split Term Bill"**.
**Configuration Location:** Purchase → Expense Account for Split Term Bill
**How It Works (Split Term Bills):**
**Step 1:** When a parent bill with the Payment Term Type **“Test Split Term”** is created is created, an offset expense line is added in the Expenses tab.
**Step 2:** The system automatically generates child bills based on the split configuration.
***
**Validation Rules:**
* Amount-related changes are allowed on offset rows.
* Child invoices and bills cannot be voided individually.
* If the parent invoice or bill is voided, or if its payment terms are changed, the related child invoices/bills will be automatically deleted and recreated — provided all of them are still in Open status.
***
### **Royal - Vendor RMA process enhancement**
**Overview:**
This release introduces a new module called **Vendor RMA (Return Merchandise Authorization)**, enabling users to manage returns to vendors with full operational and accounting control.
Previously, RMA functionality was limited to customers and could only be linked to invoices. With this enhancement, users can now create RMAs for vendors, associate them with bills, generate warehouse waves for returned items, and automatically post vendor credits once the process is completed.
This ensures accurate inventory movement, proper financial reconciliation, and streamlined warehouse processing.
***
**Feature Added:** New Module – **Vendor RMA**
**Location:**
`Purchase → Vendor Credit → Vendor RMA`
**Description:**
The Vendor RMA module allows users to:
* Create RMAs against vendor bills
* Release RMAs to generate warehouse waves
* Ship items back to vendors
* Move inventory through **In Transit** locations
* Post vendor credits
***
**App Configuration Requirement:**
**App Config Name:** **Clearing Inventory Account for Vendor RMA**
**Configuration Location:** Menu → App Config → Accounting → Clearing Inventory Account for Vendor RMA
This config allows users to select the account that will be used as the default clearing account for Vendor RMA inventory adjustments and transactions.
***
**How It Works:**
**Step 1: Open Vendor RMA**
Initiate a Vendor RMA for defective, excess, or incorrect goods. You can create a Vendor RMA in **two ways**:
**1. Create directly from Vendor RMA module**
If RMA Type is **Vendor RMA-Direct** then fields to be entered:
* **Vendor**
* **Account**
* **Return Inventory Store**
* **Item along with quantity**
After entering these details, click on Save and RMA is generated with **Open** Status.
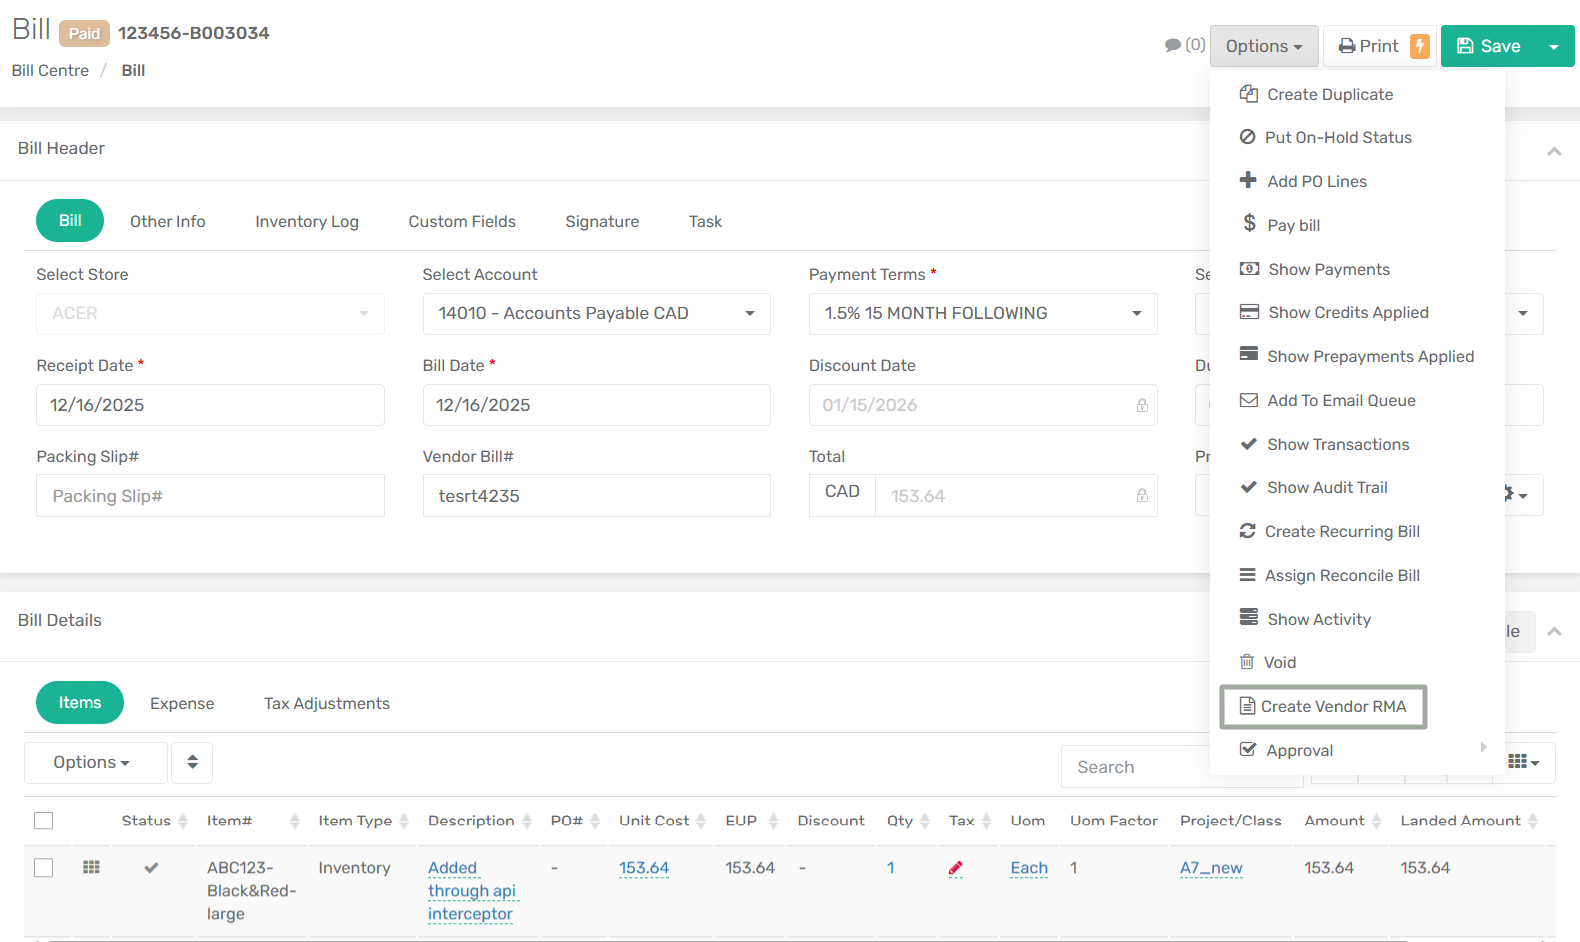
**2. Create from Vendor Bill (Bill No.)**
One can also create a Vendor RMA directly from the Vendor Bill using the built-in option by following the below steps:
1. Navigate to **Purchase → Bill Centre**.
2. Open the required **Vendor Bill**.
3. Click the **Options** dropdown menu (top right).
4. Select **Create Vendor RMA**.
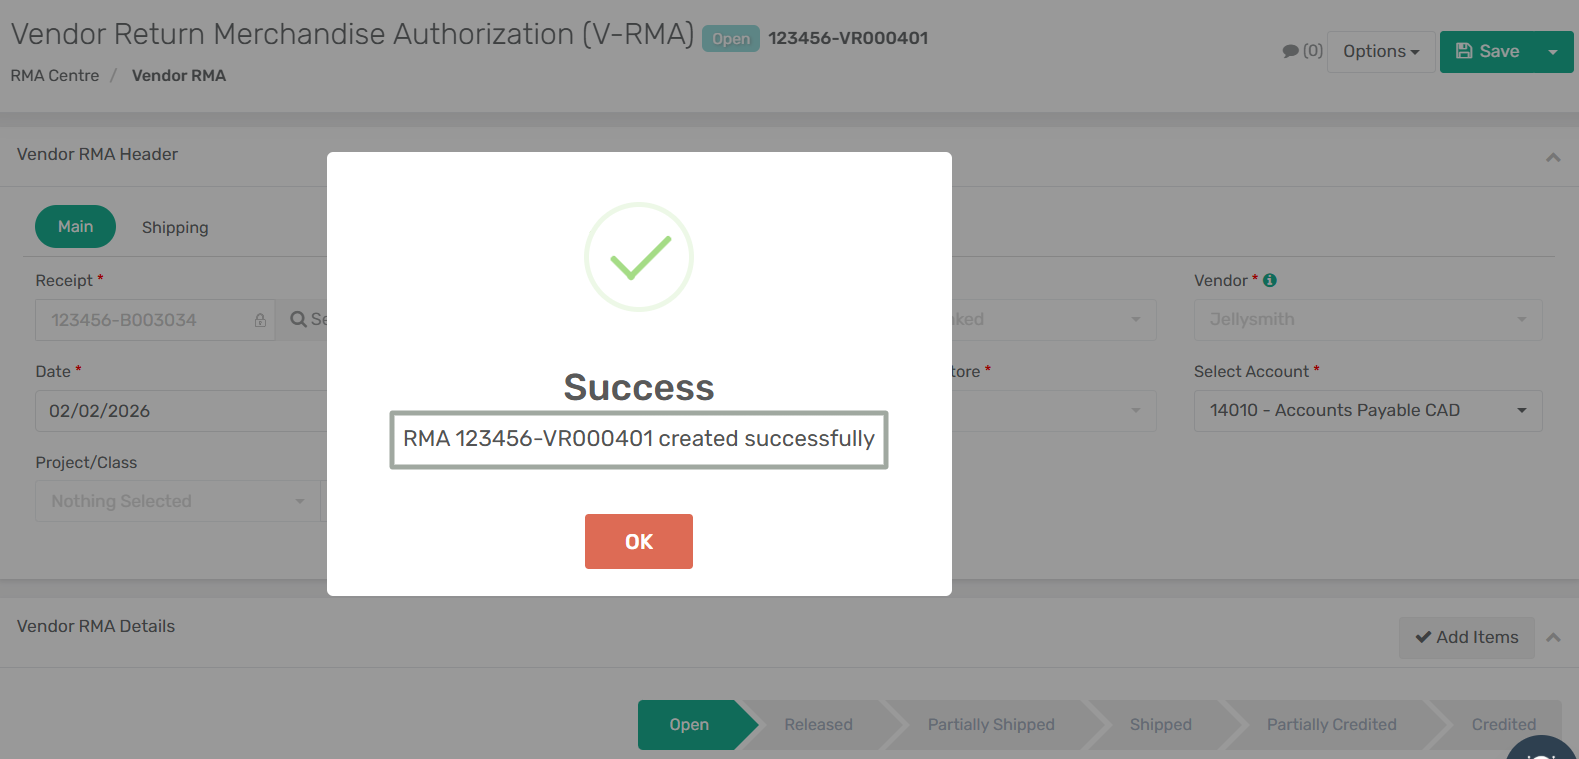
5. The system will automatically open a new Vendor RMA screen with:
* Vendor auto-populated
* Bill reference linked
* Items prefilled from the bill
Review the details, check how many items you want to return, adjust their quantities and click on **Save**.
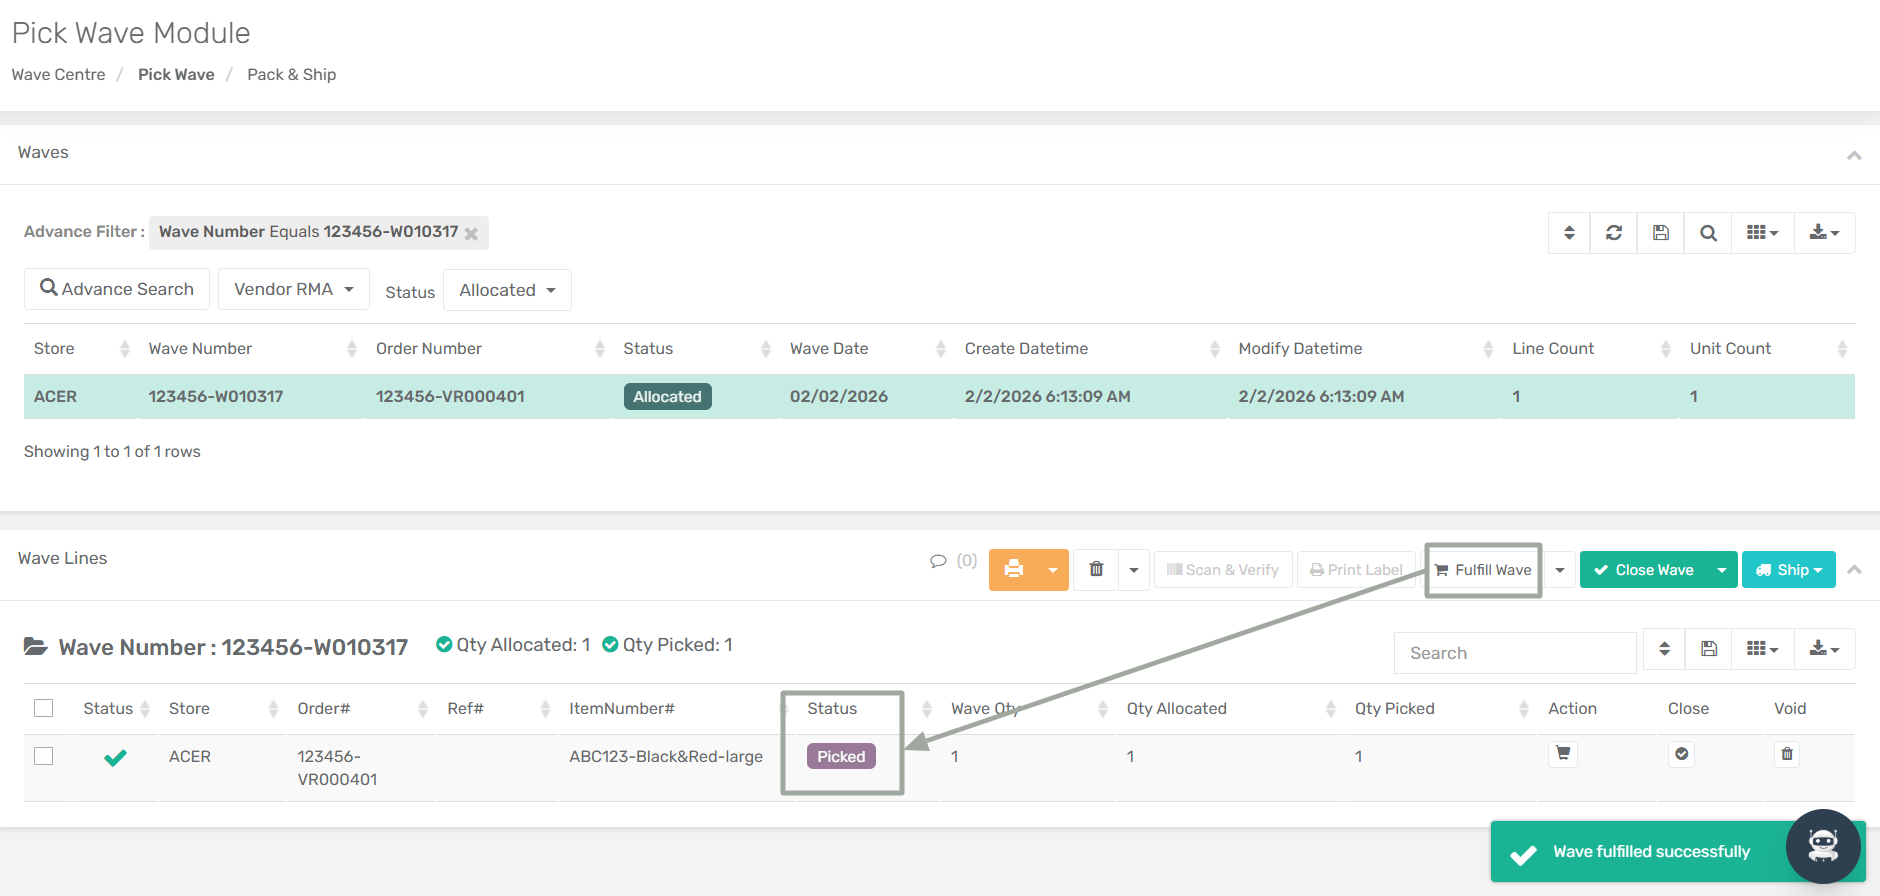
**Step 2: Release Vendor RMA**
* Click the **Release RMA** option from the Options dropdown menu. The RMA status will change from **Open** to **Released**.
* This automatically creates a wave for the RMA, which is also visible in the Wave Centre.
**Step 3: Wave Creation & Processing**
* After the wave is generated, the next step is to perform: Picking and Packing
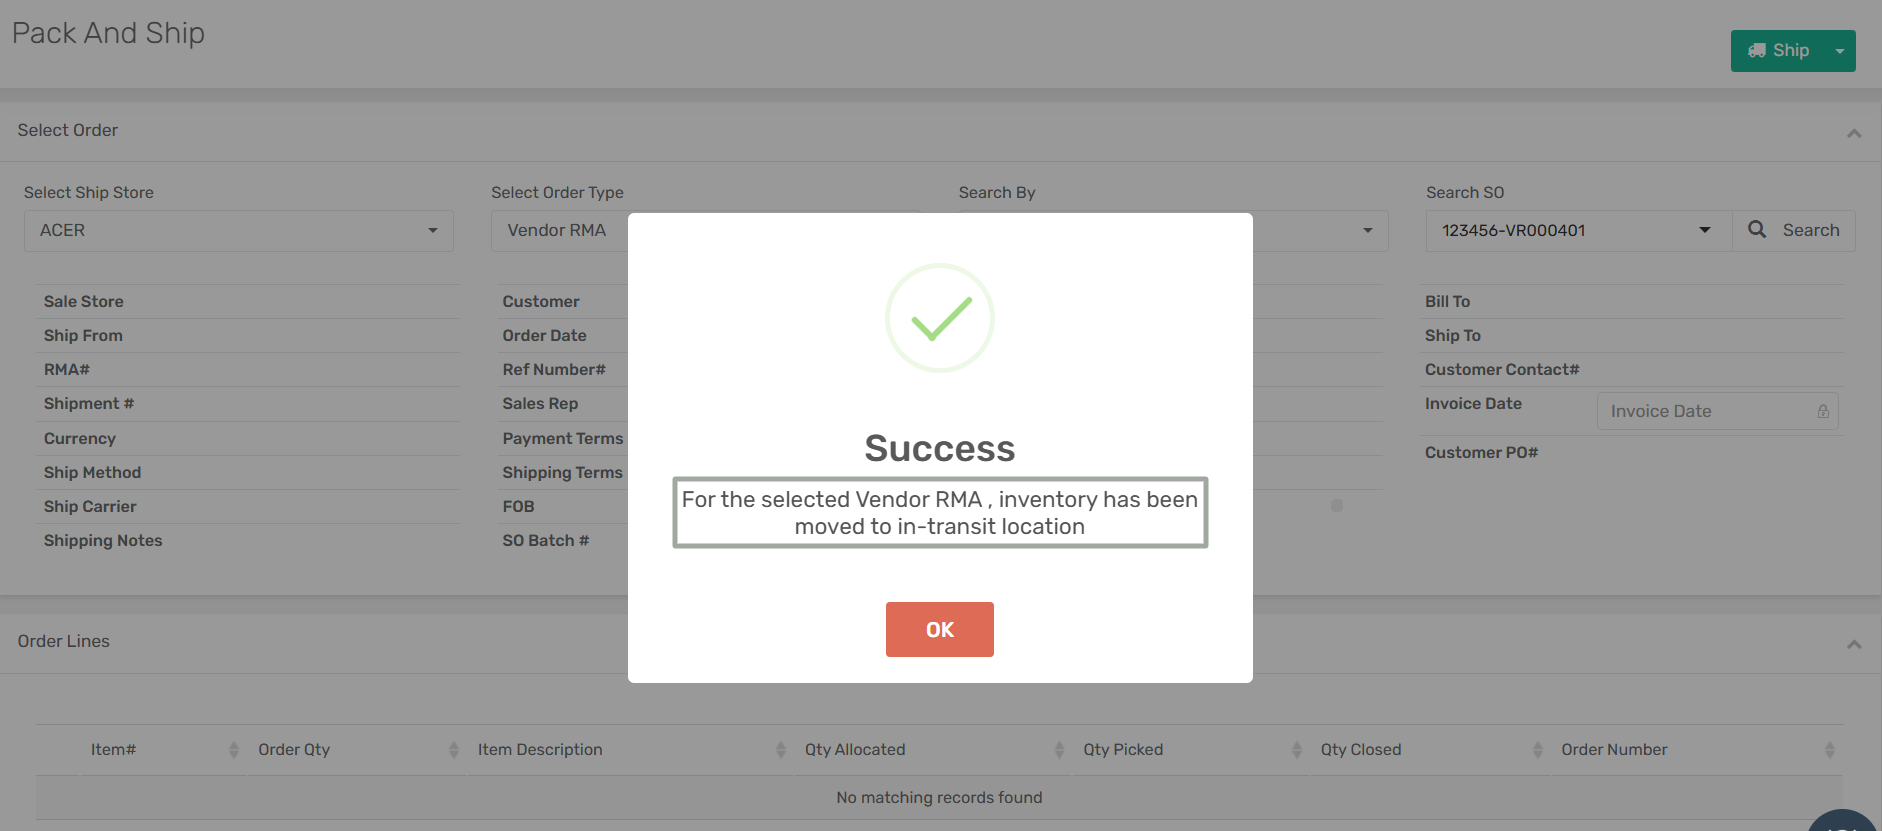
**Step 4: Ship Wave**
* When the wave is successfully shipped, items are moved from the original warehouse location to the In Transit location, and the RMA status is automatically updated to **Shipped** (if all quantities sent) or **Partially Shipped** (if partial quantities sent).
* The **Inventory Cleaning Account** is then credited with the corresponding amount.
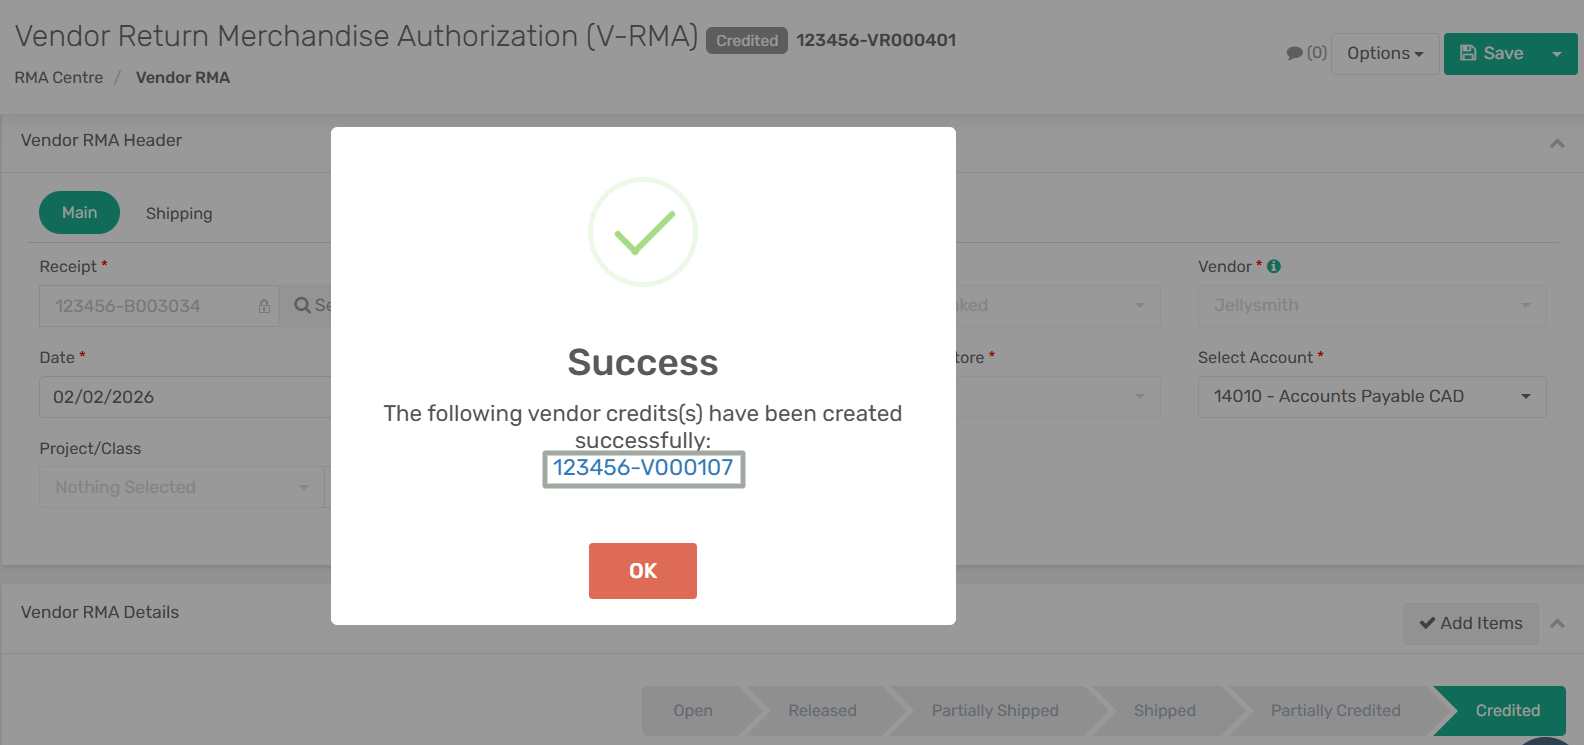
**Step 5: Post Vendor Credit**
* After the vendor confirms receipt of the returned items, click **Post Vendor Credit**. The system creates a vendor credit record, permanently removes the returned items from the system, and clears the in-transit inventory balance.
* The Inventory Cleaning Account is cleared and the Vendor Accounts Payable balance is adjusted accordingly.
* RMA status gets updated to **Credited** and is visible in the **Vendor Credit Centre**. You can either apply this credit to pay another bill or refund it back to the customer.
{% hint style="info" %}
If the RMA Type is set to **Vendor RMA-Linked**, the **Receipt** field becomes accessible, allowing you to enter the **bill number** for which you want to create the RMA.
{% endhint %}
***
### **Post Selected Lines as New Bill – Partial Posting enhancement**
**Overview:**
This enhancement extends the existing **Post Selected Lines as New Bill** functionality introduced earlier by adding **partial posting** support at the line level with automatic expense adjustment.
It allows users to post selected Item Receipt (IR) lines to a new Vendor Bill with a different **Post Amount** than the original receipt amount, while maintaining accurate AP and expense accounting.
***
**New Enhancement:**
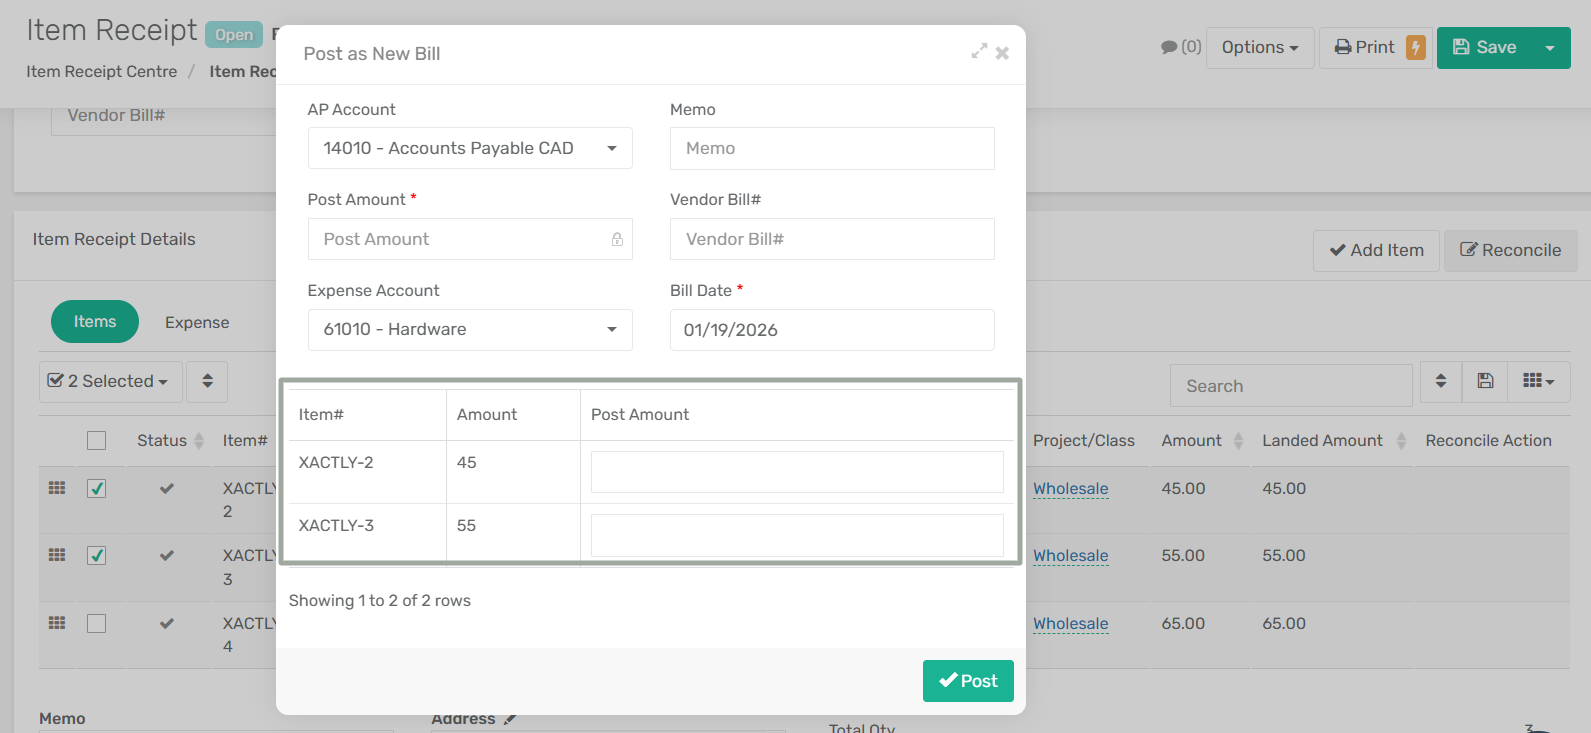
Open the Item Receipt to be processed, then select the **Post Selected Lines as New Bill** option from the **"Options"** drop-down menu.
**1. New Fields added in Post Bill Form**
* Item# (lines selected from the receipt)
* Amount (original unit cost in the receipt)
* Partial Post Amount (editable)
**Changes:**
* The Post Amount field at header level is disabled.
* Enter the Partial Post Amount individually for each selected item line.
**2. Partial Posting Calculation Logic**
* If Post Amount is greater than Item Amount:
\
The cumulative sum of additional amount per line is posted to the selected expense account.
* If Post Amount is less than or equal to Item Amount:
\
The amount is posted to the Accounts Payable(AP)account
***
**Impact:**
* Expense lines can be updated or split
* Cost components (Labor, Material, etc.) can be separated into individual lines
* Multiple expense lines are allowed
* Total bill amount must remain unchanged
***
### **Addition of ASN Header as an exportable dataset in the Data Export Centre**
**Overview:**
This release introduces the **ASN Header** as a new exportable dataset in the **Data Export Centre**. Previously, only **ASN Details** were available for export. With this enhancement, users can now export **ASN Header–level data**, enabling better integration, reporting, and automation for inbound logistics and supplier coordination.
All standard export options are now supported for the ASN Header, including:
* Export to Local
* Export to FTP
* Export to Email
* Scheduled Export
* Selected-record exports for all the above options
***
**Feature Added: ASN Header** – Exportable Dataset
**Location:**
`Data Export Center → Search field for Dataset Selection → ASN Header`
**Description:**
ASN Header data is now available as a selectable dataset in the Data Export Centre. Users can:
* Configure export templates for ASN Header
* Download files locally
* Send files to FTP servers
* Email exported files
* Schedule recurring exports
* Export all records or selected records only
This enhancement allows organizations to share shipment-level ASN information with external systems without relying solely on line-level ASN details.
***
**Supported Export Options for ASN Header:**
All export mechanisms available for other datasets are now supported for the ASN Header.
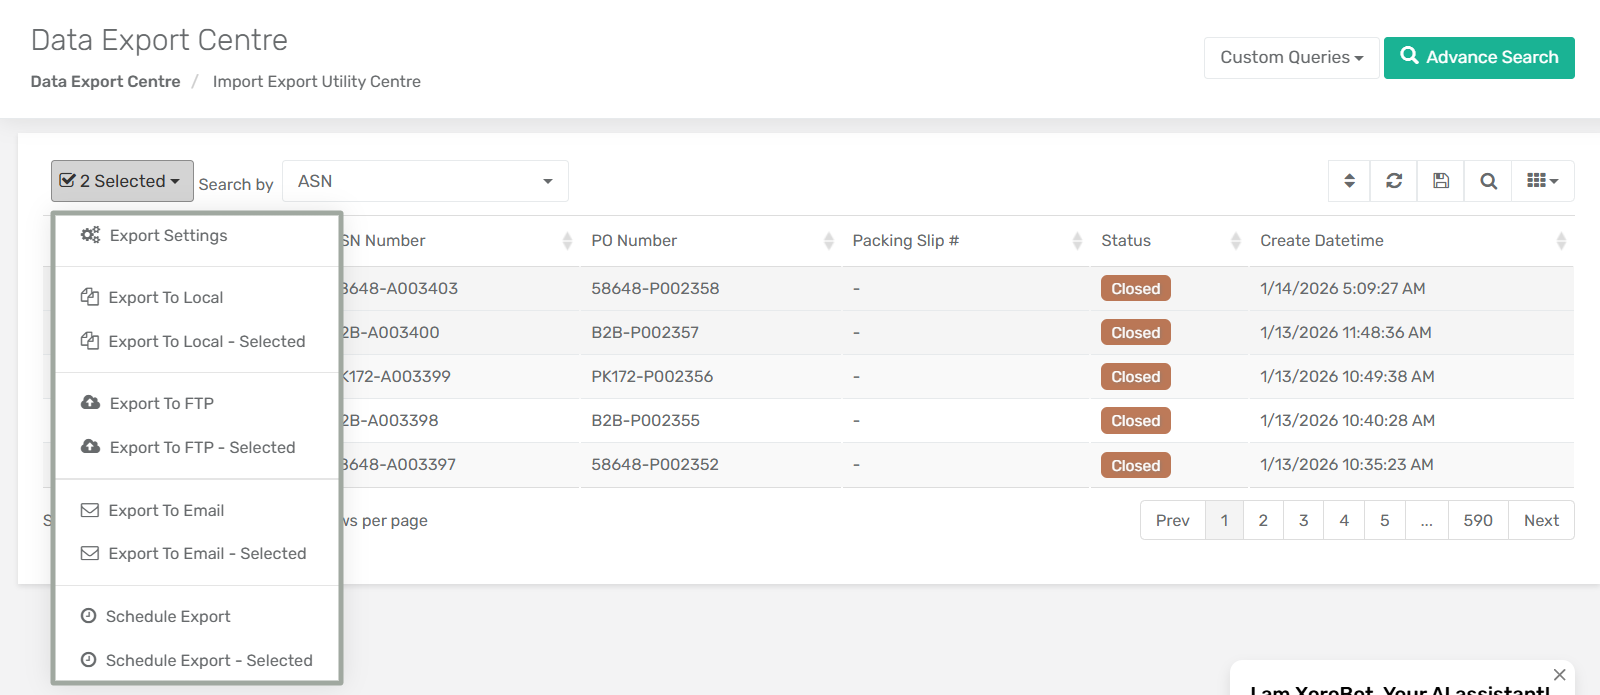
**1. Export To Local**
Exports ASN Header data directly to the local system.
**Flow:**
* Open ASN Header dataset
* Click **Options → Export To Local**
* System opens **Select Import/Export Utility Template** screen
* Click **Download**
**2. Export To Local – Selected**
Allows exporting **only selected ASN Header records** to local system.
**3. Export To FTP**
Exports ASN Header data to a configured FTP server.
**Flow:**
* Options → Export To FTP
* Select Utility Template
* Click **Send To FTP**
* Enter FTP details
* Click **Export Now**
**4. Export To FTP – Selected**
Exports only selected ASN Header records to FTP.
**5. Export To Email**
Sends ASN Header export as an email attachment.
**Flow:**
* Options → Export To Email
* Select Utility Template
* Click **Send To Email**
* Enter recipient details
* Click **Export Now**
**6. Export To Email – Selected**
Emails only selected ASN Header records.
**7. Schedule Export**
Allows scheduling automatic ASN Header exports.
**Flow:**
* Options → Schedule Export
* Select Utility Template
* Click **Schedule**
* Configure frequency & timing
**8. Schedule Export – Selected**
Schedules export for selected ASN Header records only.
***
### **Addition of 'Ref Number' Field in Inventory Snapshot Module**
**Overview:**
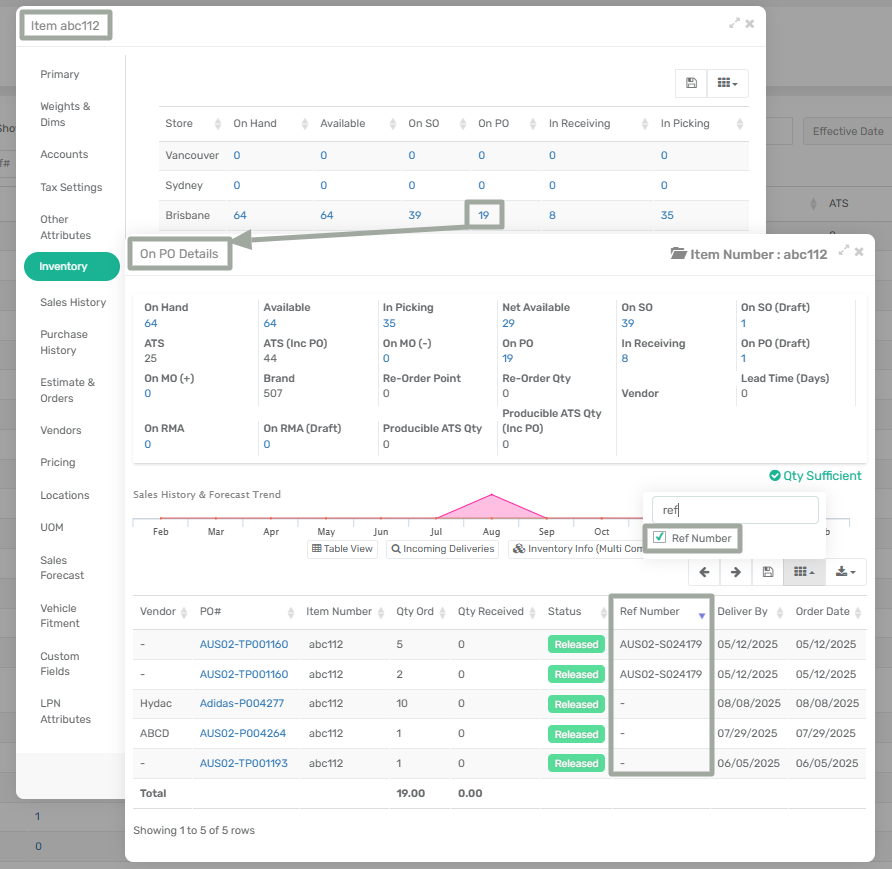
This release introduces a new enhancement in the Item Inventory Snapshot module. A new column — **‘Ref Number’** — has been added to the **On PO Details** sub-form.
This enhancement allows users to view the reference number of the corresponding Purchase Order directly from the item-level inventory view, improving traceability and visibility into the source of incoming stock.
***
**Feature Added:** A new column **'Ref Number'** has been added to the **On PO Details** sub-form.
**Location:**
`Inventory → Item Inventory Snapshot → Item Details → Inventory Tab → On PO/On PO(Draft)`
`Purchase → Purchase Order → Purchase Order Centre`
**Description:**
When users view an item’s inventory details and navigate to the **On PO** or **On PO (Draft)** quantities, the system displays the **On PO Details** sub-form containing purchase order–level information.
A new column labelled **'Ref Number'** has now been added to this sub-form. This column displays the Ref Number value of the corresponding Purchase Order, enabling users to quickly identify linked Sales Orders or external references without opening the PO record.
***
**How to view the 'Ref Number' field in On PO Details Sub form:**
There are two ways to access the On PO Details sub form**:**
1. **Item Inventory Snapshot Module**
* Navigate to **Inventory → Item Inventory Snapshot**.
* Locate the item line you want to analyze and double-click on either **On PO** or **On PO(Draft)** quantity. The user gets navigated to the **On PO Details** screen.
* A new column labelled **‘Ref Number’** is now available in the **On PO Details** sub form. This column displays the reference number of the corresponding Purchase Order.
2. **Item Sub Form**
* Navigate to **Inventory → Item Inventory Snapshot**
* Right click on the item line you want to view the PO Details for and click on the **Item Details** option
* The **Item sub form** opens. Go to the **Inventory** tab and click on either **On PO** or **On PO (Draft)** quantity
* This opens the **On PO Details** screen. A new column labelled **‘Ref Number’** is available in the **On PO Details** sub form. This column displays the reference number of the corresponding Purchase Order for quick traceability.
***
### **Direct Access to Item View Form from the Inventory by Location Module**
**Overview:**
A new enhancement has been introduced in the **Inventory by Location** module that allows users to directly open the Item information screen by double-clicking on an Item Number.
This improvement provides faster access to complete item details without navigating away from the inventory analysis workflow, helping users review product information more efficiently while performing location-based inventory checks.
***
**Impact:**
* Enhances visibility into item configuration while reviewing stock at specific locations.
* Supports faster decision-making for replenishment, transfers, and inventory adjustments.
* Reduces dependency on switching between modules for item validation and reference.
***
### **Automatic DDP Assignment via Shopify Order Tags using API Integration Connector**
**Overview:**
This release introduces a new automation using the **API Integration Connector** to handle Delivery Duty Paid (DDP) orders from Shopify more efficiently.
When a Shopify order contains the tag **“DDP”** (case-insensitive), the system will now automatically:
* Set **Duty Payment Terms = Delivered Duty Paid** on the Sales Order, and
* Control the behavior of the **DDP toggle** during shipment creation.
This enhancement eliminates manual intervention, improves consistency between e-commerce and ERP data, and ensures accurate handling of international duty responsibilities.
***
**Feature Added:** Auto-set Duty Payment Terms to “Delivered Duty Paid” based on order tags
**Location:**
`Menu → Admin → API Integration Connector Menu → API Integration Connector`
(Script applied to Shopify “Create / Update Sales Order” connector)
***
**Description:**
**Sales Order Auto-Update via API Connector**
* When creating or updating Sales Orders from Shopify, if the order tags include “DDP” or “ddp”, the Duty Payment Terms are automatically set to “Delivered Duty Paid”.
* This logic is implemented through a custom script in the API Integration Connector and applies regardless of whether the existing app configuration **“International Shipment Default for Delivery Duty Paid”** is enabled or disabled, as shown below.
***
**Shipment DDP Toggle Behaviour:**
During shipment preparation, the behavior of the DDP (Delivered Duty Paid) toggle is controlled by the app configuration “International Shipment Default for Delivery Duty Paid” and the Sales Order’s Duty Payment Terms.
* When the configuration is **enabled**, the DDP toggle is automatically set to ON for all international shipments, regardless of the Sales Order value.
* When the configuration is **disabled**, the DDP toggle is set to ON only if the Sales Order Duty Payment Terms are “Delivered Duty Paid”; otherwise, it remains OFF.
***
**How It Works:**
**Sales Order Creation (Shopify → XoroERP)**
**Step 1:** Shopify order is received in XoroERP.
**Step 2:** API Integration Connector script checks order tags.
* If tag contains `DDP`, Sales Order field **Duty Payment Terms** is set to **Delivered Duty Paid**.
**Shipment Creation (Pack & Ship Module)**
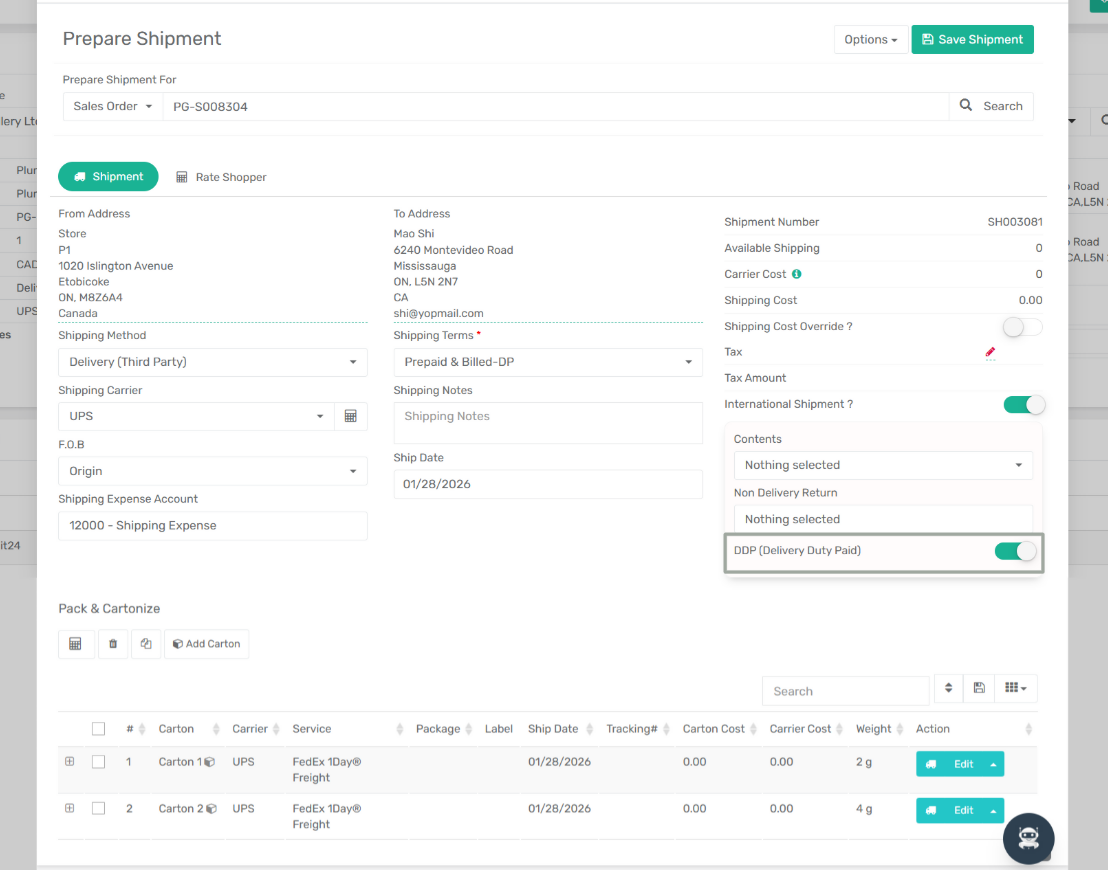
**Step 3:** Open the **Pack & Ship** module of the Sales Order. Click the **Freight** icon to navigate to the **Prepare Shipment** page.
**Step 4:** Enable the toggle **“International Shipment?”** The system evaluates the app configuration **“International Shipment Default for Delivery Duty Paid”** and the Sales Order’s **Duty Payment Terms**.
**Step 6:** Based on this evaluation, the system automatically sets the **DDP toggle** to ON or OFF. Here, the DDP toggle is set to ON since the Sales Order Duty Payment Terms are “**Delivered Duty Paid**”
***
**Impact:**
* Automates international duty handling from Shopify to shipment execution
* Prevents incorrect duty responsibility assignments
* Reduces manual errors in cross-border shipping
* Improves operational speed for high-volume e-commerce integrations
* Strengthens consistency between Sales Orders and Shipment configuration
***
### **Addition of “Account GL Code” Column in Audit Trail Detail View**
**Overview:**
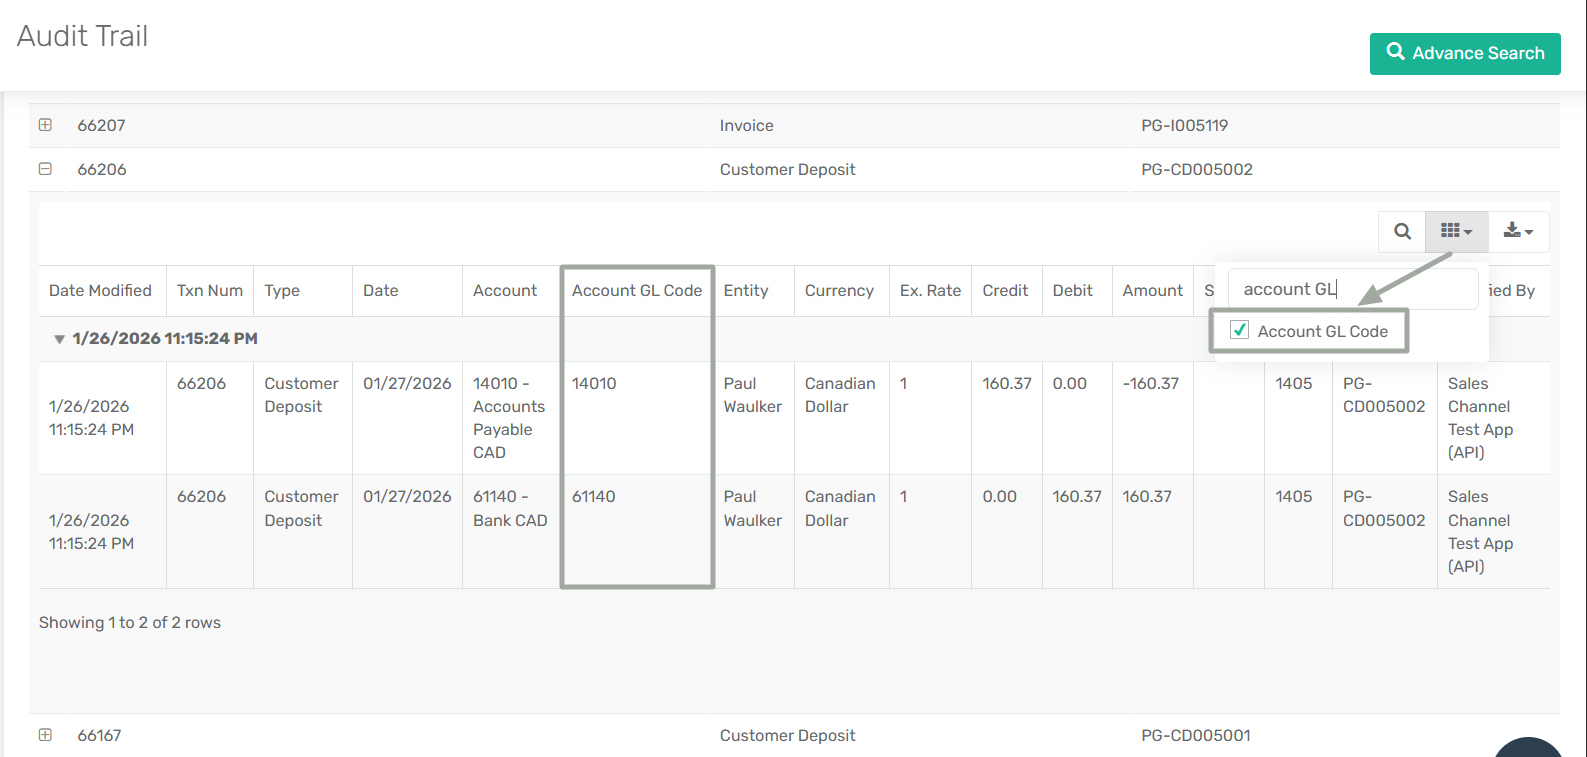
This release introduces a new enhancement in the Audit Trail module with the addition of a **“Account GL Code”** column in the Audit Trail **Detail View**.
The new column allows users to directly view the General Ledger (GL) code associated with each transaction line, improving financial traceability, audit accuracy, and reconciliation efficiency.
***
**Feature Added:** GL Code Column in Audit Trail Detail
**Location:**
`Accounting → Audit Trail → Expand transaction(Detail View)`
**Description:**
A new column labelled **“Account GL Code”** has been added to the expanded transaction detail grid within the Audit Trail module. The column displays the General Ledger account code linked to each debit or credit entry. This provides clearer identification of the exact ledger account impacted by every transaction change.
***
**How to View "Account GL Code” Column in Audit Trail Detail View:**
**Step 1:** Navigate to **Menu → Accounting → Audit Trail**.
**Step 2:** Locate the required transaction in the list.
**Step 3:** Click the **“+”** icon to expand the transaction details.
**Step 4:** View the newly added **Account GL Code** column in the detail grid.
**Step 5:** The system displays the GL code corresponding to each transaction line automatically.
***
### **Merge Vendors – Vendor Centre Enhancement**
**Overview:**
This release introduces a new **Merge Vendors** feature in the Vendor Centre, enabling users to consolidate duplicate vendor records into a single primary vendor. This enhancement helps maintain clean vendor data, improves consistency across procurement and inventory workflows, and prevents fragmentation of vendor references across modules.
***
**Enhancement:** The **Vendor Centre** now includes a **Merge** option under the **Options** menu.
**Location:**
`Menu → Purchase → Vendor Section → Vendor Centre`
**Description:**
Users can now select multiple vendors from the Vendor Centre and merge them into one primary vendor record. After a successful merge, the primary vendor automatically replaces the secondary vendor across all relevant modules, including Item Centre (default vendor mappings), Purchase Orders, Item Receipts, Item–Vendor Mapping and any other references where the secondary vendor was previously used.
***
**Pricing Rule Protection**
If a pricing rule exists for **any selected vendor**, the merge operation is blocked. Users must remove or update the pricing rule before proceeding.
**Example:**\
If Vendor 403 has a pricing rule, it cannot be merged with Vendor 401 until the rule is cleared.
***
**How It Works:**
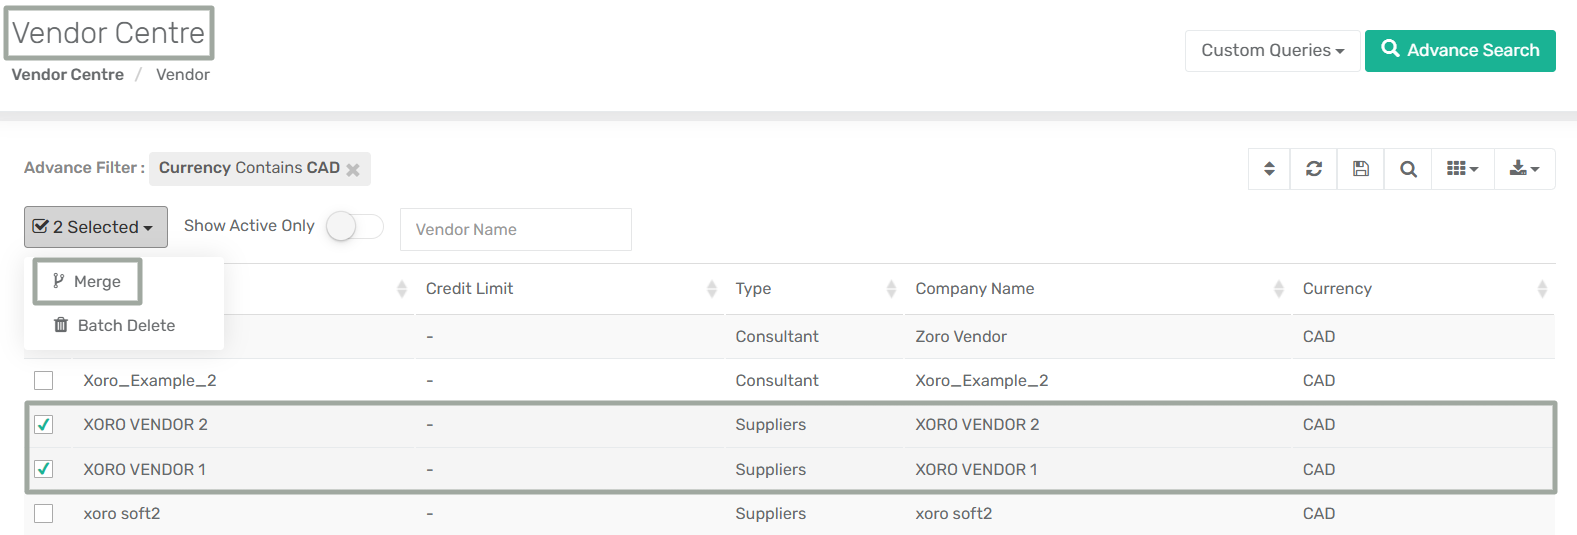
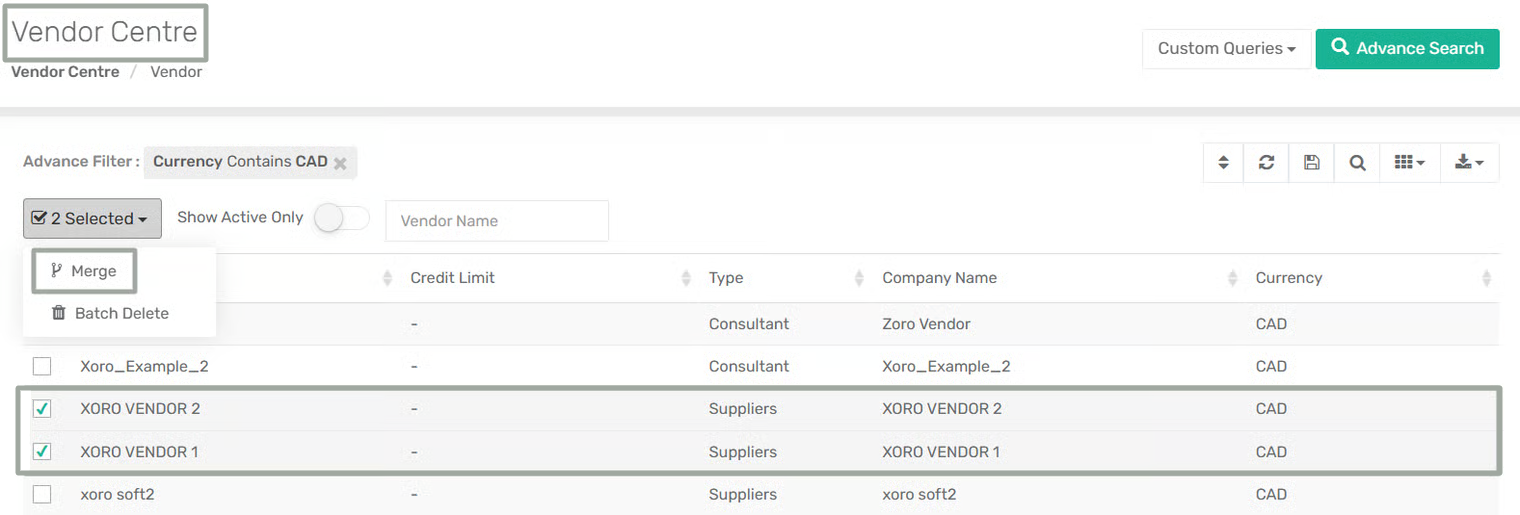
**Step 1:** Navigate to **Menu → Purchase → Vendor Section → Vendor Centre** and select two vendors that you want to merge from the vendor list.
**Step 2:** Click the **Merge Vendors** option from the **Options** dropdown menu (top right).
**Step 3:** The system validates the following before proceeding:
* Both vendors use the same currency.
* Both vendors are in Active status.
* No pricing rule exists for either vendor.
**Step 4:** A popup window appears prompting you to select the **Primary Vendor**. Select the vendor to be retained as the primary record and confirm the merge.
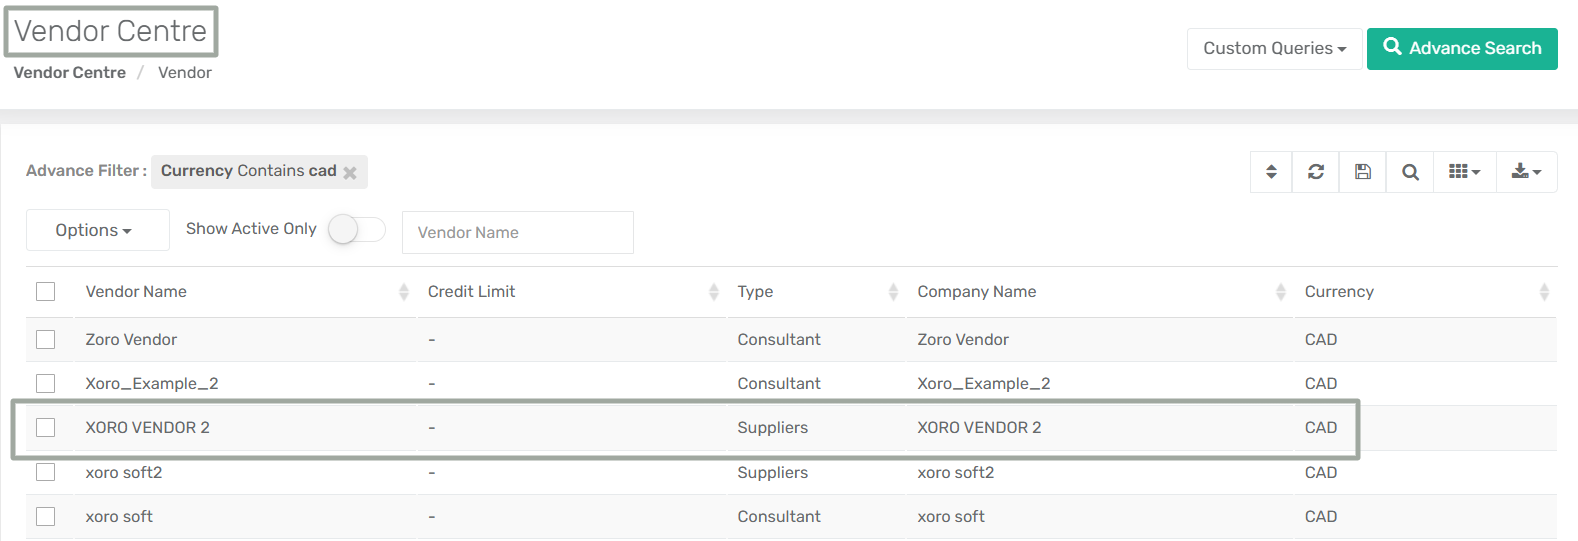
**Step 5:** The system merges the records and replaces the secondary vendor with the primary vendor in the Vendor Centre.
***
**Impact:**
This enhancement improves vendor master data accuracy, system-wide data consistency and long-term database cleanliness. It also reduces manual reconciliation efforts caused by duplicate vendor records.
***
### **Added Wave Template Support in Manufacturing Order**
**Overview:**
Wave Template support has been extended to the Manufacturing Order (MO) workflow. Users can now manually select a wave template when creating waves for both **Production** and **Disassembly** type MO.
Previously, the system always applied the store’s default wave template automatically. With this enhancement, users gain full control to choose the appropriate wave template at the time of wave creation, similar to the Sales Order waving process.
This improvement provides greater flexibility in inventory allocation, picking optimization, and warehouse operations for manufacturing workflows.
***
**Feature Added:** Wave Template Selection for MO Picking (Production & Disassembly)
**Location:**
`Menu → Manufacturing → Manufacturing Order`
***
**Key Enhancements:**
Wave template selection is now available in the following scenarios:
**1. Manual Wave Creation from Create MO Page**
When a user initiates the picking process for a Manufacturing Order in **Released** status by clicking **Start Picking**, the system first opens the **Item Inventory by Location** popup. This screen allows the user to review available inventory by location and confirm the quantities to be picked.
After clicking **Apply**, the system then opens the **Assign Wave Template** pop-up, where the user can optionally enter comma-separated LPN numbers and select a Wave Template. Once confirmed, the wave is created using the selected template.
This workflow applies to both **Production Manufacturing Orders** and **Disassembly Manufacturing Orders**.
**2. Batch MO Processing from MO Centre**
When one or more Manufacturing Orders are selected in the MO Centre and the user clicks **Quick Produce** or **Quick Disassemble**, the system opens the same **Assign Wave Template** popup, allowing users to select the desired wave template before creating waves.
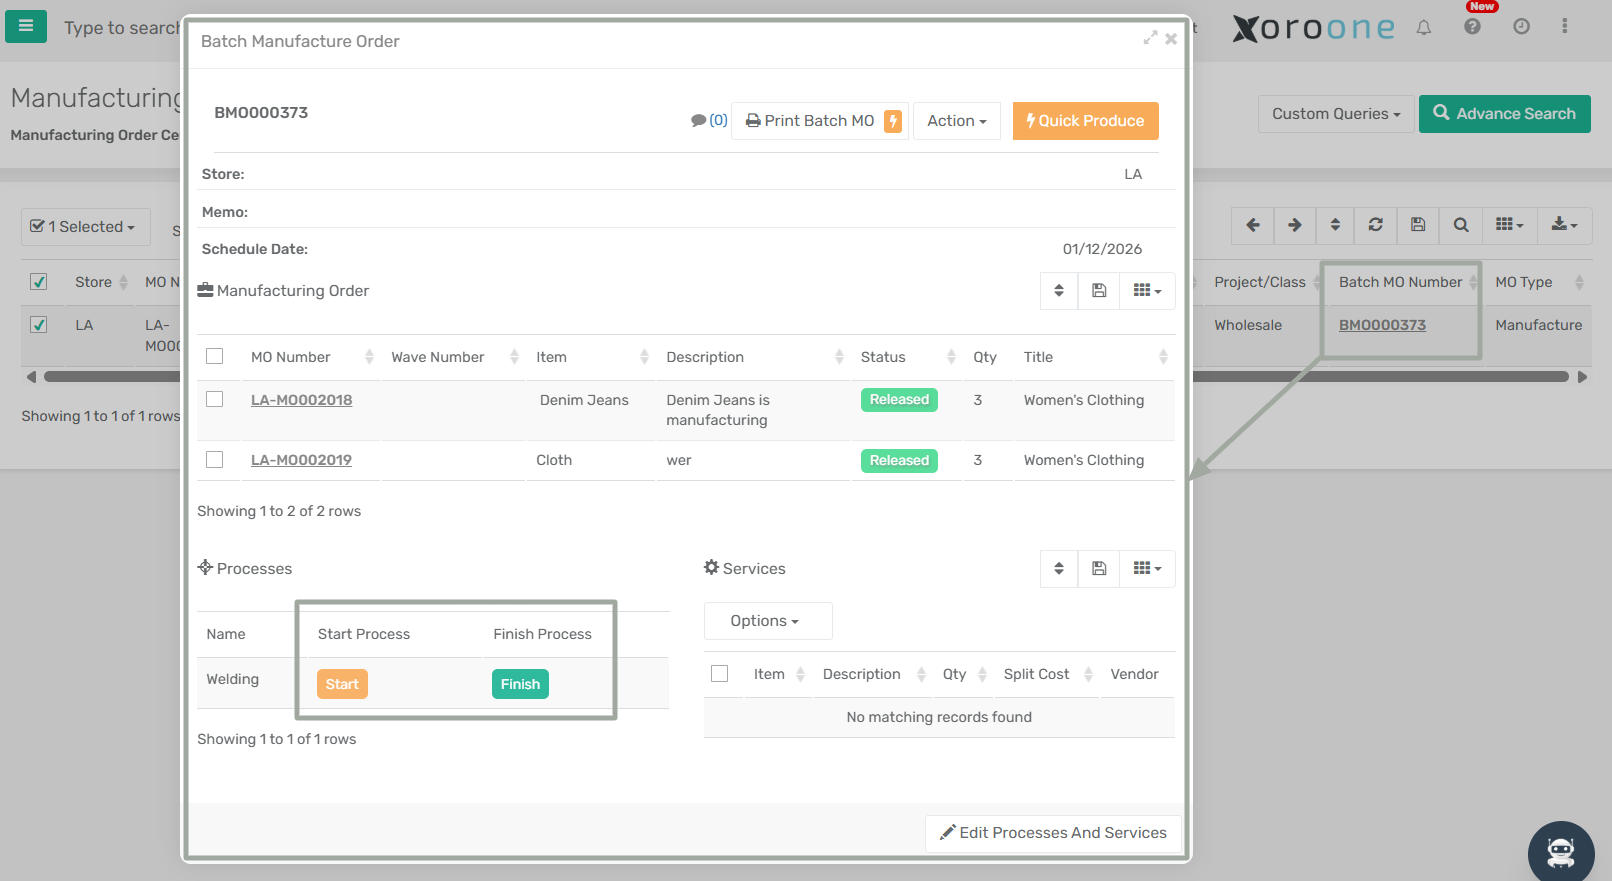
**3. Batch MO Order (Sub-Form)**
When a user clicks on a **Batch MO Number** from the Manufacturing Order Centre, the **Batch Manufacturing Order** sub-form opens.
* On Clicking the **Action** dropdown and selecting **Start Picking** opens the **Assign Wave Template** popup.
* Similarly, clicking **Quick Produce** from the same screen also opens the **Assign Wave Template** popup.
In both cases, users can optionally enter comma separated multiple LPN numbers and select the desired Wave Template before confirming wave creation.
**4. Options Menu on Create MO Page**
When the user clicks the **Options** dropdown on the Create MO page and selects **Quick Produce,** or **Quick Disassemble**, the system also opens the **Assign Wave Template** popup.
This ensures consistent behavior and wave template selection regardless of how the picking process is initiated.
***
### **Optimization to Item Price Upload & Shopify Sync**
**Overview:**
A new App Configuration, **“Enable Item Currency Price Value Comparison on Update,”** has been introduced to optimize how Item Custom Prices (ICPs) are processed and synced with Shopify during batch uploads and API updates.
This enhancement ensures that only **actual price changes** are processed and sent to Shopify, reducing unnecessary database updates, webhook triggers, and external sync operations.
***
**Configuration Details:**
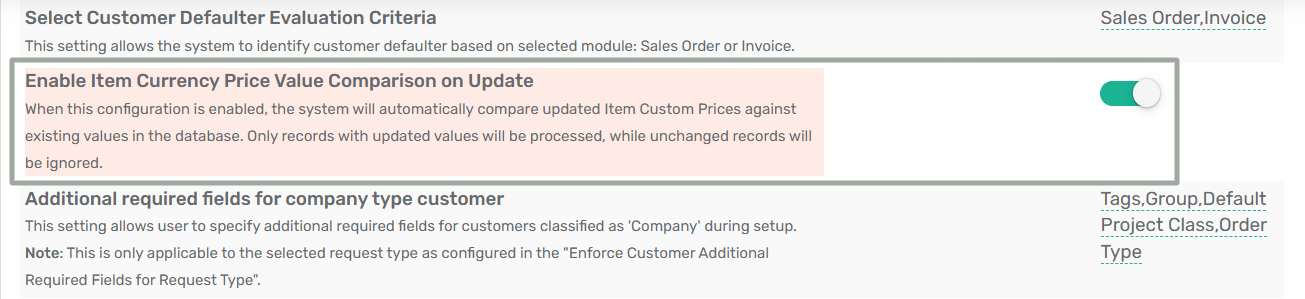
**Configuration Name:** Enable Item Currency Price Value Comparison on Update
**Configuration Location:** Menu → App Config → General → Enable Item Currency Price Value Comparison on Update
***
**Functionality:**
**When App Config Is Enabled:**
* When this configuration is **enabled**, the system compares uploaded Item Custom Prices with existing values in the database before processing them. If the uploaded value differs from the existing value, the record is updated and if the uploaded value is identical, the record is skipped and no update is performed.
***
**Functionality When App Config Is Disabled:**
* When the configuration is **disabled**, the system follows the previous behaviour. All ICPs will be updated and the updated records count in Batch Upload Item Prices show that.
***
### **Create or Update Customer Address – Enhancement in SO modules**
**Overview:**
A new App Configuration, **“Allow Option to Create/Update Customer Address in Sales Order,”** has been added to seamlessly add or modify billing and shipping addresses without
\
leaving the workflow.
Users can create new addresses or update existing customer addresses directly from Sales Order, Estimate, and Invoice modules. It reduces navigation, improves data accuracy, and ensures address consistency across customer records and transactions.
***
**Configuration Details:**
**App Config Name:** Allow Option to Create/Update Customer Address in Sales Order, Estimate and Invoice Modules
**Configuration Location:** Menu → App Config → Sales → Allow Option to Create/Update Customer Address in Sales Order, Estimate and Invoice Modules
***
**Functionality:**
1. **Functionality When App Config Is Enabled:**
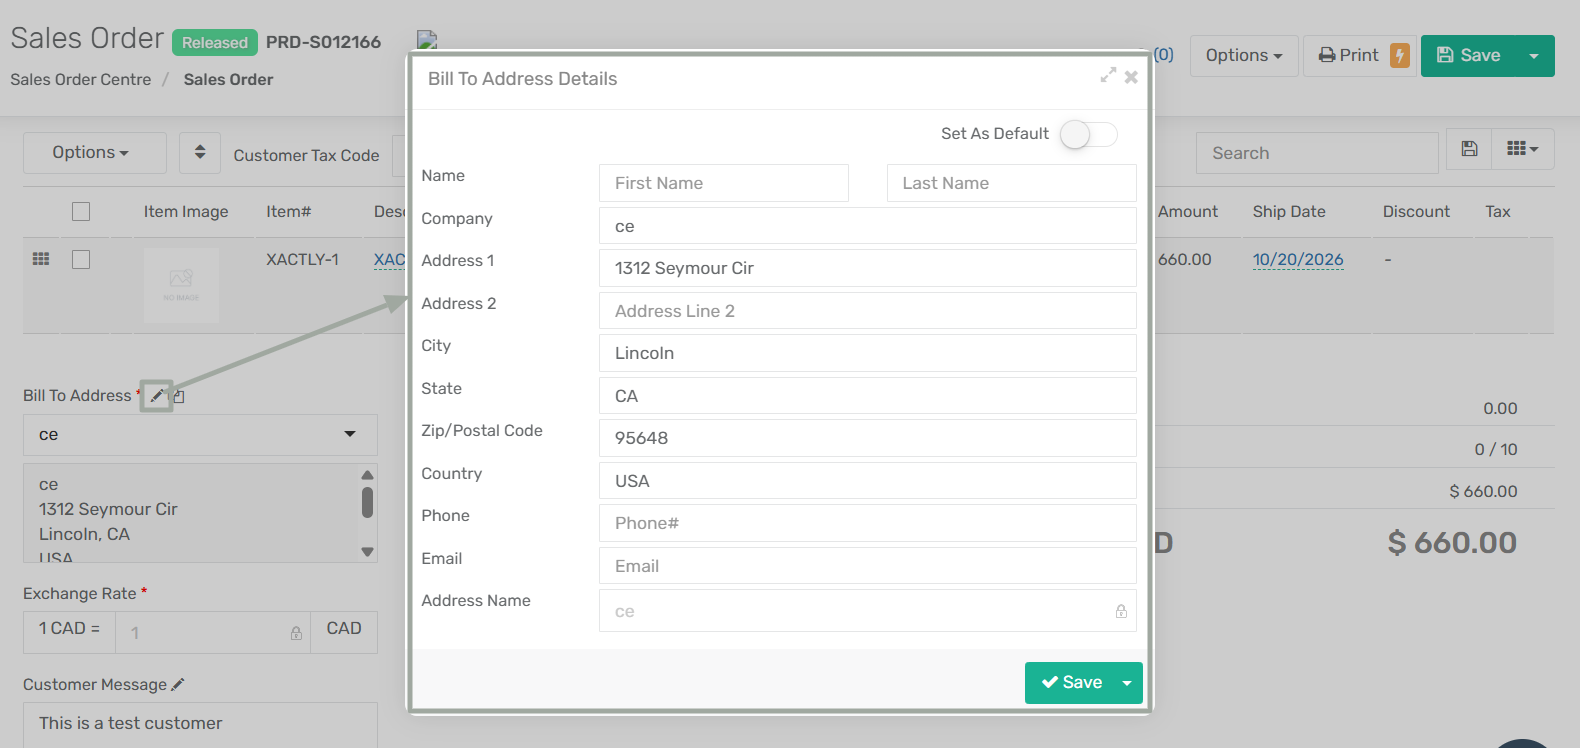
• The **Create New Address** option appears in both **Bill To** and **Ship To** address dropdowns.
• Selecting this option opens the address modal with the currently selected address prefilled. Users can update the details as needed and save it as a new address.
• If the **Set As Default** toggle is enabled, that address will be automatically populated in the **Bill To** address for future Sales Orders created for the same customer. The same behavior applies to the **Ship To** address as well.
• The newly created address becomes immediately available in the dropdown after saving.
• Users can also edit the details of an already existing address and save the changes.
• An **Update in Customer** option is also available in both Bill To and Ship To address modals to update the existing address in the customer record.
• This allows users to update the selected address directly in the customer master record.
{% hint style="info" %}
**The Address Name field is editable only when creating a new address. The field remains read-only and cannot be modified when updating or editing an existing address.**
{% endhint %}
**Key Enhancements:**
• **Create New Address from Dropdown**\
Users can add a new billing or shipping address directly from the Bill To and Ship To dropdown lists across Sales Orders, Estimates, and Invoices. The address creation modal opens with the current customer context, and the saved address is instantly available for selection.
• **Update Existing Address in Customer Record**\
The new **“Update in Customer”** option allows users to modify an existing address and sync the changes back to the customer master record from the same modal.
• **Mandatory Field Validation**\
Address Line 1, City, Country, and Zip/Postal Code are required when creating a new address to ensure data completeness and accuracy.
• **Immediate Availability**\
Newly created addresses appear in the dropdown instantly, without requiring a page refresh.
• **Cross-Module Consistency**\
The feature works consistently across Sales Orders, Estimates, and Invoices, ensuring system-wide address accuracy.
***
### App Configuration: **Void Credit Memo Linked with ASN**
**Overview:**
A new App Configuration, **“Allow Credit Memo Void with Linked ASN,”** has been introduced to provide controlled flexibility when voiding Credit Memos that are linked to an ASN. This enhancement applies only when the **"Use RMA ASN Process"** app configuration is enabled and ensures inventory integrity while allowing legitimate void operations.
***
**Configuration Details:**
* **App Config Name:** Allow Credit Memo Void with Linked ASN
* **Configuration Location:** Menu → App Config → General → Allow Credit Memo Void with Linked ASN
* **Prerequisite:** This configuration will function only when app config **"Use RMA ASN Process"** is enabled.
***
**Functionality**
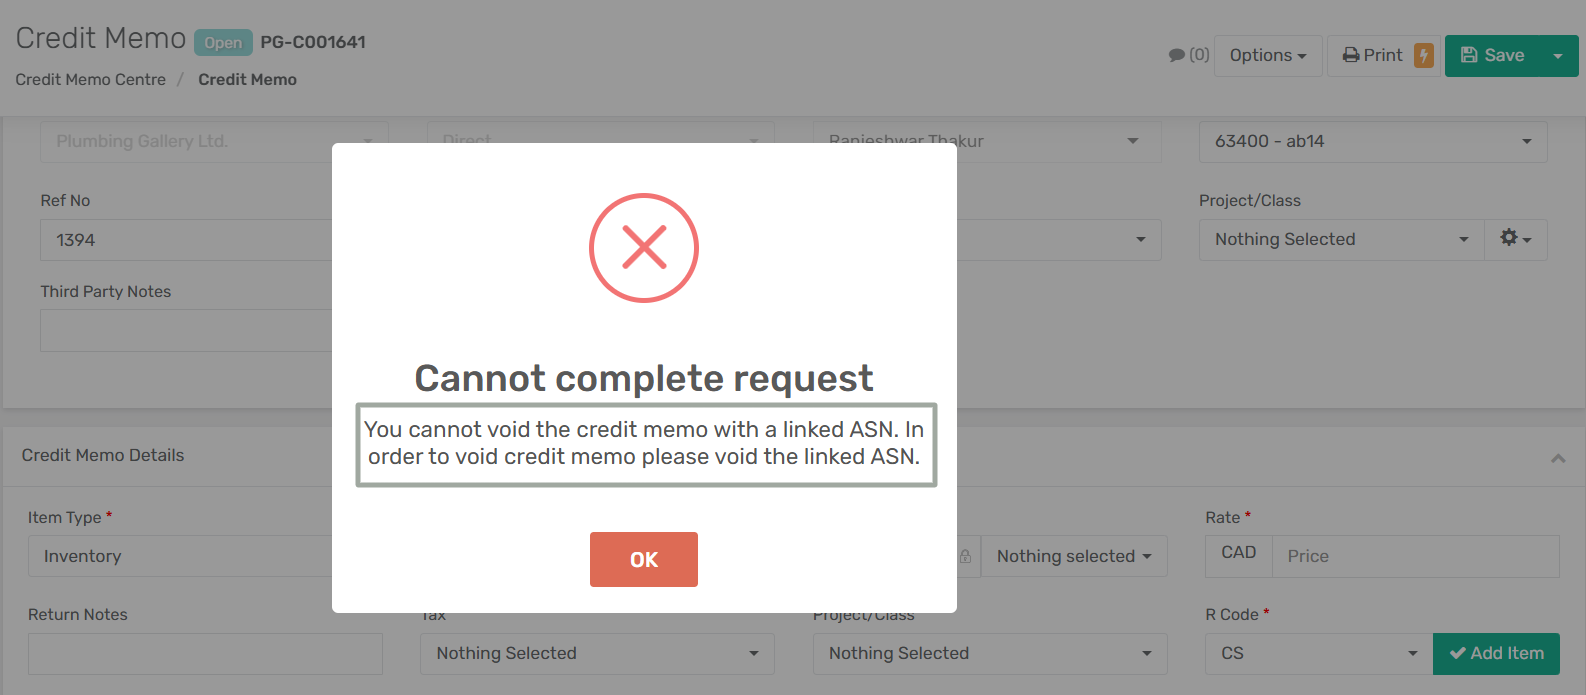
**When the App Configuration “Allow Credit Memo Void with Linked ASN” Is Disabled:**
* Credit Memos linked to an ASN cannot be voided.
* The system behavior remains unchanged, and the existing restriction continues to apply.
***
**When the App Configuration “Allow Credit Memo Void with Linked ASN” Is Enabled:**
* If **"Use RMA ASN Process"** is enabled, then the Credit Memo can be voided, even if it is linked to an ASN.
* If **"Use RMA ASN Process"** is disabled, then the Credit Memo cannot be voided when it is linked to an ASN, and the system displays a validation error.
***
**How It Works:**
**Step 1:** Enable **"Use RMA ASN Process"** from App Configuration. Then enable **"Allow Credit Memo Void with Linked ASN"**.
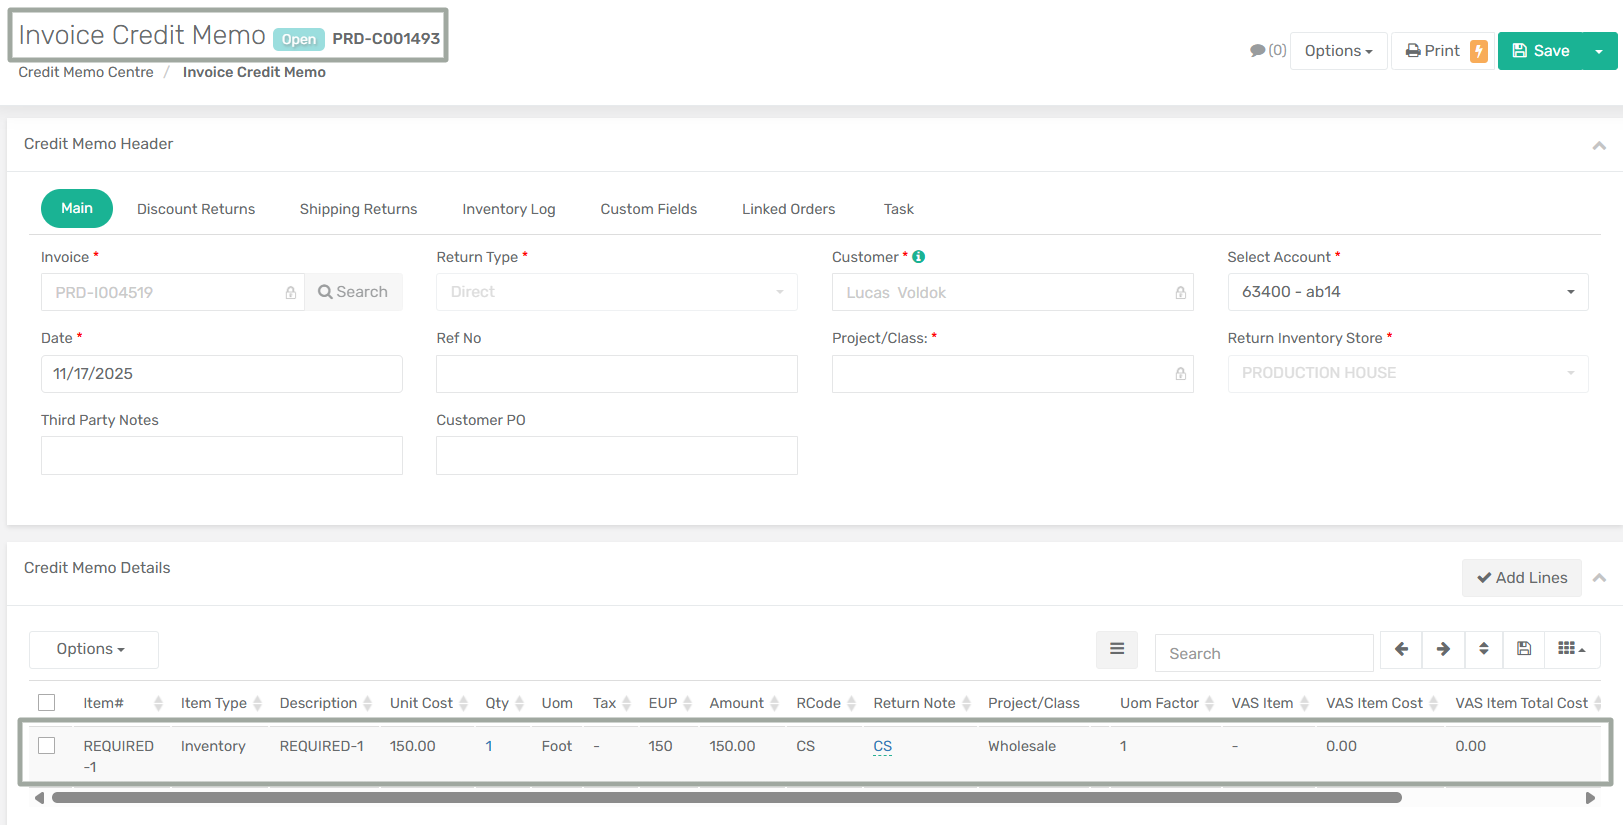
**Step 2:** Go to **Menu → Sales → Credit & Deposit → Credit Memo Centre** and open the Credit Memo you want to void that is linked to an ASN.
**Step 3:** Before voiding, manually reverse the inventory that was returned. This step is mandatory otherwise the system will throw an error message.
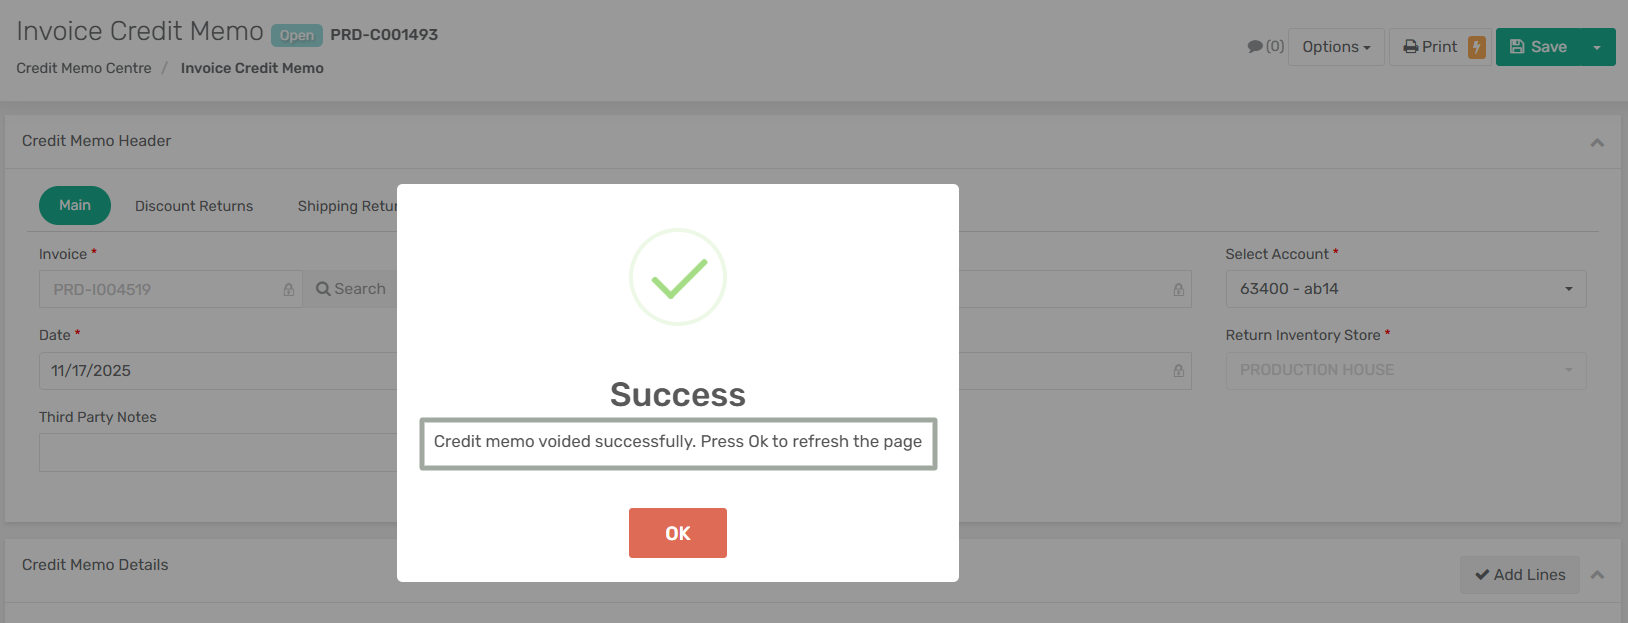
**Step 4:** From the **Options** menu, select **Void** option. If both the app configurations are enabled then the system allows the void action and confirms successful completion.
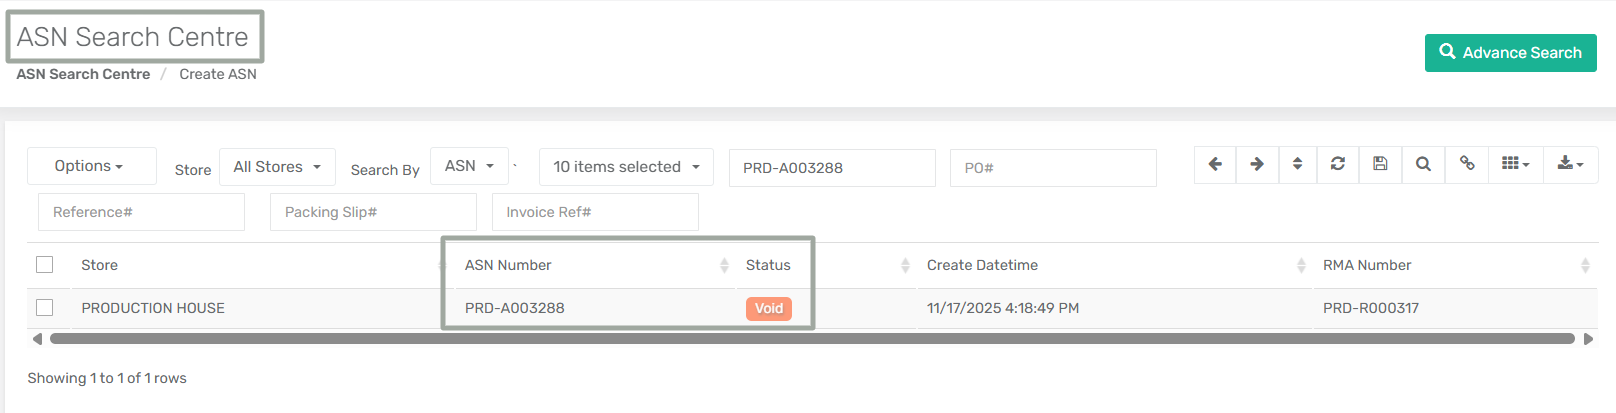
**Step 5:** Go to the **ASN Centre**. The status of the linked ASN changes to **Void**, after the Credit Memo is voided.
***
**Impact:**
* Provides controlled flexibility for finance and returns teams.
* Preserves inventory accuracy by enforcing a clear prerequisite.
* Eliminates hard blocking while maintaining data integrity.
* Ensures consistent behaviour across Credit Memo and RMA ASN workflows.
***
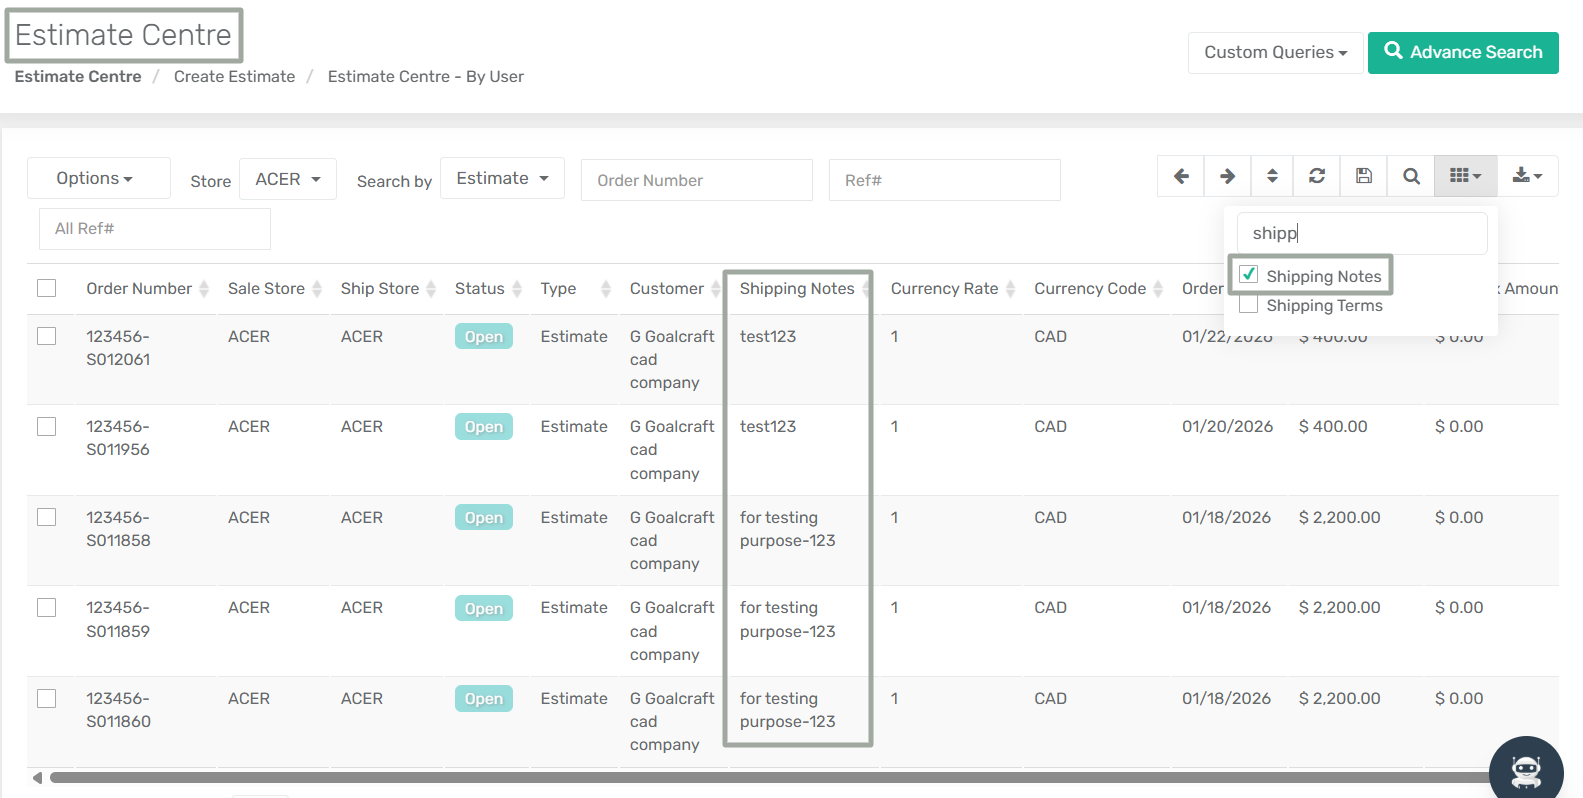
### **Auto-Population of Shipping Notes in Estimate Module - Enhancement**
**Overview:**
Shipping Notes handling in the **Estimate module** has been enhanced as the system now automatically pulls Shipping Notes from the selected customer into the Estimate, ensuring consistency across customer records, estimates, and downstream sales documents.
In addition, a **Shipping Notes column** has been introduced in the **Estimate Centre**, along with support in **Advanced Search**, improving visibility and searchability at the list level.
***
**Key Enhancements:**
* When a customer is selected on an Estimate, the Shipping Notes field is automatically populated from the customer record.
* During conversion of an Estimate to a Sales Order—including **Convert Selected Lines to Sales Order**—the Shipping Notes are carried forward.
* When an Estimate is duplicated, the Shipping Notes from the original Estimate are copied to the new one.
* If the selected customer does not have Shipping Notes defined, the Shipping Notes field remains blank.
***
### **Update in Tax Calculation Logic for Pick Up Orders**
**Overview:**
A new App Configuration, **“Auto Copy Store Address to Ship To Address,”** has been introduced to ensure accurate tax calculation for **Pick Up** orders. When enabled, the system automatically copies the selected **Ship Store address** to the **Ship To address**, ensuring taxes are calculated based on the store location instead of the customer’s address.
This enhancement improves tax accuracy and maintains consistency across all sales channels and order creation methods.
***
**Configuration Details:**
* **App Config Name:** Auto Copy Store Address to Ship To Address
* **Configuration Location:** Menu → App Config → Sales → Auto Copy Store Address to Ship To Address
* **Prerequisite:** Ship Store address must be configured.
**Functionality:**
**When App Config "Auto Copy Store Address to Ship To Address" Is Enabled:**
* When the Ship Method is set to **Pick Up**, the Ship To Address is automatically populated with the Ship Store address.
* The existing customer Ship To Address is overridden.
* Taxes are recalculated based on the updated Ship To Address if the already existing configuration **"Calculate Taxes Based on Address"** is enabled.
* On customer change, the Ship To Address is refilled with the Ship Store address.
* On store change, the Ship To Address is updated with the newly selected Ship Store address and taxes are recalculated accordingly.
***
**When App Config "Auto Copy Store Address to Ship To Address" Is Disabled:**
* The Ship To Address remains unchanged when the Ship Method is set to **Pick Up**.
* The system continues to use the customer’s Ship To Address for tax calculation.
* System behaviour remains unchanged (existing logic applies).
***
**Impact:**
* Ensures accurate tax calculation for Pick Up orders based on store location.
* Eliminates reliance on customer Ship To address for Pick Up scenarios.
* Maintains consistent behaviour across UI, API, upload, and Shopify workflows.
* Reduces manual corrections and tax discrepancies.
***
### **Addition of Defaulter Evaluation Criteria for Sales Orders and Invoices**
**Overview:**
A new App Configuration, **"Select Customer Defaulter Evaluation Criteria",** has been introduced to provide control over how customer credit limit and overdue Invoice checks are evaluated. This enhancement allows businesses to define whether defaulter evaluation should be based on Sales Orders, Invoices, or a combination of both—ensuring more accurate and flexible credit enforcement across sales workflows.
This configuration works in conjunction with existing defaulter controls and enhances transparency when determining customer eligibility during Sales Order release and Invoice creation.
***
**Configuration Details:**
* **App Config Name:** Select Customer Defaulter Evaluation Criteria
* **Type:** Multi-select Dropdown
* **Configuration Location:** Menu → App Config → General → Select Customer Defaulter Evaluation Criteria
* **Available Options:**
* Sales Order
* Invoice
* **Prerequisite:**\
The following existing configurations must be enabled for this feature to function:
* **Criteria for Restricting Defaulter Customers**
* **Restrict Defaulter Customer Sales**
If neither Sales Order nor Invoice is selected, the system follows the default defaulter evaluation logic.
***
#### Functionality
**When Only Sales Order Is Selected**
* Select **Sales Order** from the available options in the *Select Customer Defaulter Evaluation Criteria* app configuration.
* Only Sales Orders in **Released** or **Partially Shipped** status are considered.
* Estimates are included where applicable.
* Invoice balances are **not** considered for credit limit evaluation.
* If releasing a Sales Order causes the evaluated balance to exceed the credit limit, the system displays a **Defaulter Permission** prompt.
***
**When Only Invoice Is Selected**
* Select **Invoice** from the available options in the *Select Customer Defaulter Evaluation Criteria* app configuration.
* Only **open invoice balances** are considered.
* Sales Order balances are **not** included in the credit limit evaluation.
* If a direct invoice exceeds the remaining available credit, a **credit limit restriction** is triggered immediately.
***
**When Both Sales Order and Invoice Are Selected**
* Select both **Sales Order** and **Invoice** from the available options in the *Select Customer Defaulter Evaluation Criteria* app configuration.
* The system evaluates the **combined balance** of:
* Sales Orders in **Released** or **Partially Shipped** status, and
* **Open invoice balances**.
{% hint style="warning" %}
If only Invoice is selected as the **Customer Defaulter Evaluation Criteria**, invoices generated from Sales Orders are allowed even if they exceed the limit, but the customer is marked as a defaulter afterward.
{% endhint %}
***
**Impact:**
This enhancement provides precise control over customer credit enforcement, aligns defaulter logic with business policies, reduces false positives, and ensures consistent behaviour across Sales Orders and Invoices—without disrupting existing workflows.
***
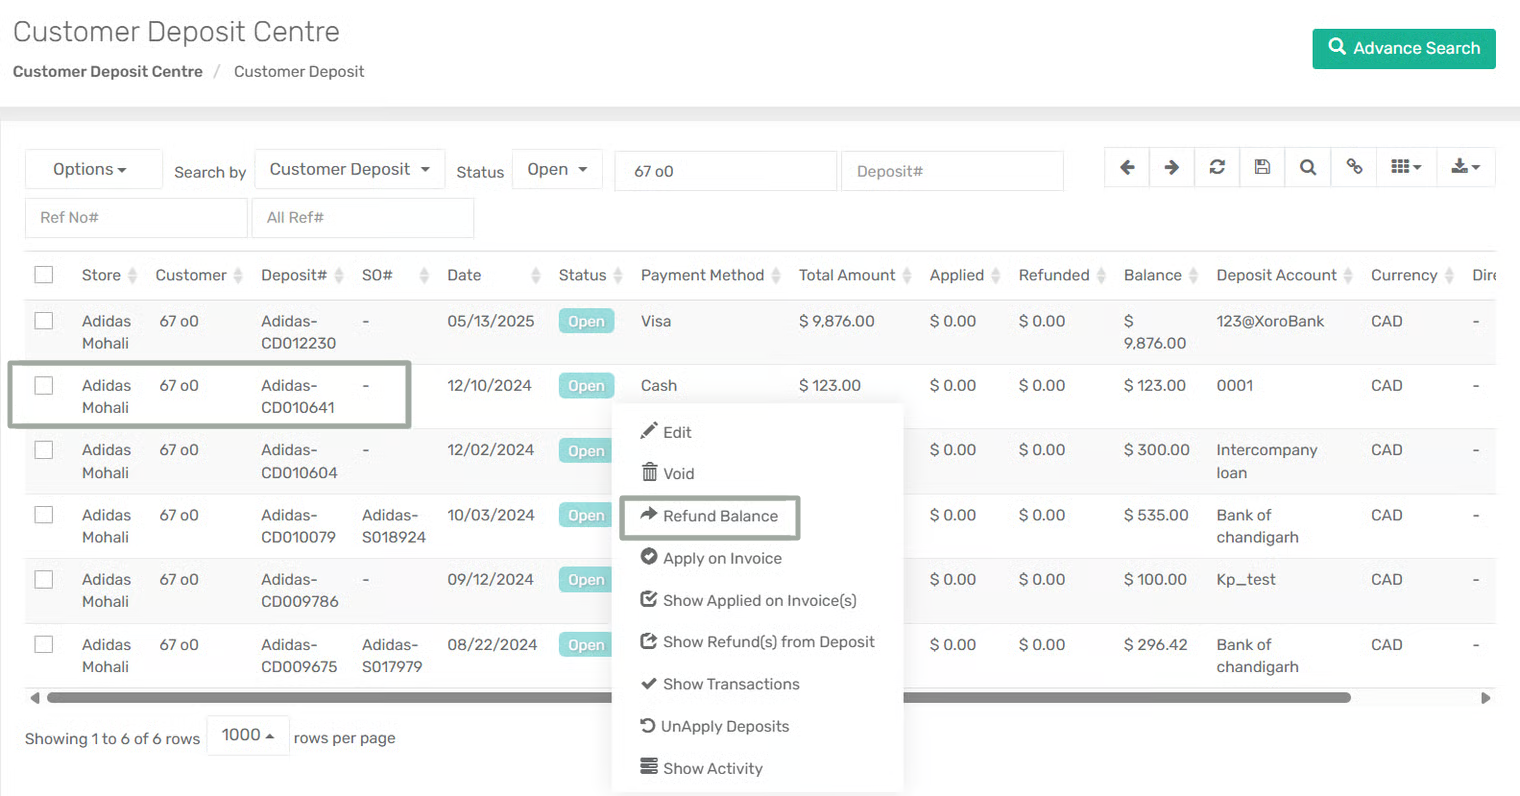
### **Addition of Customer Deposit Refund Email Notification**
**Overview:**
A new App Configuration has been introduced to automatically notify customers via email when a **Customer Deposit Refund** is processed. This enhancement ensures timely communication with customers and improves transparency around refund transactions—without requiring any manual email action from users.
Once enabled, the system sends a refund notification email using the newly added 'Customer Deposit Refund (Default)' email template whenever a customer deposit is refunded.
***
**Configuration Details:**
* **App Config Name:** Send Customer Deposit Refund Email
* **Configuration Location:** Menu → App Config → General → Send Customer Deposit Refund Email
***
**How It Works:**
**Step 1: Enable the App Configuration:** Enable **"Send Customer Deposit Refund Email"** from the Application Configuration.
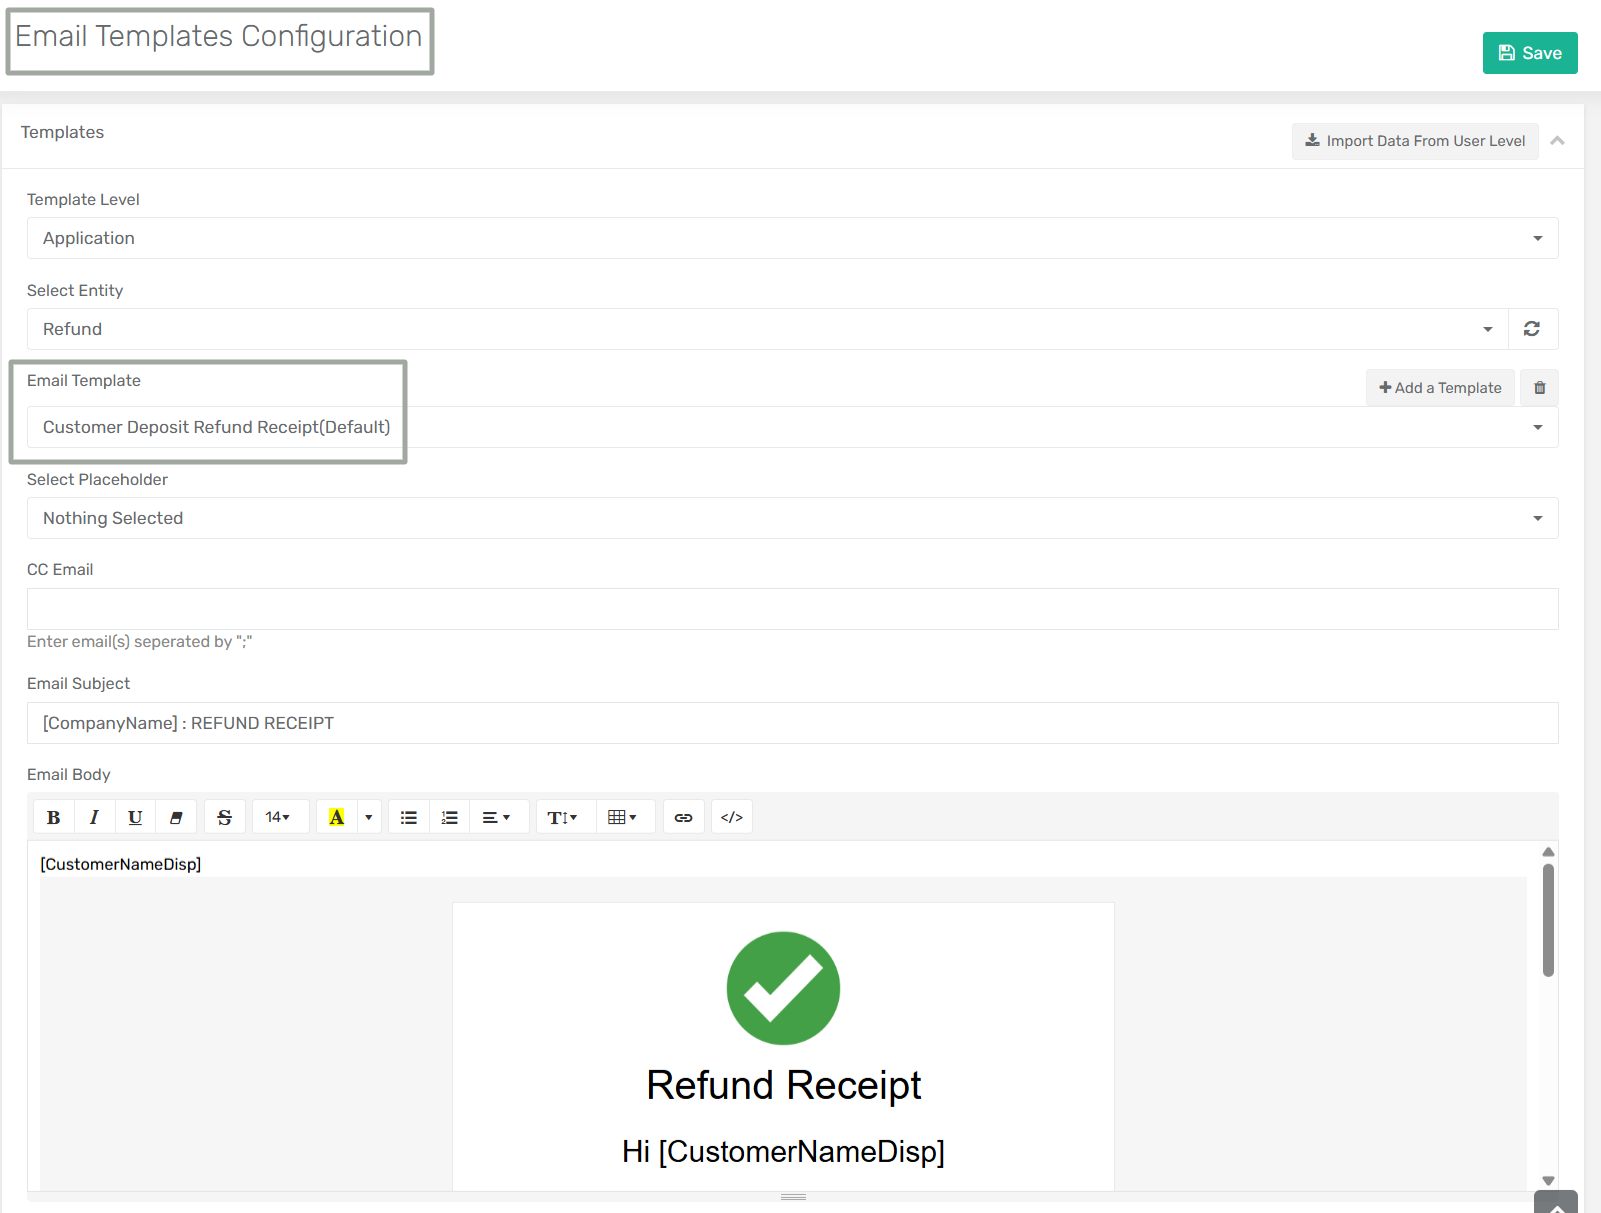
**Step 2: Configure the Email Template:** Navigate to Email Templates Configuration and follow the below steps:
* Select **Refund** as the Entity
* Choose the **Customer Deposit Refund Receipt (Default)** template
* Customize the subject and email body if required
**Step 3: Process a Customer Deposit Refund:** When a customer deposit refund is completed, the system automatically triggers the refund email.
**Step 4: Email Delivery Logic**
* The email is sent to the customer’s **Billing Email**
* If the Billing Email is not available, the system sends the email to the customer’s **Main Email**
***
#### Impact
* Ensures customers are automatically informed about deposit refunds
* Reduces manual follow-ups and support queries
* Improves customer communication and financial transparency
* Fully configurable through App Config and Email Templates without impacting existing workflows
***
### **Extension of Credit Card Expiration Year**
**Overview:**
The Credit Card Expiration Date selection has been extended to support future years beyond the previously available range. This enhancement ensures users can add or update customer credit card details with longer-valid expiration dates, aligning the system with current card issuer standards and reducing the need for frequent updates.
***
**New Enhancement:**
The **Expiration Year** dropdown in **Credit Card Info** now includes additional future years (up to **2045**).
**How to View it:**
* Navigate to Customer Centre → Customer → Payments → Credit Card Info
* This opens up **Add / Update Credit Card** modal.
***
**Impact:**
* Prevents validation issues for long-valid credit cards.
* Improves compatibility with modern payment providers.
* Reduces administrative overhead caused by limited expiration year ranges.
***
### **Addition of Fee and Discount Handling Option in Card and Direct Debit Payment Services**
**Overview:**
Charge management capabilities have been extended across the **Manage Credit Card Payment Services**, **Manage Direct Debit (ACH) Payment Services**, and **Create Payment Method** pages. Additionally, users can manually add charges using the **Add Charges** button in the new **Fees & Discounts** tab added in both **Sales Order** and **Invoice** modules.
This update allows businesses to configure fees or discounts directly at the payment service level and ensures these charges are automatically calculated, applied, and reflected during payment processing—without requiring any manual intervention.
***
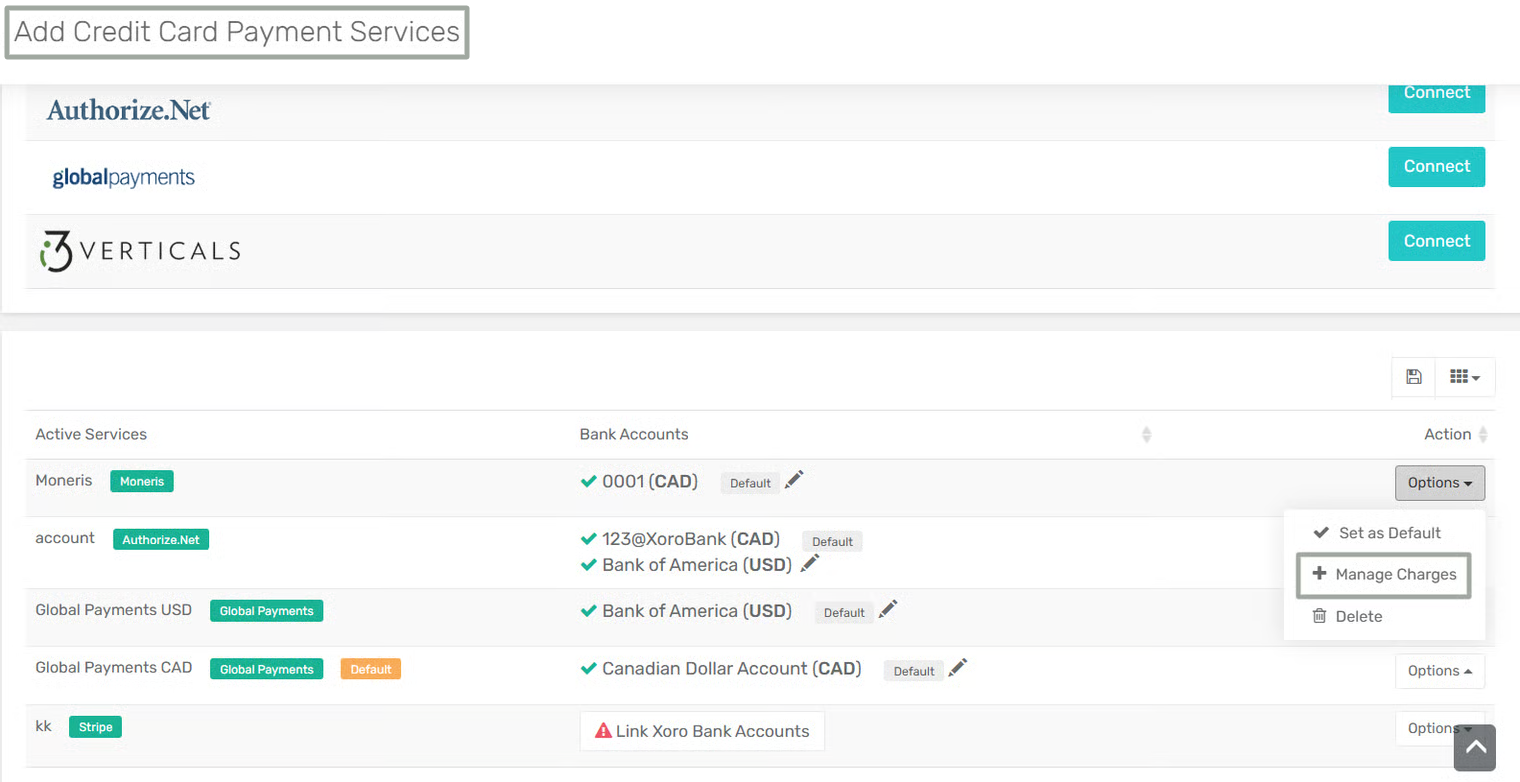
**New Enhancement:**
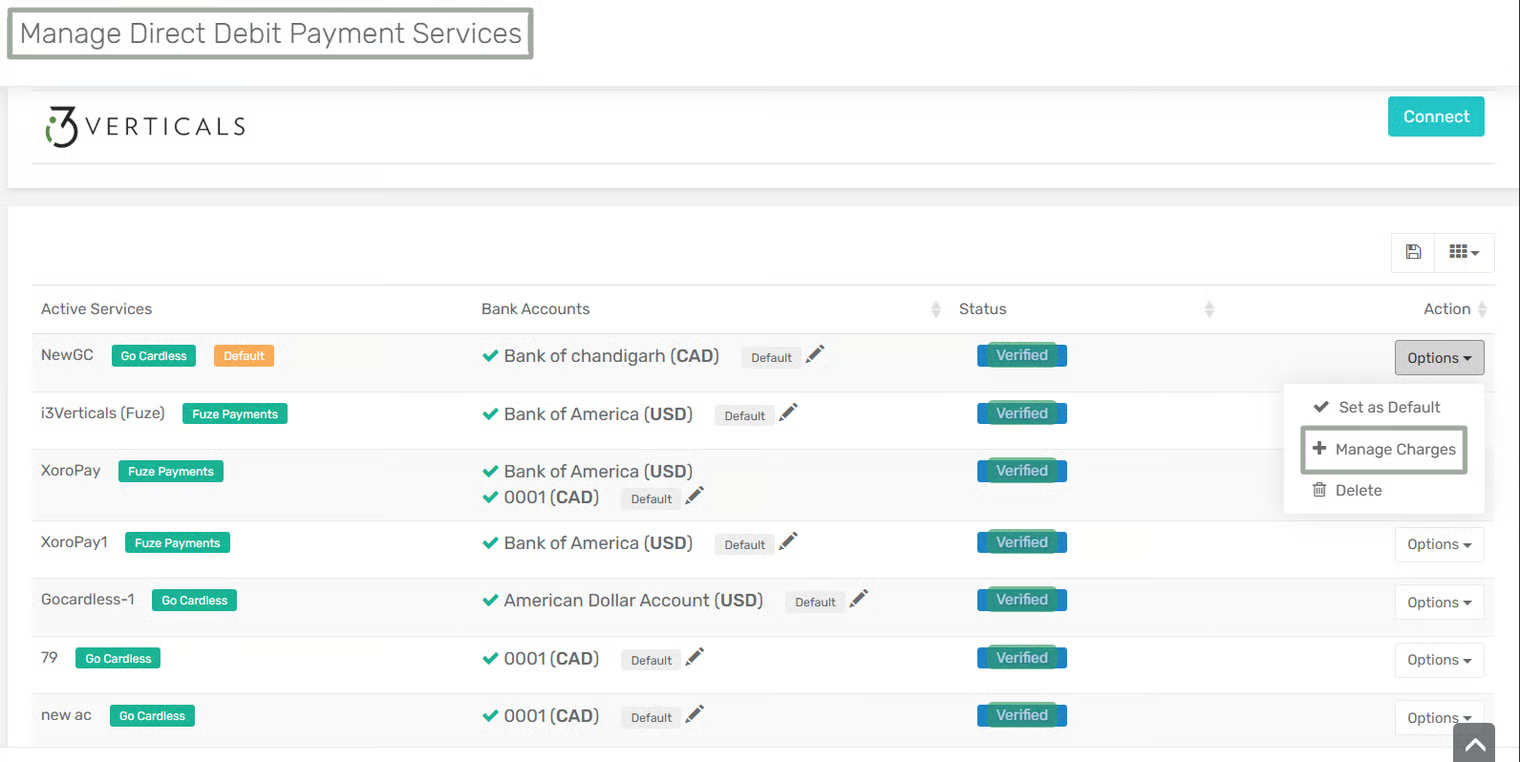
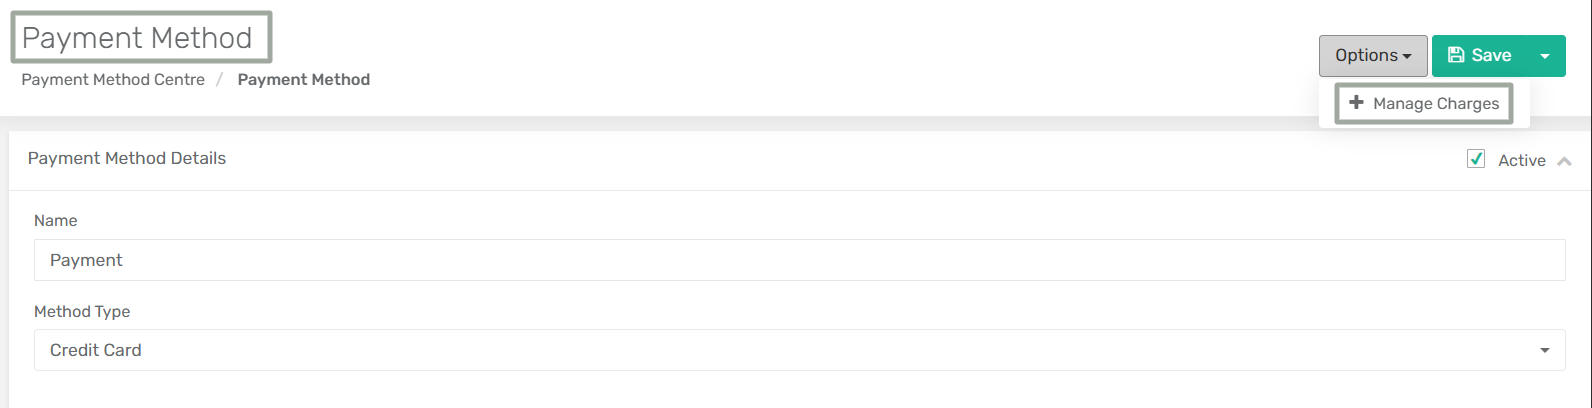
A new **Manage Charges** option has been added to the **Options** dropdown menu in:
* Manage Credit Card Payment Services
* Manage Direct Debit (ACH) Payment Services
* Create Payment Method page
Selecting **Manage Charges option** opens a sub form where charge rules can be defined for the selected payment service. The following fields are displayed in the sub form:
* **Charge Type** – Fee or Discount
* **Charge Value Type** – Flat or Percentage
* **Charge Value** – Numeric value of the fee or discount
* **GL Account** – GL account used for posting the charge
This sub form appears when the **Manage Charges** option is selected in the **Manage Credit Card Payment Services**, **Manage Direct Debit (ACH) Payment Services**, or **Create Payment Method** page. Once saved, the charges are applied as part of the total invoice payment.
***
**How It Works:**
Charges can be applied in two different ways:
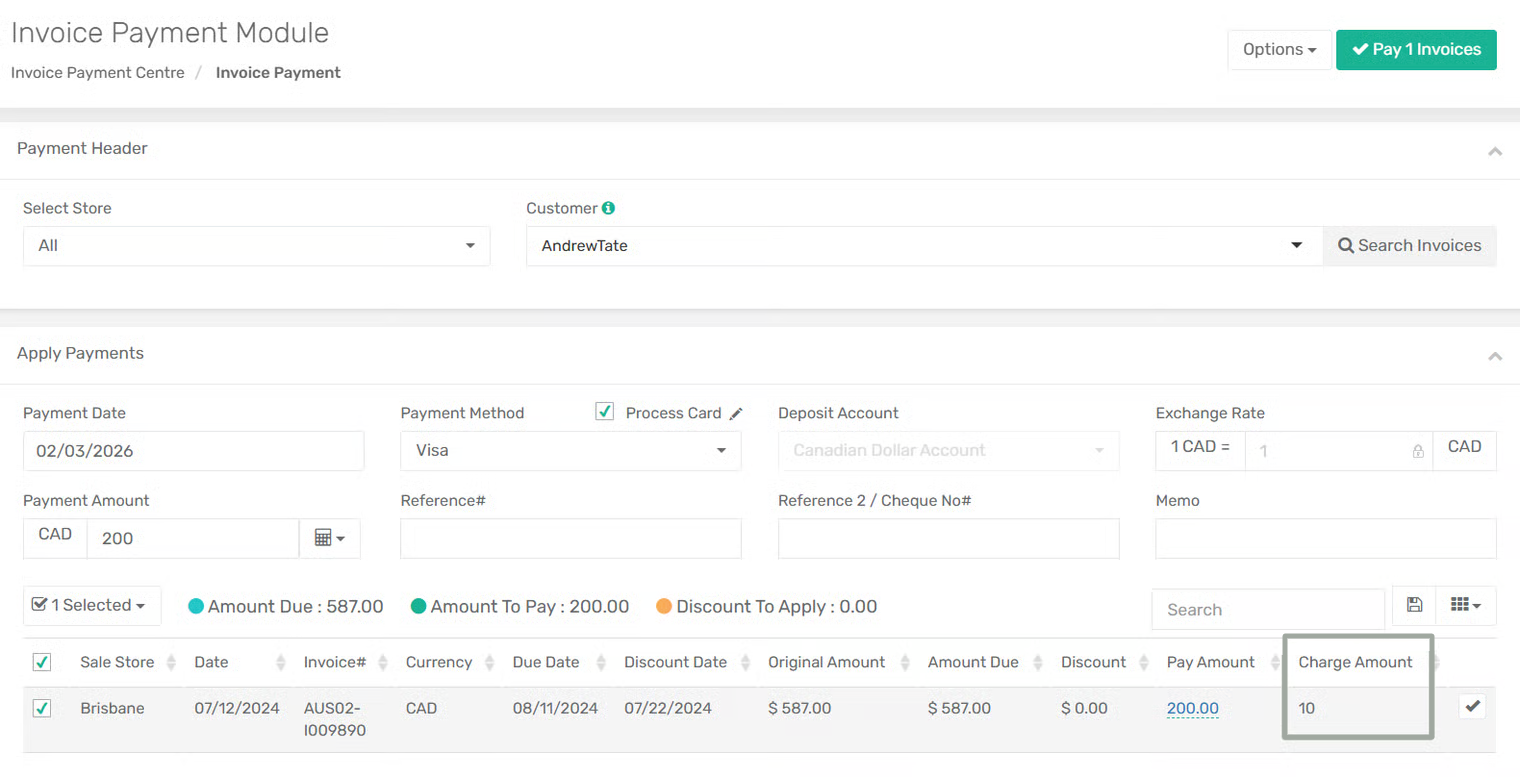
1\. **Invoice Payment Module**
**Step 1:** Navigate to the **Invoice Payment Module** and select the invoice(s) to be paid.
**Step 2:** Choose a **payment method**. If charges are configured for the selected payment service, the system automatically calculates the applicable fee or discount.
**Step 3:** Once payment is completed, these charges can be viewed in the **Fees & Discounts** tab.
**2. Manual Addition of Charges via Fees & Discounts Tab**
Charges can also be added manually during Sales Order or Invoice creation.
1. **Sales Order Creation**
**Step 1:** Create or edit a Sales Order and navigate to the **Fees & Discounts** tab.
**Step 2:** Click **Add Charges** and enter the sub form details.
2. **Invoice Creation**
**Step 1:** Create or edit an Invoice and go to the **Fees & Discounts** tab.
**Step 2:** Click **Add Charges** and define the required charge details.
In both cases, once saved, the charges are automatically reflected in the total order or invoice balance.
***
### **Added Process Association at Bill of Material Level**
**Overview:**
Previously, manufacturing processes could only be defined at the **Batch Manufacturing Order (Batch MO)** level. Manufacturing Orders (MOs) created as part of a batch would inherit the same set of processes from the Batch MO.
With this enhancement, processes can now be defined **directly at the Bill of Material (BOM) level**, ensuring that **every Manufacturing Order created using that BOM automatically receives the defined processes**, even when the MO is created independently (outside of a batch).
This update improves consistency, reduces dependency on Batch MOs, and ensures standardized process execution across all Manufacturing Orders.
***
**Feature Added**: A new **Processes** tab in the **Bill of Material** module.
**Location:**
`Menu → Manufacturing → Bill of Materials`
Users can add or remove processes in the BOM module. One can reorder the sequence of processes using drag-and-drop functionality.
***
**Key Enhancements:**
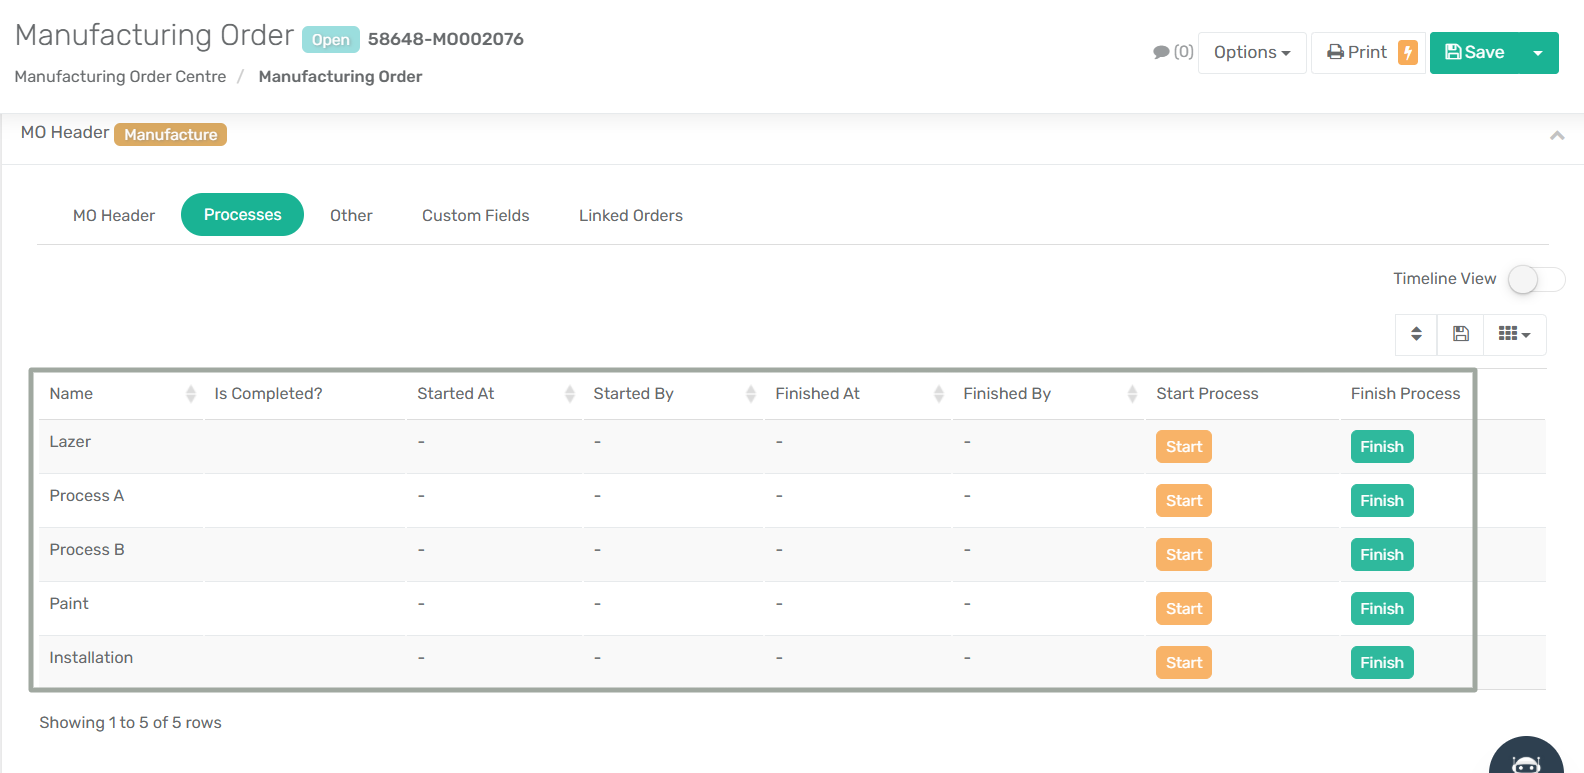
1. **Manufacturing Order module**
* The following new tracking fields have been added in the **Processes** tab:
* **Started At**
* **Started By**
* **Finished At**
* **Finished By**
* **Is Completed?**
* Processes can only be started or finished in the sequence in which they are defined.
* If the **Finish** button is clicked directly, the system automatically starts and finishes the process at the same time.
* Added a **Timeline View toggle** to visually track process progression.
2. **Manufacturing Order Centre**
* A new **Processes** column has been added in the Manufacturing Order Centre that displays the associated processes for each MO, improving visibility and tracking.
3. **Batch MO Sub Form**
* Added line-level **Start** and **Finish** buttons in Batch MO.
* Starting or finishing a process in a Batch MO applies the same action to all related Manufacturing Orders (if applicable).
***
### **Auto-Creation of Item Sub Categories via Upload Items/Products**
**Overview:**
Item upload and API workflows have been enhanced to automatically handle Item Subcategories. When uploading items/products (via upload or API), the system now **auto-creates Item Sub Categories** if they do not already exist in the system.
Additionally, while creating Item Categories or Subcategories, the **Code field is automatically populated with the same value as the Name**, ensuring consistency and reducing manual input.
If the Category Name or Sub Category Name provided during item upload or API integration already exists in the system either as a **Name** or as a **Code** the system will automatically assign the corresponding existing Category or Subcategory to the item.
***
**Impact:**
* Removes the need to manually create Item Sub Categories before item uploads
* Prevents duplicate Category and Subcategory records
* Ensures seamless mapping using either Name or Code
* Improves upload accuracy for bulk and API-driven item creation
{% hint style="info" %}
Name and Code values of Item Category/ Item Sub Category must be unique across the system to ensure correct mapping.
{% endhint %}
***
### **Addition of Address-Based Tax Fallback Control for Forced Item Tax**
**Overview:**
A new App Configuration, **“Address-Based Tax Fallback for Forced Item Tax,”** has been introduced to provide greater control over tax determination for items with **Force Sales Tax Code** enabled.
This enhancement refines the tax priority logic by allowing businesses to control whether address-based tax calculation should be used as a fallback when item state tax mapping is unavailable. It ensures more predictable tax behavior and provides flexibility in how item, address, and customer tax codes are prioritized during sales transactions.
This functionality applies across **Sales Orders, Invoices, Sales Receipts, and Credit Memos**.
***
#### **Configuration Details**
**App Config Name:** Address-Based Tax Fallback for Forced Item Tax
**Configuration Location:** Menu → App Config → General → **Address-Based Tax Fallback for Forced Item Tax**
**Functionality:** Controls whether address-based tax calculation is used as a fallback when item state tax mapping is not available.
***
**How It Works:**
**Scenario: App config “Address-Based Tax Fallback for Forced Item Tax” Is Enabled**
1. **Force Sales Tax Code toggle is ON** (available in the **Tax Settings** tab of the Item edit page) **and a** **Tax Mapping by State** **exists**. The system determines the tax code using the following priority sequence:
* **State Mapping Tax Code**\
Applied when a matching item state tax mapping exists for the Ship-To state.
* **Address-Based Tax Code**\
Applied when no matching state mapping is found and an address-based tax code is available.
* **Item Default Tax Code**\
Applied when neither state mapping nor address-based tax is available.
* **Customer Tax Code**\
Applied only if none of the above tax sources are available.
2. **Force Sales Tax Code toggle is ON but no Tax Mapping by State exists**
* The system directly applies the Item Default Tax Code.
3. **Force Sales Tax Code toggle is OFF**
* The system follows the existing tax calculation behavior (no change).
***
**Scenario: App config “Address-Based Tax Fallback for Forced Item Tax” Is Disabled**
1. **Force Sales Tax Code toggle is ON with an existing Tax Mapping by State.** The system determines the tax code using the following priority sequence:
* **State Mapping Tax Code**\
Applied when a matching state mapping exists.
* **Item Default Tax Code**\
Applied when no matching state mapping is found.
***
**Impact:**
* Provides configurable control over address-based tax fallback behavior.
* Ensures predictable tax calculation when item state mappings are unavailable.
* Prevents unintended tax overrides from address-based logic when not required.
* Improves consistency and flexibility in tax handling across sales transactions.
***
***
### **Addition of Default Payable Account in Vendor Page Defaults**
**Overview:**
The Vendor module has been enhanced to allow users to define a **Default Payable Account at the Vendor Page Defaults level**. This ensures that newly created vendors automatically inherit the correct Accounts Payable (AP) account, eliminating incorrect defaults and reducing the need for manual corrections during vendor setup and payables processing.
This enhancement improves accounting accuracy and ensures consistency across vendor-related transactions.
***
**New Enhancement:**
A new **'Default Payable Account'** field has been introduced in the **Vendor Page Defaults** settings.
***
**How It Works:**
**Step 1:** Navigate to **Purchase → Vendor Section → Vendor**.
**Step 2:** Open **Page Defaults** by clicking on the **vertical ellipsis (⋮)** in the top‑right corner of the XoroERP interface.
**Step 3:** The **Default Configuration** form opens, allowing users to define default values for Vendor-related fields. Set the **Default Payable Account** you want to apply and save the configuration.
**Step 4:** Now, whenever a new Vendor is created, the **Default Payable Account** is automatically populated in the **Payments** tab, eliminating the need for manual selection.
***
**Impact:**
* Ensures newly created vendors are consistently assigned the correct Accounts Payable account.
* Reduces manual corrections and rework in payables and accounting workflows.
* Improves accuracy and consistency in vendor-related financial transactions.
* Saves time during vendor setup, especially in high-volume or multi-currency environments.
***
### **Added 'Is Active?' Column to Batch Update in BOM Centre**
**Overview:**
Previously, users could not modify the Active status of multiple Bills of Material (BOMs) at once. Each BOM had to be opened individually to mark it active or inactive, making bulk maintenance time-consuming—especially when managing large BOM libraries.
This enhancement introduces batch-level control over BOM activation status directly from the Bill of Material Centre.
***
**New Enhancement:**
The **Batch Update** functionality in the **Item Centre** has been enhanced to include **'Is Active'** field.
***
**How It Works:**
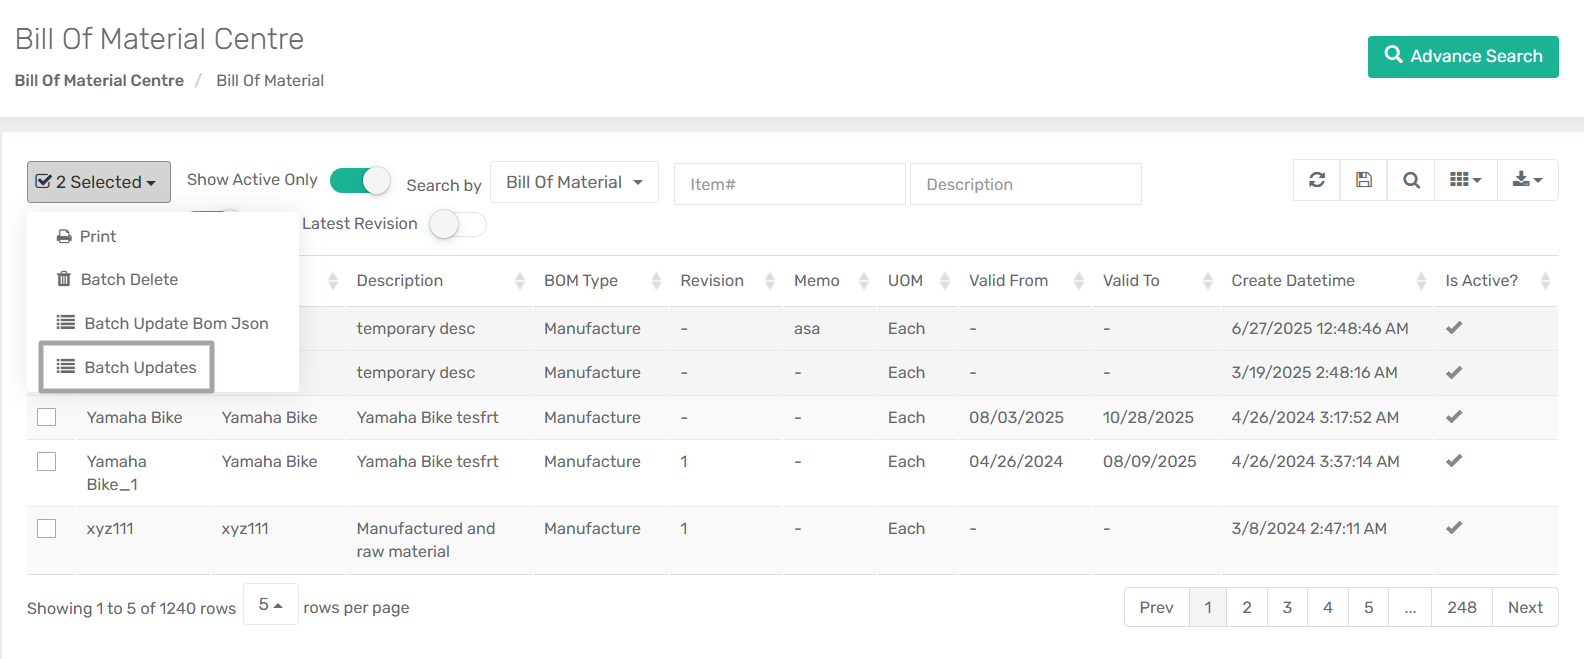
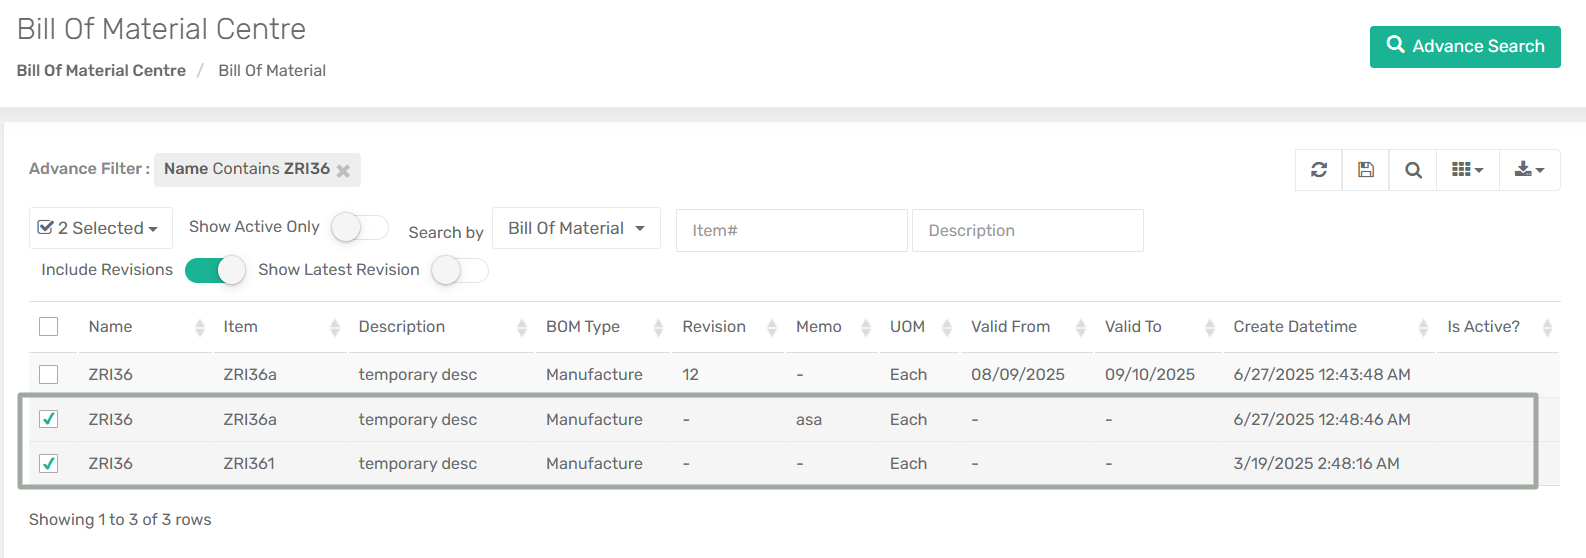
**Step 1:** Navigate to **Manufacturing → Bill of Material → Bill of Material Centre**.
**Step 2:** Select one or more Bill of Materials from the grid.
**Step 3:** Click **Batch Update** from the options drop-down menu located next to the header search fields.
**Step 4:** In the Batch Update window, select **'Is Active?'** as the column to update and set the desired value (Yes/No).
**Step 5:** Click **Update** to apply the change. The selected BOMs are updated in bulk with the new active status.
***
**Impact:**
* Enables bulk activation or deactivation of multiple Bills of Material from a single screen.
* Eliminates the need to open and update BOMs individually, significantly reducing manual effort.
* Improves efficiency when managing large BOM libraries or performing mass clean-ups.
* Ensures faster and more consistent BOM maintenance directly from the Bill of Material Centre.
***
### **Addition of Printed Cheque# Column in Account Register**
**Overview:**
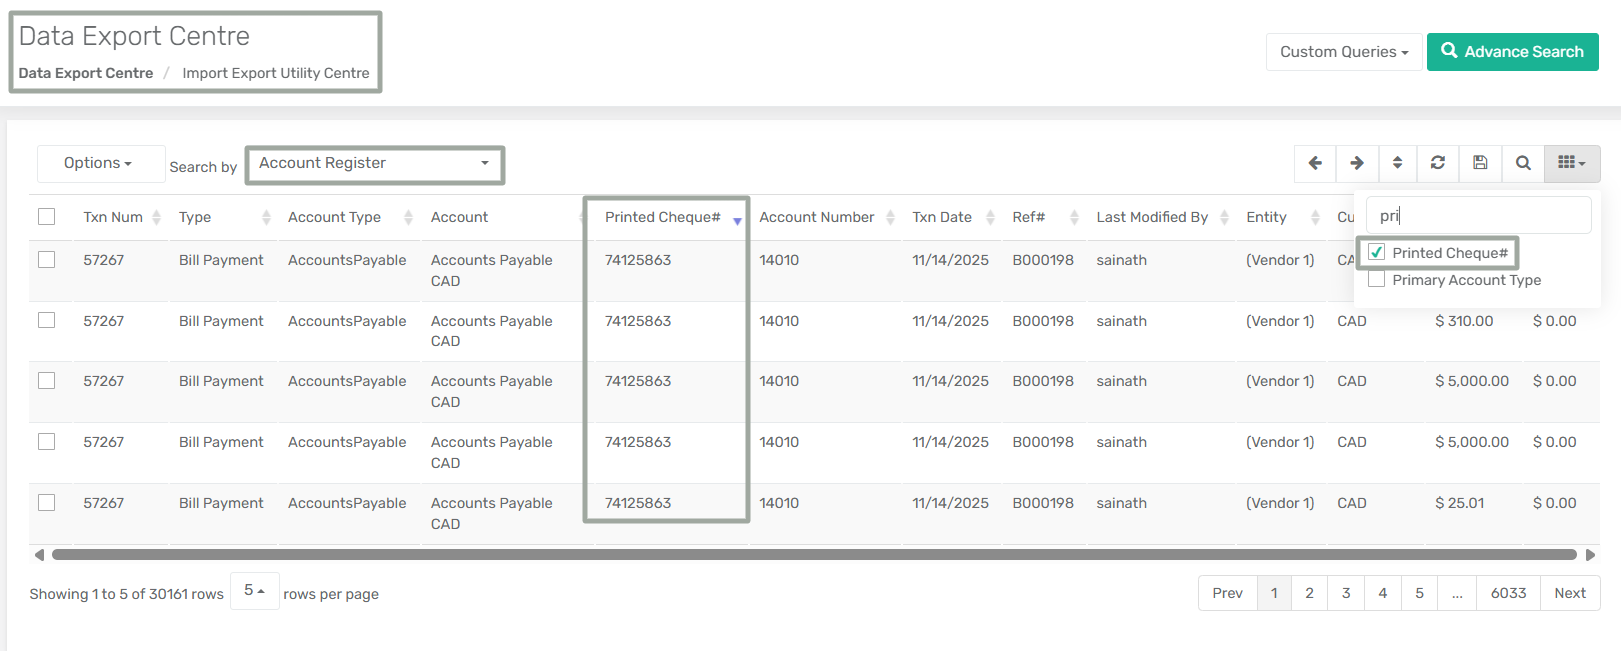
The Account Register has been enhanced to include the **Printed Cheque#** column, providing greater visibility into cheque-based payment transactions. By surfacing the Printed Cheque Number directly in transactional views and exports, users can more easily trace payments, reconcile accounts, and audit cheque-related activity without navigating into individual records.
***
**New Enhancement:**
Added **Printed Cheque#** column in **Account Register**, **Account Register report**, and the **Account register(data Export)**.
***
**Impact:**
* Finance teams can instantly identify cheque numbers associated with bill payments directly from the Account Register.
* Eliminates the need to open individual transactions to verify cheque details during bank or AP reconciliation.
* The Printed Cheque# is now available in reports and exported datasets, ensuring downstream systems and analyses retain complete payment references
***
### **Auto-Select Default Location Toggle – Enhancement to Quick Receive Module**
**Overview:**
Previously, automatic assignment of an item’s default location during **PO receiving** was entirely controlled by the App Config **“Auto-Select Default Item Location for Item Receiving and MO Production/Disassembly.”**
However, if the **Receive ASN** option was not selected in this configuration, there was no way to auto-populate the item’s default location when **Quick Receiving a PO**. As a result, locations had to be selected manually for each item—even when the intent was to receive items into their default locations—making the process unnecessarily time-consuming.
***
**Enhancement Added:**
* A new toggle **“Auto-select default location by item”** is now available in the **Quick Receive PO** modal.
* When this toggle is turned on, it will automatically use the receiving location based on the default location of the item.
***
**Impact:**
* Enables faster receiving workflows when default locations are desired only in specific cases.
* Reduces manual errors while preserving flexibility for mixed operational scenarios.
* Improves usability for teams that rely on **Quick Receive** but do not want Receive ASN automation enabled system-wide.
***
### **Added Dedicated Default Location Support in Sales Receipt**
**Overview:**
A new App Configuration, **“Allow Dedicated Location in Sales Receipt,”** has been introduced to provide greater control over inventory location handling during Sales Receipt creation. When this configuration is enabled, a **Default Location** dropdown is displayed on the Sales Receipt form, allowing users to assign all inventory items to a single, dedicated location and streamline the receiving process.
***
**Configuration Details:**
**Configuration Name:** Allow Dedicated Location in Sales Receipt
**Configuration Location:** Menu → App Config → Sales → Allow Dedicated Location in Sales Receipt
**Prerequisite:**
* This configuration can only be enabled when config **"Enable LPN Tracking"** is off, and vice versa. It will work only under the following conditions:
* **Warehousing** is **enabled**
* **LPNs** is **disabled**
***
**Functionality:**
**When Warehousing is enabled and a Default Location Is Selected:**
* The **Item Detail** sub form is displayed, allowing users to simply select the item and click **Add Item** to add it to the Sales Receipt. The pop-up for selecting items from multiple locations will not appear.
* This behaviour will be the same as when **Warehousing is off**, where only a single location setup is used.
* Once a **Default Location** is selected and inventory items are added, the Default Location cannot be removed or changed. The location can only be modified by deleting the existing inventory lines.
***
**When Warehousing is enabled and no Default Location Is Selected:**
* The pop-up for adding items from multiple locations will appear immediately after entering the item details and clicking the **Add Item** option in the **Item Detail** subform.
* If items are added without selecting a Default Location, we will not be able to select a Default Location until the previously added items are deleted.
***
**Impact:**
* Prevents accidental mixing of inventory locations during item addition
* Reduces operational errors in warehouse-enabled environments
* Provides clearer, rule-based control over location selection behaviour
***
### **Addition of 'Third Party Ref No' field in Estimate Module**
**Overview:**
The **'Third Party Ref No'** field has been introduced to the **Estimate module**, improving cross-document traceability and strengthening validation when converting Estimates to Sales Orders. This enhancement ensures consistency of third-party references across sales workflows while maintaining existing upload and API behaviour.
In addition, the Third Party Ref No. is now searchable via **Global Search**, allowing users to quickly locate both Estimates and Sales Orders using external reference numbers.
***
**Feature Added:** A **Third Party Ref No** Field in **Sales** tab of Estimate Module
**Location:**
`Menu→ Sales → Estimate → Create Estimate`
***
**Validation Rules:**
* When converting an Estimate to a Sales Order, the system validates that the **Third Party Ref No. does not already exist in any Sales Order**.
* If a duplicate Third Party Ref No. is detected in an existing Sales Order, the system blocks the conversion and displays a validation error.
* This validation applies to both **Convert to SO** and **Convert Selected Lines to SO**. This ensures that Third Party Reference Numbers remain unique at the Sales Order level.
***
**Impact:**
* A new column for **Third Party Ref No.** is available in the **Estimate Centre**, ensuring visibility at the listing level.
* Improves traceability by extending third-party references to Estimates.
* Enhances searchability across sales documents using Global Search.
* Maintains backward compatibility for uploads and APIs.
***
### **Addition of Zip Code–Based Tax Calculation for Canada**
**Overview:**
A new App Configuration, **“Calculate Tax for Canada Zip Code,”** has been introduced to improve tax calculation accuracy for Canadian transactions. When enabled, the system calculates sales tax based on the Ship-To postal code for Canada, ensuring precise, address-level tax determination. The enhancement also introduces validation to alert users when tax calculation cannot be completed due to missing or invalid postal codes.
This feature works in conjunction with existing tax configurations and applies consistently across multiple sales modules.
***
**Configuration Details:**
**Configuration Name:** Calculate Tax for Canada Zip Code
**Configuration Location:** Menu → App Config → System → Calculate Tax for Canada Zip Code
***
**Functionality:**
**When App Config Is Enabled:**
* If the Ship-To address contains a valid Canadian postal code, tax is calculated based on the [**priority logic**](#addition-of-address-based-tax-fallback-control-for-forced-item-tax).
* If the postal code is missing or invalid, the system displays an alert indicating that tax cannot be calculated due to an invalid zip/postal code.
* If App Config **“Restrict Save on Tax Calculation Error”** is enabled then the sales order cannot be saved and a blocking error message is displayed stating that the request cannot be completed due to a tax calculation error.
**When App Config Is Disabled:**
* If the postal code is invalid or missing, tax defaults to the item’s configured sales tax (for example, GST).
* If the postal code is valid, the system follows the existing tax calculation priority flow.
***
**Impact:**
This enhancement improves tax accuracy for Canadian customers by enforcing postal-code-based tax calculation while giving businesses control over whether tax errors should block transaction saving. It reduces incorrect tax application, improves compliance, and ensures consistent behaviour across all sales workflows.
***
### **Added Exchange Rate Adjustment Account App Setting in Sales Channel**
**Overview:**
A new app setting, **“Exchange Rate Adjustment Account,”** has been added to the Sales Channel to properly handle exchange rate differences received from Shopify. This enhancement ensures that currency-related adjustments are clearly identified, correctly posted, and accounted for during payout processing.
Previously, exchange rate differences received in Shopify payout data lacked a clear identifier, making it difficult to track and post these adjustments accurately. This update introduces a dedicated configuration to resolve that gap and improve financial clarity.
***
**App Setting Details: Exchange Rate Adjustment Account** app setting
**App Setting Location:**
`Menu → Apps → Sales Channel → Settings → Payouts`
**Description:**
A new field, **Exchange Rate Adjustment Account**, is now available in the Sales Channel settings. Users can select a GL account that will be used specifically to record exchange rate differences arising from multi-currency transactions.
The selected account is automatically applied whenever the system detects an exchange rate adjustment during payout processing.
***
**How It Works:**
* When an order is placed in Shopify using a currency different from the store’s base currency, the exchange rate difference is included in the Shopify payout data.
* During payout processing, the system evaluates the transaction for any exchange rate variance.
* If a difference is detected, the system posts the adjustment to the **Exchange Rate Adjustment Account** selected in the sales channel settings.
* This logic applies consistently across core financial workflows, including Invoice Payments, Customer Deposits and Refunds.
***
### **Addition of Flinks Bank Connection Support**
**Overview:**
Flinks has been introduced as an alternative bank connection provider to Yodlee and Plaid, ensuring uninterrupted bank feed connectivity when other providers face availability or compatibility issues. This integration enables secure, real-time bank connections for both Canadian and U.S. financial institutions, allowing users to link bank feeds, sync transactions, and manage reconciliations directly within XoroERP.
Flinks uses encrypted open-banking standards to safely import financial data, improving reliability, visibility, and control over bank transactions.
***
**Feature Added: Flinks Bank Integration**
**Available Providers: Flinks Canada**, **Flinks USA**
**Location:**\
`Menu→ Connect Banks → Connect Bank Accounts → Link Bank Feeds → Manage Added Accounts`
***
**How It Works:**
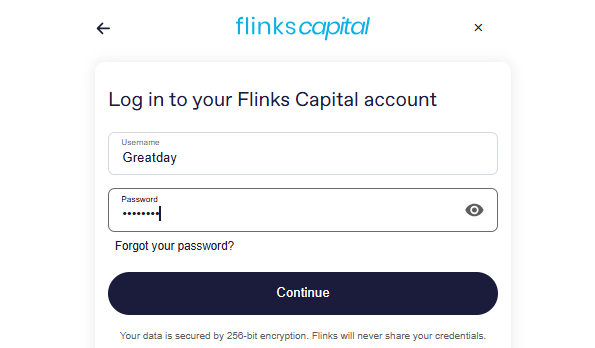
**1. Connect Bank Accounts**
* Select **Flinks Canada** or **Flinks USA**
* Accept the Flinks Privacy Statement and proceed. A list of supported banks will appear based on the selected country.
* Log in using your Flinks Capital credentials.
* Complete any other security verification
* On successful authentication, the bank account is securely connected to XoroERP
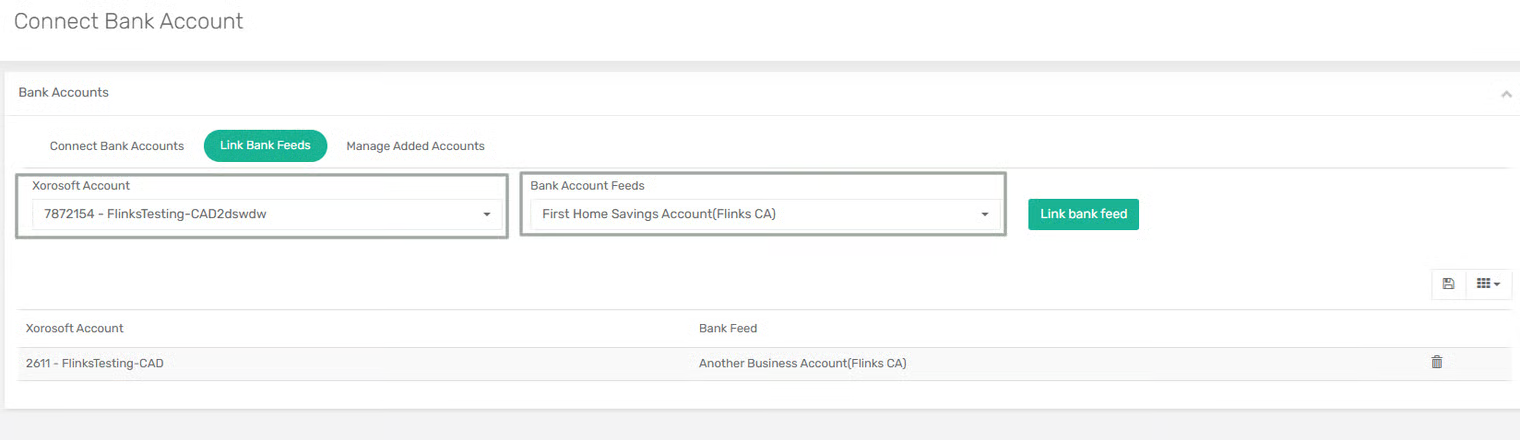
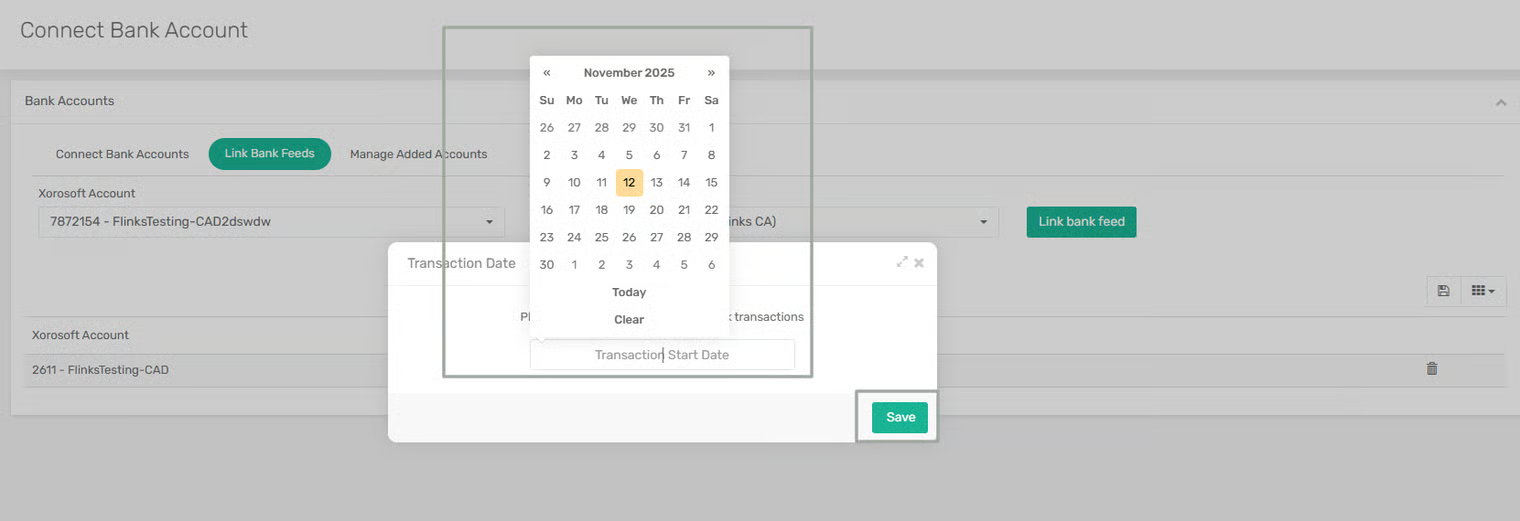
**2. Link Bank Feeds**
* Select a connected bank feed from the dropdown
* Map it to the appropriate XoroERP Chart of Account
* Choose a transaction start date and save
* Click **Link Bank Feed** to enable synchronization
**3. Manage Added Accounts**
* Navigate to **Manage Added Accounts**
* **Edit Credentials:** Allows updating stored login details if required
* **Delete Account:** Unlink the mapping first, then delete the account connection
**4. Bank Statement Centre**
* Navigate to **Bank Statement Centre**
* View imported debit and credit transactions
* Switch between Header View and Detailed View
* Monitor reconciliation status
* Users can download or delete statements and transactions if required
***
**Impact:**
* Provides a reliable fallback bank integration option
* Improves transaction visibility and reconciliation accuracy
* Ensures secure handling of banking credentials
* Enhances overall stability of bank feed operations within XoroERP
***
### **Addition of Tag Update Restriction During Shopify Re-Sync**
**Overview:**\
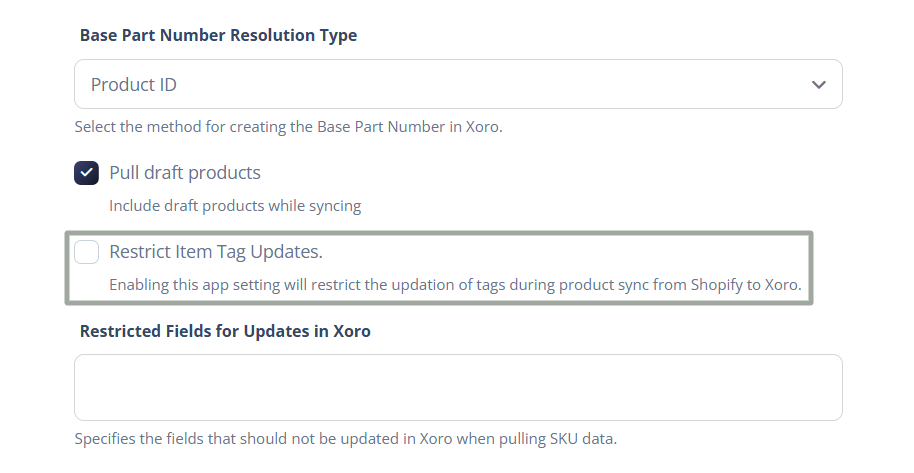
A new App Setting, **"Restrict Item Tag Updates",** has been introduced to give teams control over how item tags are handled during Shopify re-syncs and item updates. This enhancement addresses scenarios where businesses want to maintain different tag values in Shopify and Xoro for the same item—without having Shopify overwrite Xoro tags during subsequent updates.
**App Setting Details:**
* **App Setting Name:** Restrict Item Tag Updates
* **Scope:** Item sync from Shopify to Xoro
* **Setting Location:**\
`Menu → Apps → Sales Channel → Settings → Products & inventory`
***
**Functionality:**
**If the "Restrict Item Tag Updates" Setting Is Enabled:**
* Item tags in **Xoro are not updated** during item updates or re-syncs from Shopify.
* Existing tags in Xoro remain unchanged, even if Shopify tags differ.
***
**If the "Restrict Item Tag Updates" Setting Is Disabled (default behavior):**
* Item tags are updated in Xoro based on Shopify during item updates and re-syncs.
***
**Impact:**
* Prevents unintended overwrites of Xoro item tags during Shopify re-syncs.
* Supports workflows where Shopify and Xoro require different tagging strategies.
* Reduces manual correction after updates while preserving accurate initial item creation.
***
---
# Agent Instructions: Querying This Documentation
If you need additional information that is not directly available in this page, you can query the documentation dynamically by asking a question.
Perform an HTTP GET request on the current page URL with the `ask` query parameter:
```
GET https://docs.xorosoft.com/whats-new/release-notes/current-release/october-release.md?ask=
```
The question should be specific, self-contained, and written in natural language.
The response will contain a direct answer to the question and relevant excerpts and sources from the documentation.
Use this mechanism when the answer is not explicitly present in the current page, you need clarification or additional context, or you want to retrieve related documentation sections.