> For the complete documentation index, see [llms.txt](https://docs.xorosoft.com/llms.txt). Markdown versions of documentation pages are available by appending `.md` to page URLs; this page is available as [Markdown](https://docs.xorosoft.com/whats-new/release-notes/previous-releases/2023/june-2023-release.md).
# June 2023 Release
### **1.** Upload Commission Rule: Introduced the ability to create Commission Rule via Upload
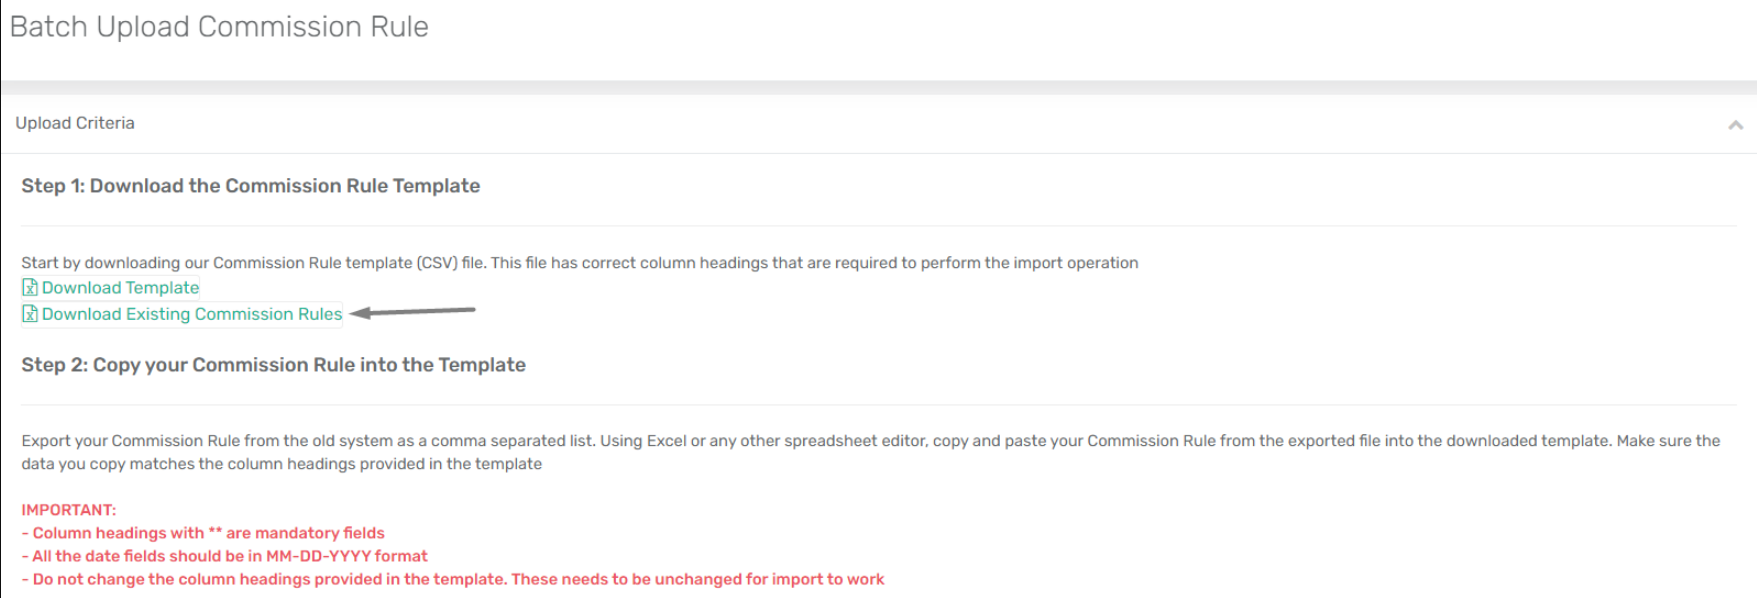
We have added a new module, “Upload Commission Rule”. This module provides users with the convenient capability to create Commission Rules in bulk. Additionally, it also allows for the update of existing Commission Rules.
How does it work?
* Go to the Upload Commission Rule module and download the Template provided in the module.
* In the template, you can use the “HeaderIdentifierType” column to decide whether you want to create a new rule or update an existing rule. HeaderRefNumber represents the creation of a new commission rule. Id represents the updation of an existing commission rule.
* To create a new Commission Rule, enter the term “HeaderRefNumber” in the “HeaderIdentifierType” column. Then, specify any reference number in the “HeaderIdentifier” column.
* Fill in the remaining details and upload the file into the system. Remember, fields marked with asterisks (\*) are mandatory and cannot be left blank.
* You can also update an existing Commission Rule. To do that, download the master data file from the Upload Commission Rule module.
* The term “Id” will be mentioned in the “HeaderIdentifierType” column. Subsequently, the specific Id from the Commission Rule Center will be mentioned in the “HeaderIdentifier” column.
* Make the needed updates and upload the file.
### **2. Quick Receive: Added the ability to quick receive selected lines**
We have added the ability to quick receive selected lines of a PO.
**How does it work?**
* Create a Purchase Order and release it. Then, proceed to Quick Receive the Purchase Order from the Options.
* On the “Quick Receive Orders” page, the Items in the Orders have been listed.
* Select the Items that you want to Quick Receive and then select the “Quick Receive Selected Item Lines” from the “Quick Receive” dropdown.
* The selected Item(s) would be received and a corresponding Item Receipt would be created for the received Item(s).
### **3. Added the ability to use parent’s credit on a child customer and vice-versa**
Now you can use the parent’s credit for the child and vice versa. This means you can pay a child customer’s invoice using the parent’s credit and vice versa. The system also shows available credits for both parent and child customers when paying invoices with credits
### **4. MO Disassemble: Added the ability to set a default offset account**
We have added the ability to set a Disassemble Offset Account when creating a “Disassemble” type Manufacture Order.
For this, a new App Config named “Disassemble Offset Account” has been added under the Manufacturing tab. \*\*You can also set this option for specific MO in the Manufacture order module using a dropdown menu.
The account selected here would be automatically added as an offset account for disassembly-type manufacturing orders.
### **5. Added Sent-by-Scheduler column to Bill of Material Centre and Data Export Centre**
We have added a new column, “Sent by Scheduler” to the Bill of Material Centre and Data Export Centre (Bill Of Material Lines).
When the file is exported using Data Export Centre in the case of Job Scheduler, this column will be marked as Y.
### **6. Chart of Accounts: Added the ability to deactivate the accounts**
We have added the ability to deactivate an account. For this purpose, an active toggle button is added to the Account module.
Turn the toggle off to deactivate the account.
Please note that only accounts with no transaction or zero balance can be deactivated.
### **7. Item Inventory Snapshot: Added Sales Rep column in the On SO Details and On SO Draft Details**
We have made an update to the On SO and On SO Draft Details modules fetched from the Inventory Snapshot by adding the “Sales Rep” column.
**How does it work?**
* Navigate to the Inventory Snapshot module and click on the quantity under the “On SO” or “On SO Draft” column\
.
* This will open up the Details module. Here, you will notice the addition of a new column called “Sales Rep”.
* This column provides information about the sales representative associated with the SO.
With this addition, you can check the associated Sales Rep for an SO directly from the Item Inventory Snapshot module.
### **8. ASN Centre: Added Vendor column**
We have added a new column, “Vendor” in the ASN Centre. This will fetch the Vendor linked to the PO.
### **9. Receive ASN: Added the “Expiry Date” column**
We have added a new column, “Expiry Date” in the Receive ASN module.
**How does this work?**
* Navigate to the Receive ASN module.
* Click on the “Action” button\
.
* A “Receive Item to Location” window will populate. The “Expiry Date” column has been added here.
### **10. Manufacture Order Template: Added Customer Name**
We have added the Customer Name in the template of Manufacture Orders that are linked to a Sales Order. This will be populated under the “Linked SO’s” column in the template.
### **11. Added Customer Statement Section in the Customer Portal**
We have added a new section, “Customer Statement” in the B2B Portal. From here your customers can view and print their statements.
### **12. Data Export Centre: Added Item Price Centre**
We have added the “Item Price Centre” option in the Data Export Centre. With this addition, you can view the Item Price Centre details from the Data Export Centre and export the data as per your requirement.
**How does it work?**
* Navigate to the “Data Export Centre”.
* From the “Search by” dropdown, select the “Item Price Centre” option.
* You can view and export this data as required.
### **13. Upload Pricing Rule: Added the ability to schedule the upload**
We have added the ability to schedule an upload for the Pricing Rule.
**How does it work?**
* Navigate to the Upload Pricing Rule module.
* Browse and select the file to be uploaded.
* From the “Verify & Upload” dropdown, select the “Schedule Import” option.
* You will be taken to the “Job Scheduler” page. Enter all the details here and click on “Save”.
* You can see the job in the “Job Scheduler History” module and the Pricing Rule will be uploaded as scheduled.
### **14. Added “Alternative Item Numbers” on multiple modules**
We have added Alternative Item Numbers in the Item Receipt Centre (Detail level), Bill Centre (Detail level) and on the Create ASN module.\
### **15. Added ASN Info tab in the Item Receipt and Bill modules**
We have added a new tab, “ASN Info” in the Item Receipt and Bill modules. This contains ASN details, like the ASN Number, Status and PO Number.
Additionally, you can click on the ASN number and PO number to get more details.
### **16. Introducing Bill Approval Functionality**
We are introducing a new feature for bill approval, along with the ability to limit payments for bills that haven’t been approved. To achieve this, a new app configuration named “Restrict Payment for Unapproved Bills” has been added under the Purchase tab.
**How does it work?**
* When the above-mentioned app configuration is turned on, bills will be generated with the status “Waiting for approval.”
* Approval is required before proceeding with bill payments. You can achieve this by going to Options > Approval > Mark as Approved.
* Attempting to pay an unapproved bill will trigger the following system error.
* Furthermore, a new column titled “Approval Status” has been incorporated into the Bill Centre. This column will indicate whether a bill has been marked as “Approved” or is still “Waiting For Approval”.
### **17. Vendor: Added the ability to choose the default payment method**
We have added the ability to set a default payment method for a Vendor. With this addition, you can select the default payment method used to pay the bill to the Vendor.
**How does it work?**
* Open the Vendor for which you want to add the default payment method.
* Under the “Payments” tab of the Vendor, we have added the option to select the “Default Payment Method”. Select the method from the dropdown and click on “Update”/”Save” to apply the changes.
* You can also set the default payment method via upload. For that, a new column, “DefaultPaymentMethodName” had been added to the upload vendor file.
* The default payment method set for the vendor will be registered in the respective Item Receipt and Bill and you can use this while making the bill payment.
### **18. Added the ability to view multi-company inventory in Sales Order, Purchase Order and Item Inventory Snapshot modules**
We have introduced a new feature that streamlines the process of tracking inventory across multiple integrated companies.
A new app config, “Show Inventory Info (Multi Company)” has been added for this.
Additionally, a new access level has been added in the Access Manager module under the Admin tab. This helps you to select which user have the multi company access.

This feature is now available within both the Sales Order, Purchase Order and Item Inventory Snapshot modules, allowing you to effortlessly access and assess inventory information from different companies, all within a single instance.
\*\*Note: This option is only applicable for the instances setup as multi-company and connected to each other
* **Sales Order and Purchase Order**
To check the inventory levels for multiple companies on Sales Order and Purchase Order, follow the steps below:
* Navigate to the Item Details section of the order and right-click on the desired Item to access the Inventory Details.
* From the menu that appears, select the “Inventory Info (Multi-Company)” option.

* Upon clicking, a new window named “Qty Detail Multi-Company” will appear. This window displays a detailed breakdown of the available inventory by location for the selected item across all integrated instances.
* **Item Inventory Snapshot**
To check the inventory levels for multiple companies on Sales Order, follow the steps below:
* Navigate to the “Item Inventory Snapshot” module.
* Click on the quantity displayed under any Inventory level.

* In the ensuing “Qty Details” window, a new tab has been introduced labelled “Inventory Info (Multi-Company).”

* Click on this tab to view the “Qty Detail Multi-Company” window. Here, you will find a comprehensive view of the inventory available by Location for the Item across all integrated instances.

---
# Agent Instructions
This documentation is published with GitBook. GitBook is the documentation platform designed so that both humans and AI agents can read, navigate, and reason over technical content effectively. Learn more at gitbook.com.
## Querying This Documentation
If you need additional information that is not directly available in this page, you can query the documentation dynamically by asking a question.
Perform an HTTP GET request on the current page URL with the `ask` query parameter, and the optional `goal` query parameter:
```
GET https://docs.xorosoft.com/whats-new/release-notes/previous-releases/2023/june-2023-release.md?ask=&goal=
```
`ask` is the immediate question: it should be specific, self-contained, and written in natural language.
`goal` is optional and describes the broader end goal you are ultimately trying to accomplish on behalf of the user. GitBook uses it to tailor the answer towards what is most useful for that goal.
The response will contain a direct answer to the question and relevant excerpts and sources from the documentation.
Use this mechanism when the answer is not explicitly present in the current page, you need clarification or additional context, or you want to retrieve related documentation sections.