> For the complete documentation index, see [llms.txt](https://docs.xorosoft.com/llms.txt). Markdown versions of documentation pages are available by appending `.md` to page URLs; this page is available as [Markdown](https://docs.xorosoft.com/whats-new/release-notes/previous-releases/2025/november-2025-release.md).
# November 2025 Release
{% hint style="warning" %}
This is a Custom Release. Feature availability depends on configuration and rollout status. Some features listed above may not be visible in your environment if they are part of a staged or custom deployment. Please contact your support representative to confirm enablement.
{% endhint %}
### **Added Batch Update Functionality For Emails in Customer Centre**
**Overview:**
The **Customer Centre** serves as a centralized hub for managing customer data, enabling users to efficiently maintain and update customer-related information. The Batch Update feature further streamlines this process by allowing bulk updates across multiple customer records.
To enhance communication management and reduce manual effort, three new columns have been introduced in the **Batch Update** options within the Customer Centre:
* **Email CC**
* **Default Billing Email**
* **Default Shipment Updates Email**
These fields can now be updated in bulk for multiple customers through the Batch Update process.
***
**Key Enhancements:**
* **Improved Efficiency:** Enables users to update email-related fields for multiple customers in a single action, reducing repetitive manual updates.
* **Better Communication Management:** Ensures consistent and accurate email configurations across customers for billing and shipment communications.
* **Time Savings:** Eliminates the need to open individual customer records for updating email details.
* **Reduced Errors:** Minimizes the chances of inconsistencies in email data by allowing standardized bulk updates.
***
**How It Works:**
**Step 1:** Navigate to **Menu** → **Sales** → **Customer Section** → **Customer Centre** and select the customer(s) for which you want to perform updates.
**Step 2:** Click on the **Header Level Options** button and select **Batch Update**. A popup will appear displaying batch update options.
**Step 3:** In the **Column Name** dropdown, select one of the newly added fields—**Email CC**, **Default Billing Email**, or **Default Shipment Updates Email**—and enter the required value in the **Value** field.
**Step 4:** Click on **Update**. The changes will be reflected in the corresponding email fields for the selected customer records.
***
### **Enhanced Bill Search Logic in Bill Payment Module**
**Overview:**
The **Bill Payment module** allows users to search and filter unpaid bills based on various criteria, such as due date and discount eligibility. These filters are critical for identifying bills that need immediate payment or qualify for early payment discounts.
The new logic in Bill Search in the Bill payment module uses **"OR"** when searching using both the filters: **"Due on or Before"** and **"Discount Date On Or Before."**
***
**Key Enhancements:**
* **Improved Visibility of Bills:** Users can now view all relevant bills that are either due soon or eligible for discounts, instead of only those meeting both conditions.
* **Better Cash Flow Management:** Enables users to identify and prioritize bills based on due dates or discount opportunities more effectively.
* **Reduced Risk of Missed Discounts:** Bills with valid discount dates are no longer excluded if they don’t meet the due date criteria simultaneously.
* **More Flexible Filtering:** The updated OR logic provides a broader and more practical search result set aligned with real-world payment workflows.
***
### **Addition of "Hazmat Code" Column in Item Centre**
**Overview:**
The **Item Centre** acts as a centralized repository for managing item-related data, offering a wide range of columns to help users analyze inventory, attributes, and compliance-related information. As businesses deal with regulated or hazardous materials, having quick access to safety and compliance data becomes increasingly important.
To support this need, a new column, **“Hazmat Code”**, has been added to the **Item Centre**. This column displays the hazardous material classification code associated with each item, enabling users to easily identify and manage items that fall under hazardous categories.
***
**Key Enhancements:**
* **Improved Compliance Visibility:** Users can quickly identify hazardous items directly from the Item Centre without navigating into individual item records.
* **Enhanced Operational Awareness:** Provides better insight into items requiring special handling, storage, or transportation.
* **Streamlined Decision-Making:** Helps teams make informed decisions related to logistics, shipping restrictions, and regulatory requirements.
* **Reduced Manual Effort:** Eliminates the need to open each item to verify hazmat-related information, improving efficiency.
***
### **Global Search Support Added for Overpayment Reference Numbers**
**Overview:**
The **Invoice Payment** module allows users to process customer payments, including handling overpayment scenarios where excess amounts can be recorded as credits or refunds with a Reference Number for tracking.
With this enhancement, the **Reference Number** entered during overpayment is now searchable via the global search. This improves visibility and makes it easier to quickly locate related payment and credit records across the system.
***
**Key Enhancements:**
* Improves traceability of overpayment transactions through reference numbers.
* Enables faster search and retrieval of payment and credit records.
* Enhances auditability and financial tracking.
* Reduces dependency on manual lookup or navigation across modules.
***
**How It Works:**
**Step 1:** Navigate to **Menu → Sales → Invoice Payment Centre → Invoice Payment**. Select the customer and choose the invoice(s) for which payment is to be made.
**Step 2:** Enter the **Payment Amount** such that it exceeds the **total due amount**, triggering an overpayment scenario.
**Step 3:** An **Over Payment pop-up** appears. Enter the **Reference Number** and Memo, and select the required action (e.g., *Create Credit* or *Issue Refund*).
**Step 4:** Click **OK**, then proceed to **Save & Apply Payment** to complete the transaction. A credit record is generated with the entered Reference Number.
**Step 5:** Use the **Global Search** and enter the same Reference Number. The system will now successfully display the related **Invoice Payment/Credit** record, confirming that the reference is searchable.
***
### **Inventory Snapshot Optimization with “Show In-Transaction Items” Toggle**
**Overview:**
This enhancement addresses performance issues and timeouts experienced in the **Inventory Snapshot (Short Inventory Planner)** view.
To improve load times and system efficiency, optimizations have been introduced along with a new toggle that allows users to control the dataset being displayed. This ensures faster rendering, especially for large inventories.
***
**Enhancement Added:**
A new toggle, **"Show In Transaction Items,"** has been introduced in the **Item Inventory Snapshot** module.
***
**Prerequisite:**
App Config **“Enable Optimized Views”** must be enabled, and **Inventory Snapshot** must be selected as the optimized view.
***
**Functionality:**
**When App Config “Enable Optimized Views” Is Enabled and Inventory Snapshot Is Selected:**
* The system displays the **“Show In-Transaction Items”** toggle in the **Inventory Snapshot** module.
* If the toggle is **ON** (default), only items involved in transactions (SO, PO, TO, Inventory, etc.) are displayed. This reduces data load and helps prevent timeouts.
* If the toggle is **OFF**, all items and store combinations are displayed, including those not involved in any transactions.
***
**When App Config “Enable Optimized Views” Is Disabled:**
* The **“Show In-Transaction Items”** toggle is not available.
* All items and store combinations are displayed in the **Inventory Snapshot** view, which may lead to slower performance or timeouts for large datasets.
***
**How It Works:**
**Step 1:** Navigate to **Menu → App Config → General → Enable Optimized Views**, and select **Inventory Snapshot** as the optimized view from the available options.
**Step 2:** Go to the **Inventory Snapshot** module and locate the **“Show In-Transaction Items”** toggle.
**Step 3:** Use the toggle based on your requirement: turn it **ON** to view only transaction-related items, or turn it **OFF** to view all items.
{% hint style="info" %}
If any option other than **Inventory Snapshot** is selected as the optimized view in the **“Enable Optimized Views”** app config, the system treats the **“Show In-Transaction Items”** toggle as **enabled (TRUE)** by default from the backend, and only transaction-based items are displayed in those views.
{% endhint %}
***
### **Auto Print Sales Orders via Upload/API**
**Overview:**
This enhancement enables automatic printing of Sales Orders when they are created through Upload or API. By leveraging the **Print Service** integration, users can directly send Sales Orders to the **Print Queue** without manual intervention, improving operational efficiency and reducing processing time.
***
**Enhancement Added:**
* Two new fields, **AutoPrintSalesOrder** and **PrintRequesterName**, have been introduced in the Sales Order upload file.
* Sales Orders are automatically added to the **Print Service Queue** based on the provided inputs in the fields in the uploaded file/API.
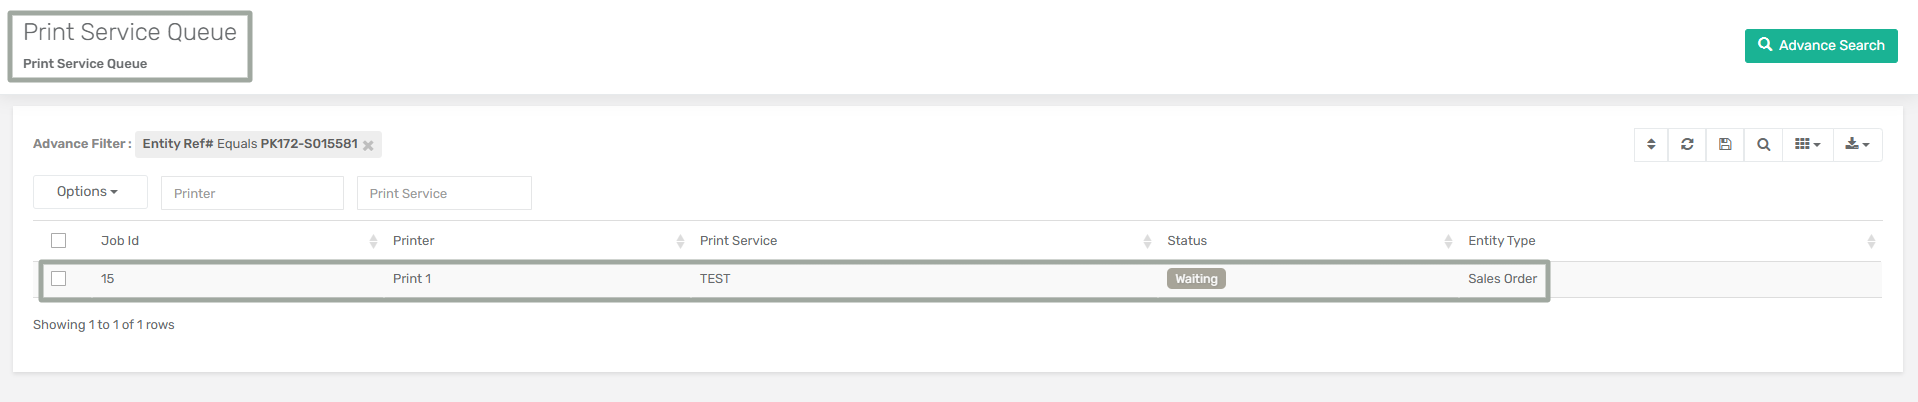
* A new column, **“Is Printed?”** has been added in the **Sales Order Centre**. The **“Is Printed?”** icon is clickable and redirects to the **Print Service Queue** with the **respective Sales Order** filtered using **Entity Ref#**.
***
**Prerequisite:**
App Config **"Enable Xoro Print Service"**, available under **Menu → App Config → System**, must be enabled for this enhancement to work.
***
**Functionality:**
**When App Config is Enabled:**
* If **AutoPrintSalesOrder** is set to **Y/True** and a valid **PrintRequesterName** is provided in the **upload file** or API, the Sales Order is automatically added to the **Print Service Queue**.
* The **“Is Printed?”** column in the Sales Order Centre is updated with a check icon, indicating that the print request has been generated.
* Clicking the **“Is Printed?”** icon redirects you to the **Print Service Queue**, with the respective **SO#** populated as the **Entity Ref No.** in Advanced Search.
* If **AutoPrintSalesOrder** is set to **N/False** or not provided, the Sales Order is created normally and is not added to the Print Queue.
* If **PrintRequesterName** is missing or invalid, the Sales Order is created successfully, but is not added to the Print Queue.
***
**When App Config is Disabled:**
* The Sales Order is created normally via Upload/API.
* No print request is generated, regardless of the **AutoPrintSalesOrder** value, and the **“Is Printed?”** column remains unmarked.
***
**How It Works:**
**Step 1:** Enable the App Config **"Enable Xoro Print Service"** from **Menu → App Config → System**.
**Step 2:** Go to the **Batch Upload Sales Orders** module. Download the Sales Order template and populate the required details, including **AutoPrintSalesOrder = Yes/True** and **PrintRequesterName** with a valid value.
**Step 3:** Upload the updated file. Once the upload is processed, the Sales Order is created in the **Sales Order Centre**.
**Step 4:** Verify the **“Is Printed?”** column in the **Sales Order Centre** for the **respective Sales Order**. A check icon indicates that the print request has been generated.
**Step 5:** Double-click the **“Is Printed?”** (check) icon. The system redirects to the **Print Service Queue**, displaying the respective Sales Order with the **Entity Ref#** pre-populated in Advanced Search.
***
### **Batch Update To Be Shipped Date for Sales Order Lines**
**Overview:**
This enhancement allows users to update the **To Be Shipped Date** at the line-item level in Sales Orders using the Batch Update functionality. It provides greater flexibility by enabling selective updates without modifying the entire Sales Order.
***
**Key Enhancements:**
* Enables **line-level update** of the To Be Shipped Date without affecting other items in the same Sales Order.
* Introduces support for updating the field via **Batch Update**, improving efficiency for bulk operations.
* The field is displayed as **“To Be Ship Date”** in the Sales Order line grid and mapped as **“Line Date To Be Shipped”** in the Batch Update modal.
***
**How It Works:**
**Step 1:** Navigate to **Menu → Sales → Sales Order Centre**. In the **Search By** field, select **Sales Order Detail**, then choose the required Sales Order line items.
**Step 2:** Click on **Batch Update** from the **Options** dropdown.
**Step 3:** In the Batch Update pop-up, select **“Line Date To Be Shipped”** as the Column Name and enter the required date in the Value field.
**Step 4:** Click **Update**. The **To Be Shipped Date** is updated for the selected line items.
***
### **Added Support for Vendor Mapping Fields in Product Upload**
**Overview:**
This enhancement introduces new vendor-related fields in the **Product Upload template**, allowing users to create products along with their associated item-vendor mappings directly during upload. It eliminates the need to manually configure vendor mappings after product creation, streamlining the purchasing setup process.
The system now supports capturing vendor pricing, discounts, part numbers, and lead times at the time of upload, ensuring that items are immediately purchase-ready with accurate vendor details.
***
**Key Enhancements:**
* Added new columns in the **Product Upload template**:
* Vendor List Price
* Vendor Discount
* Vendor Part Number
* Lead Time (days)
* Vendor mapping is automatically created if any of the following vendor-related fields contain values in the upload file: **Vendor List Price, Vendor Discount, Vendor Part Number, or Lead Time (days)**.
* **Default Vendor** is mandatory for mapping creation; vendor-related data will only be processed if a valid Default Vendor is provided in the upload.
* Ensures seamless integration between uploaded items and the **Item Vendor Mapping Centre** without manual intervention.
* Products (and their variants, if applicable) are created upon successful upload of the Product template.
* Uploaded vendor pricing and discount values are reflected directly in purchasing transactions (e.g., Purchase Orders).
***
**How It Works:**
**Step 1:** Navigate to **Menu → Utilities → Data Imports → Upload Products** and download the latest Product Upload template by clicking on **“Download Template.”**
**Step 2:** Populate the template with product details.
**Step 3:** If item-vendor mapping is required, enter values in the vendor-related fields such as **Vendor List Price, Vendor Discount, Vendor Part Number, and Lead Time (days)**. Ensure that a valid **Default Vendor Name** is provided.
**Step 4:** Upload the completed CSV file by clicking **“Upload Products.”**
**Step 5:** Once the upload is processed successfully, the products (and their variants, if applicable) are created in the system.
**Step 6:** If vendor-related fields contain values and a valid **Default Vendor** is provided, the system also automatically creates the item-vendor mapping.
***
### **Added Default Order Type Field at Vendor Level**
**Overview:**
This enhancement introduces a **Default Order Type** field at the vendor level. It allows users to define a default order type for each vendor, which is automatically applied when creating Purchase Orders, reducing manual effort and improving consistency.
***
**Key Enhancements:**
* **Vendor-Level Default Order Type:** A new **Default Order Type** dropdown has been added under the **Other Info** tab in the **Create Vendor page**, allowing users to configure a default value per vendor.
* **Automatic Population in Purchase Orders:** When a vendor is selected while creating a Purchase Order, the system automatically fetches and applies the **configured Default Order Type** to the Order Type field in the header.
* **Consistency Across Transactions:** The selected Order Type flows through subsequent transactions such as **Item Receipts** and **Bills**, maintaining data consistency.
* **Vendor Centre Visibility:** A new **Default Order Type** column has been added to the **Vendor Centre** grid, enabling users to view and track the configured default value for each vendor directly from the listing.
* **Data Export Support:** Order Type is included in the **Data Export Centre**, allowing users to export and reuse this information during data imports.
***
**How It Works:**
**Step 1:** Navigate to **Menu → Purchase → Vendor Section → Vendor Centre**. Double-click on the vendor for whom you want to set the **Default Order Type**.
**Step 2:** Set the **Default Order Type** in the *Other Info* tab for the selected vendor, and update the vendor record.
**Step 3:** Navigate to **Menu → Purchase → Purchase Order → Create Purchase Order**. Fill in the header details and select the required vendor.
**Step 4:** The system automatically populates the **Order Type** field in the Purchase Order header based on the vendor’s Default Order Type.
This value is also carried forward to subsequent transactions such as **Item Receipts and Bills**, ensuring consistency across documents.
***
### **Allow Creating Bank Reconcile Rules During Reconciliation**
**Overview:**
This enhancement updates the existing app configuration to allow users to create **Bank Reconciliation Rules** directly during the reconciliation process. It improves usability by enabling rule creation at the point of transaction entry, reducing manual steps, and improving automation for future matches.
***
**Enhancement Added:**
* The existing app configuration, available under **Menu** → **App Config** → **Accounting**, has been renamed to **“Allow Creating Bank Reconcile Rules During Reconciliation.”**
* Additionally, users can now create Bank Reconciliation Rules **directly from the Journal Entry module**. A new prompt allows users to define rule parameters (such as **Payee**, **Amount**, **Category,** and **Reference**) at the time of saving the Journal Entry.
***
**Functionality:**
**When App Config is Enabled:**
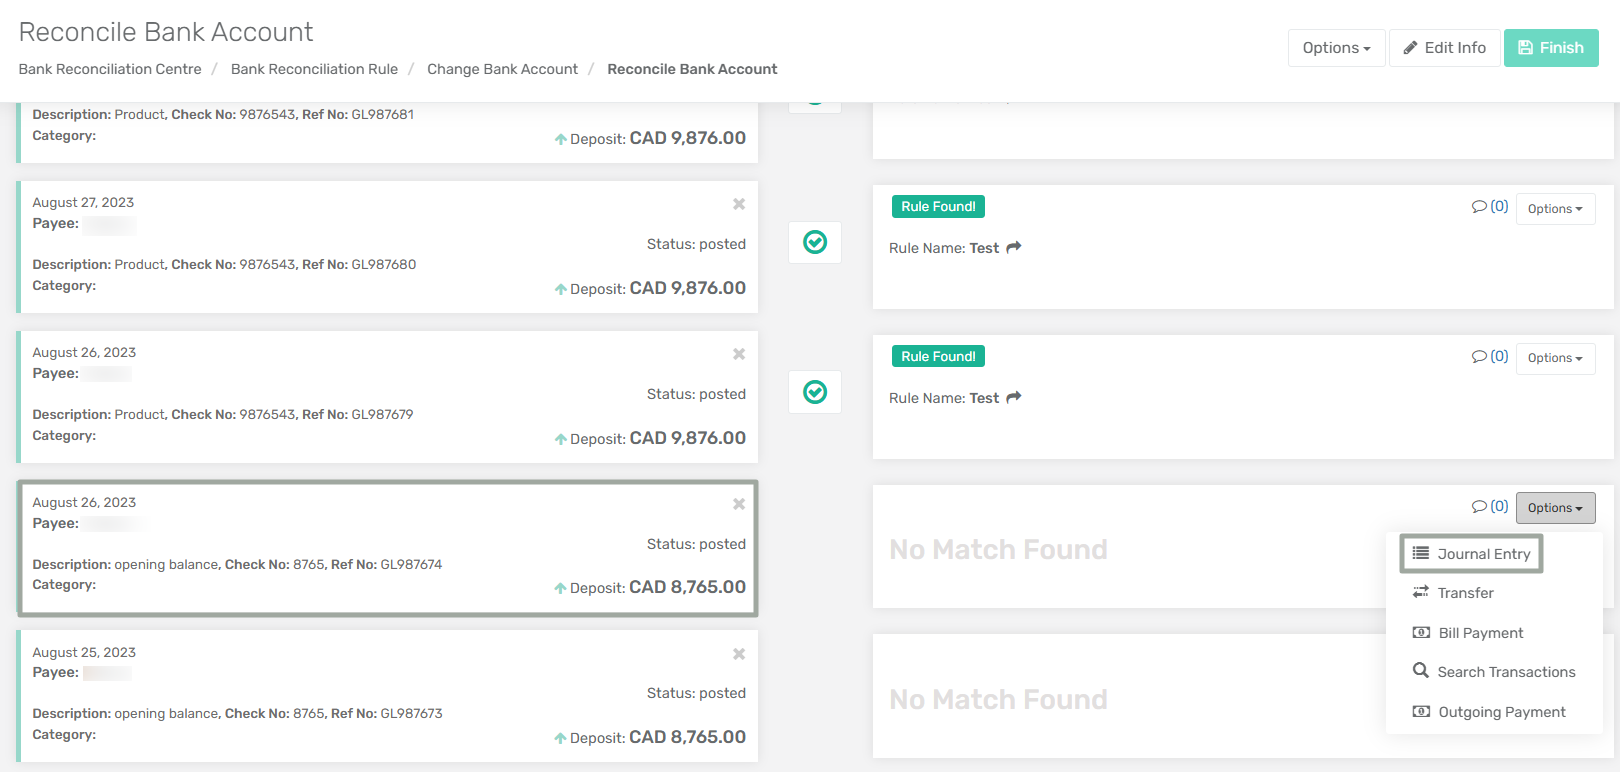
* During Bank Reconciliation, if **no matching rule is found**, users can proceed to create a Journal Entry
* On clicking **Save** in the Journal Entry module, a toggle **“Remember this rule for future?”** is displayed. This pop-up allows users to define rule criteria such as Rule Name, Payee, Amount, Category, and Reference No.
* Once saved, the rule is created and stored. The system automatically detects and applies the rule while reconciling the payments. (shown by **“Rule Found”**)
***
**When App Config is Disabled:**
* No **rule creation pop-up** is shown after saving the **Journal Entry**, and users must manually create reconciliation rules from the **Bank Reconcile Rule Centre**.
***
**How It Works:**
**Step 1:** Navigate to **Menu → App Config → Accounting** and enable app config **“Allow Creating Bank Reconcile Rules During Reconciliation.”**
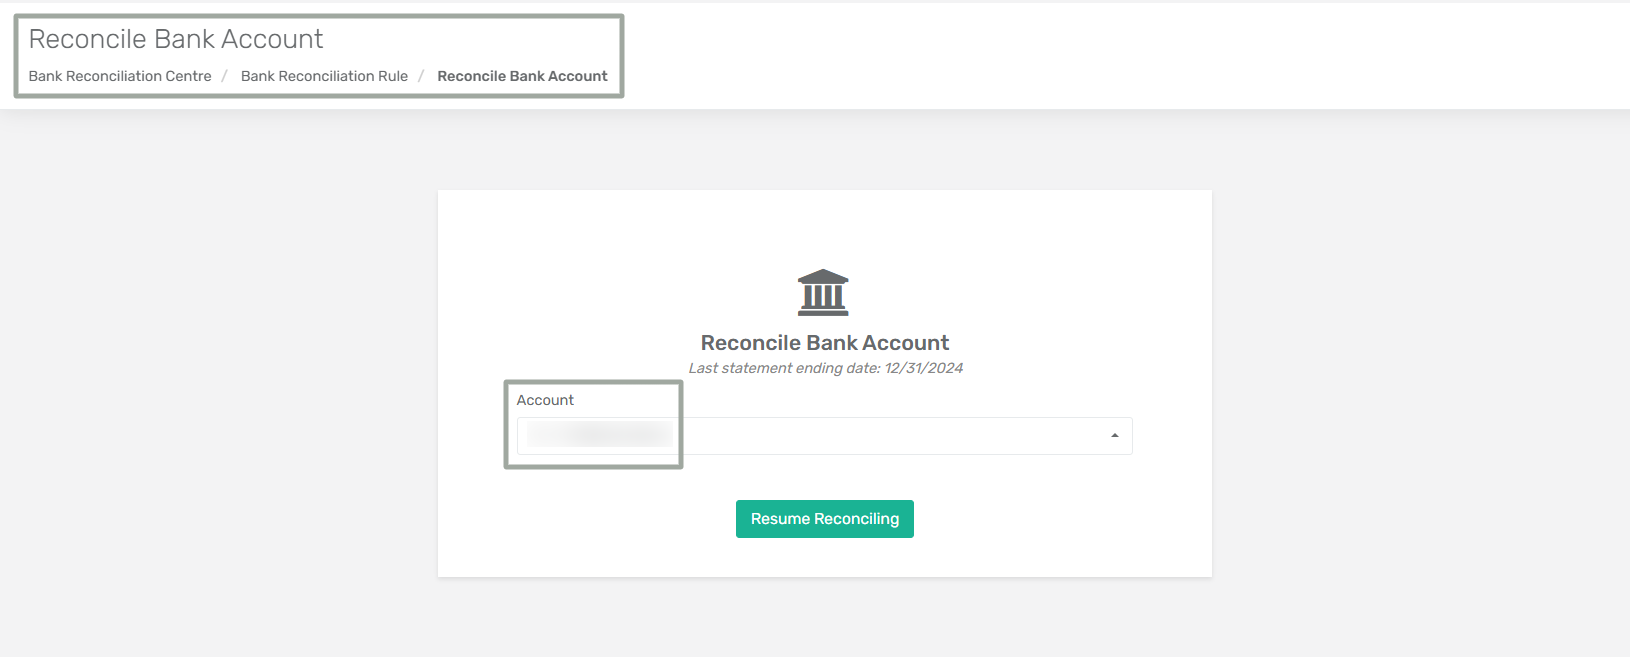
**Step 2:** Go to the **Reconcile Bank Account** module and select the account whose transactions you want to reconcile.
**Step 3:** Create a **Journal Entry** for the selected transaction by clicking on **Create Journal Entry** from the **Options menu**, and balance the journal entry lines.
**Step 4:** Click **Save**. A pop-up appears prompting you to enable/disable the **“Remember this rule for future?”** toggle.
**Step 5:** Enable the toggle to remember the reconciliation rule for future transactions. Enter the rule details, such as **Rule Name** and required parameters (**Payee, Amount, etc**.), then confirm.
**Step 6:** The rule is saved and can be viewed in the **Bank Reconcile Rule Centre**.
**Step 7:** Going forward, whenever transactions match the defined criteria, a **“Rule Found”** indicator is displayed, allowing you to reconcile the transaction accordingly.
***
### **Enable Raw Cost & Overhead % in Item**
**Overview:**
This enhancement introduces a new app configuration that allows users to control the visibility and behavior of **Raw Cost** and **Overhead (%)** fields within the **Item module**. It enhances pricing transparency and flexibility by enabling detailed cost breakdowns and automatic profit calculations across item pricing and multi-currency configurations.
***
**Enhancement Added:**
* A new app configuration, **“Enable Raw Cost fields and Overhead % in Item,”** has been introduced under **Menu → App Config → General**.
* Additionally, the **Recalculate Standard Unit Price** field has been added to the CSV template in the **Upload Products** module.
* The following fields have been added to the **Create Item page** under the **Primary** tab and in the **Multi Currency Pricing section** of the **Advanced Pricing** tab.
* Raw Cost
* Overhead(%)
* Standard Unit Price
* Gross Profit
* Gross Profit Margin (%)
* Markup (%)
These fields are available in **Item Centre**, **Item sub form**, **Upload Items**, **Upload Products**, **Upload Item Prices**, and **Batch Update** in **Item Price Centre.**
***
**Functionality:**
**When App Config Is Enabled:**
* The **Raw Cost** and **Overhead (%)** fields are editable in the **Create Item page** under the **Primary** tab and in the **Multi Currency Pricing** section of the **Advanced Pricing tab**.
**When App Config Is Disabled:**
* **Raw Cost** and **Overhead (%)** fields are visible but non-editable in the Item module. In this state, Raw Cost defaults to **Standard Unit Cost**, and Overhead (%) is set to **0**.
***
**How It Works:**
**Step 1:** Navigate to **Menu → App Config → General** and enable the app config **“Enable Raw Cost fields and Overhead % in Item.”**
**Step 2:** Go to the **Item Centre**, then right-click on the item record and select **“Edit in New Window.”**\
Alternatively, you can go to the **Create Item** page to create a new item.
**Step 3:** In the **Primary** tab, enter the **Raw Cost** and **Overhead (%)** values.
**Step 4:** Navigate to the **Advanced Pricing** tab. In the **Multi Currency Pricing** section, click **Add New** to open the **Add New Currency Price** subform, where you can also enter the **Raw Cost** and **Overhead (%)** fields.
**Step 5:** Save the item. The system will calculate and update the pricing fields across all relevant modules.
**Step 6:** To update the **Raw Cost** or **Overhead (%)** fields for an existing item, go to the **Item Price Centre**, select the required item, click on the **Options** dropdown, and choose **Batch Update**. Then select the column you want to update and apply the changes.
***
### **Enhancement to Fixed Asset Fields and Depreciation Calculation Logic**
**Overview:**
This enhancement introduces additional fields in the **Fixed Asset module** to improve the accuracy and transparency of asset valuation and depreciation tracking. The update separates the **original asset acquisition details** from the **registered asset values used for depreciation calculations**.
These changes provide clearer visibility into asset history, improve depreciation accuracy, and ensure better alignment with accounting practices when registering assets that already have depreciation applied.
***
**Newly Added Fields:**
The following fields have been added to the **Fixed Asset module**:
* **Original Purchase Date:** Stores the original purchase date of the asset.
* **Original Purchase Cost:** Stores the original purchase cost of the asset.
* **Original NBV (Net Book Value):** Represents the current net book value of the asset.
* **Accumulated Depreciation Amount:** Represents the depreciation amount accumulated in the current year up to the asset register date.
***
**Enhancement Added:**
To better reflect the purpose of the fields during asset registration, the following fields have been renamed:
* The **Purchase Date field** has been renamed as **Register Date**
* **Purchase Cost** has been renamed as **Register Purchase Cost**
***
**Calculation Logic Changes:**
* **Register Purchase Cost:** The **Register Purchase Cost** field is now automatically calculated by the system.
* **Formula:** Register Purchase Cost = Original NBV – Accumulated Depreciation Previous Amount
* This field is **read-only** and cannot be manually edited.
***
**Depreciation Calculation Update:**
* All depreciation calculations within the **Fixed Asset module** will now use the **Register Purchase Cost** instead of the original purchase cost.
* This ensures that depreciation calculations reflect the **correct asset value at the time of registration**.
***
**Key Enhancements**
* **Improved Asset Value Tracking**\
The addition of original purchase and depreciation-related fields provides clearer visibility into the asset’s historical acquisition value and its current net book value.
* **Accurate Depreciation Calculations**\
Depreciation is now calculated based on **Register Purchase Cost**, ensuring accurate depreciation when assets are registered after partial depreciation has already occurred.
* **Better Accounting Transparency**\
Separating original purchase values from registered asset values allows businesses to maintain a clear audit trail for asset valuation and depreciation history.
* **Reduced Manual Calculations**\
The system automatically calculates **Register Purchase Cost**, eliminating manual adjustments and reducing the risk of calculation errors.
---
# Agent Instructions
This documentation is published with GitBook. GitBook is the documentation platform designed so that both humans and AI agents can read, navigate, and reason over technical content effectively. Learn more at gitbook.com.
## Querying This Documentation
If you need additional information that is not directly available in this page, you can query the documentation dynamically by asking a question.
Perform an HTTP GET request on the current page URL with the `ask` query parameter, and the optional `goal` query parameter:
```
GET https://docs.xorosoft.com/whats-new/release-notes/previous-releases/2025/november-2025-release.md?ask=&goal=
```
`ask` is the immediate question: it should be specific, self-contained, and written in natural language.
`goal` is optional and describes the broader end goal you are ultimately trying to accomplish on behalf of the user. GitBook uses it to tailor the answer towards what is most useful for that goal.
The response will contain a direct answer to the question and relevant excerpts and sources from the documentation.
Use this mechanism when the answer is not explicitly present in the current page, you need clarification or additional context, or you want to retrieve related documentation sections.