# September 2021 Release
### **1. Wave Centre Enhancements: Added new Columns**
New Columns have been added to the Wave Centre.
In the Wave Centre module, the following new columns have been introduced:
* Customer PO number,
* Date To Be Shipped,
* Date To Be Cancelled, and
* Total Wave Amount
* The Column can be added from the Nine Dots dropdown.
The Total Wave Amount column shows the sum of Amounts of all the Wave lines altogether.
### **Enhancement: Update the “Reason Code” on Credit Memo through ASN Receipt Upload**
*The* *Reason Code on the Warehouse Type Credit Memo/Invoice Credit Memo can be updated through the Upload ASN Receipt file*.
**How does it work?**
* Create a Warehouse Type Invoice Credit Memo or a Credit Memo.
* After saving the ASN can be generated.
* Now, the “R” Code on the Credit Memo can be updated while receiving the ASN through the “*Upload ASN Receipt*” file.
* A ***column “Reason Code” is added*** in which the new R Code can be filled.
 * The upload will Receive/Close the ASN and the R Code will get updated on the Credit/Invoice Credit Memo.
 ### **3. Sales Order Centre: Added Columns to access the Return information**
The Sales Order Centre has been improved by adding columns to view and directly access the linked invoice credit memo(s).
The following columns are added to the SO Centre
* ***SO: Invoice Credit Memo#***
* ***SO Detail: Quantity Returned***
**How does it work?**
* Create Sales Order -> Create Invoice -> Create Invoice Credit Memo.
* In the SO Centre add the new column “***Invoice Credit Memo#***” from the nine dots option.
* The column will display the quick link to the ICM, and the Status of the ICM.
* The column will show all the linked ICMs to the particular SO
In the SO Detail view under the SO Centre, added column “***Quantity Returned***“.
This column shows the total **Qty Returned** on the SO.
### **3. Sales Order Centre: Added Columns to access the Return information**
The Sales Order Centre has been improved by adding columns to view and directly access the linked invoice credit memo(s).
The following columns are added to the SO Centre
* ***SO: Invoice Credit Memo#***
* ***SO Detail: Quantity Returned***
**How does it work?**
* Create Sales Order -> Create Invoice -> Create Invoice Credit Memo.
* In the SO Centre add the new column “***Invoice Credit Memo#***” from the nine dots option.
* The column will display the quick link to the ICM, and the Status of the ICM.
* The column will show all the linked ICMs to the particular SO
In the SO Detail view under the SO Centre, added column “***Quantity Returned***“.
This column shows the total **Qty Returned** on the SO.
 ### **4. Manufacturing Order Enhancements: Duplicate MO, create SO to MO for selected Items, change Qty on an MO**
**Update 1. Ability to Duplicate MO**
**How does it work?**
* Create a Manufacturing Order.
* Under the Options dropdown, there is an option to “Create Duplicate”.
* This will duplicate the MO.
* If the current MO is associated with a Batch MO, the duplicate MO will be in the Open state and will not be related to any Batch MO.
**Update 2: Create SO to MO for selected Items**
* Navigate to the SO Centre, open any existing SO, and from the Options dropdown, under the Copy option, select Create Manufacturing Order.
* The new option ‘***Selected Items’** has been* introduced in SO. MO can be created here like other options.
### **4. Manufacturing Order Enhancements: Duplicate MO, create SO to MO for selected Items, change Qty on an MO**
**Update 1. Ability to Duplicate MO**
**How does it work?**
* Create a Manufacturing Order.
* Under the Options dropdown, there is an option to “Create Duplicate”.
* This will duplicate the MO.
* If the current MO is associated with a Batch MO, the duplicate MO will be in the Open state and will not be related to any Batch MO.
**Update 2: Create SO to MO for selected Items**
* Navigate to the SO Centre, open any existing SO, and from the Options dropdown, under the Copy option, select Create Manufacturing Order.
* The new option ‘***Selected Items’** has been* introduced in SO. MO can be created here like other options.
 * Also, the Item’s description will be copied into the MO Memo field after the new MO is created.
**Update 3: Change the Qty on an MO**
The Qty on an MO can now be increased/decreased while the MO is in Open/Release status.
* Also, the Item’s description will be copied into the MO Memo field after the new MO is created.
**Update 3: Change the Qty on an MO**
The Qty on an MO can now be increased/decreased while the MO is in Open/Release status.
 ####
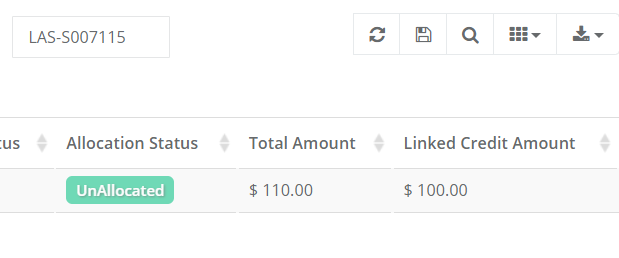
### **5. Sales Order Module: Added Link Credit Memo option and Sales Order directly from their modules**
Enhancement has been made to the Sales Order and the Credit Memo modules to create a direct link between the two.
**Linking from the Sales Order module:**
**How does it work?**
* Create a Sales Order. Save it and go to “Link Credit Memo” in the Options dropdown.
* It will open a “Credit Memo Linking” Subform.
* In the “Credit Memo Linking” Sub form the Sales Order dropdown will be auto-filled with the Sales Order number.
* In the Credit Memo dropdown, only the Credit Memo numbers with the same Customer and Store selected in the Sales Order will be retrieved.
* Once the Credit Memo# is filled, other details like the Customer Name, Ref#, Linked Sales Order(Linked amount), and total amount will get auto-filled.
* Hit “Link” and the link will be saved.
####
### **5. Sales Order Module: Added Link Credit Memo option and Sales Order directly from their modules**
Enhancement has been made to the Sales Order and the Credit Memo modules to create a direct link between the two.
**Linking from the Sales Order module:**
**How does it work?**
* Create a Sales Order. Save it and go to “Link Credit Memo” in the Options dropdown.
* It will open a “Credit Memo Linking” Subform.
* In the “Credit Memo Linking” Sub form the Sales Order dropdown will be auto-filled with the Sales Order number.
* In the Credit Memo dropdown, only the Credit Memo numbers with the same Customer and Store selected in the Sales Order will be retrieved.
* Once the Credit Memo# is filled, other details like the Customer Name, Ref#, Linked Sales Order(Linked amount), and total amount will get auto-filled.
* Hit “Link” and the link will be saved.
 * Only the amount equal to or less than the sales order total amount can be linked.
* Link the Credit Memo to Sales Order and save the SO to save the mapping.
* The linked Credit memo can be seen under the “Credits/Deposits” tab of the SO.
* This tab will show the linked Credit Memo and linked Customer Deposits with that Sales Order.
* Only the amount equal to or less than the sales order total amount can be linked.
* Link the Credit Memo to Sales Order and save the SO to save the mapping.
* The linked Credit memo can be seen under the “Credits/Deposits” tab of the SO.
* This tab will show the linked Credit Memo and linked Customer Deposits with that Sales Order.
 * After the Sales Order is Shipped, **the credit amount linked with the Sales Order will be automatically applied to the Invoice.**
* Added a new column “***Linked Credit Memo Amount***” in the Sales Order Centre. The Total Linked Amount will be fetched in this column.
* After the Sales Order is Shipped, **the credit amount linked with the Sales Order will be automatically applied to the Invoice.**
* Added a new column “***Linked Credit Memo Amount***” in the Sales Order Centre. The Total Linked Amount will be fetched in this column.
 **Linking from the Credit Memo module:**
The process of Linking Credit memo with SO on the Credit Memo module works in the same way as explained above.
* Navigate to the Credit Memo module and save the Credit Memo.
* Now go to Link Sales Order in the Options tab.
* The linking Subform will open and the Credit Memo number will be auto-filled and the drop-down will be disabled.
* In sales order drop down the sales order number of the selected customer and the store will come.
* On change of sales order the data Customer name, Ref no, Total amount, and Linked credit memo (Linked amount) will be shown.
**Linking from the Credit Memo module:**
The process of Linking Credit memo with SO on the Credit Memo module works in the same way as explained above.
* Navigate to the Credit Memo module and save the Credit Memo.
* Now go to Link Sales Order in the Options tab.
* The linking Subform will open and the Credit Memo number will be auto-filled and the drop-down will be disabled.
* In sales order drop down the sales order number of the selected customer and the store will come.
* On change of sales order the data Customer name, Ref no, Total amount, and Linked credit memo (Linked amount) will be shown.

 ### **6. Ability to search items using multiple keywords**
We have improved the Item searching options in various modules.
A new feature is added to search Item numbers using multiple keywords in the Item Number dropdowns in the modules where the Item search is used.
An App Config **“*****Advanced Item Search*****”** has been added **under the General tab.**
***If this setting is turned ON, the Item dropdown in various modules can search the Item by providing multiple keywords in an arbitrary sequence separated by a ‘space’.***
### **6. Ability to search items using multiple keywords**
We have improved the Item searching options in various modules.
A new feature is added to search Item numbers using multiple keywords in the Item Number dropdowns in the modules where the Item search is used.
An App Config **“*****Advanced Item Search*****”** has been added **under the General tab.**
***If this setting is turned ON, the Item dropdown in various modules can search the Item by providing multiple keywords in an arbitrary sequence separated by a ‘space’.***
For example, **the Item Number name is “Test\_Item\_Red”** if the user **searches “Test Item” or “Test Item Red** then if the App **Config is OFF, the user will not be able to search** Item number with these parameters.
If the App **config is ON, the User will be able to find** Item numbers with these parameters in the dropdown.
***\*\*Note:** This feature can make the Item search slower if the number of items in the Item Centre is greater than 500.*
**How does it work?**
* Navigate to the App Config Module and under the General Settings, turn on the setting “*Advanced Item Search*“.
 * Now, navigate to any module where the Item search has to be applied.
* Let’s say we create a Sales Order. While selecting the Item Number from the dropdown, just write the initials of the Item number (separated by space, if using multiple words).
* The complete Item number will appear in the dropdown list.
* See the screenshots below.
If the App Config is turned OFF, the old functionality will work and the dropdown will not show all the items containing the keyword mentioned in the search.
* Now, navigate to any module where the Item search has to be applied.
* Let’s say we create a Sales Order. While selecting the Item Number from the dropdown, just write the initials of the Item number (separated by space, if using multiple words).
* The complete Item number will appear in the dropdown list.
* See the screenshots below.
If the App Config is turned OFF, the old functionality will work and the dropdown will not show all the items containing the keyword mentioned in the search.
 ### **7. Job scheduler: Ability to generate/split multiple export files (CSV)**
Introduced a feature to split the Data Export Files, based upon the Identifiers when scheduling a Job.
An Identifier is a key value of the data belonging to a particular module. Following are few a examples of Xoro modules with their Identifiers.
* Wave Detail: **Order Number**
* ASN Detail: **PO Number**
* SO Detail: **Third-Party Ref No**
* PO Detail: **Third-Party Ref No**
* Item Product Header: **Base Part Number**
**How does it work?**
* Navigate to the Data Export Center module.
* Select the file to be exported; here we take the example of exporting the Wave detail.
* Selected **6 Waves, out of which 2 have the same SO#**, (Please Note: **SO# is the Identifier of the Wave Detail** data).
* Now, schedule Export from the options.
* Fill in the required details.
* A checkbox has been added in the Job Scheduler, “***Split Files By Identifier***“.
**Please Note: This check box will only show in the case of exports.**
* If this checkbox is set to true, the file will be divided/split into multiple files based on the Identifier (SO# in this case).
* In the above example out of 6 Waves, 2 Waves belong to the same SO.
* Thus the total number of files exported will be 5.
### **7. Job scheduler: Ability to generate/split multiple export files (CSV)**
Introduced a feature to split the Data Export Files, based upon the Identifiers when scheduling a Job.
An Identifier is a key value of the data belonging to a particular module. Following are few a examples of Xoro modules with their Identifiers.
* Wave Detail: **Order Number**
* ASN Detail: **PO Number**
* SO Detail: **Third-Party Ref No**
* PO Detail: **Third-Party Ref No**
* Item Product Header: **Base Part Number**
**How does it work?**
* Navigate to the Data Export Center module.
* Select the file to be exported; here we take the example of exporting the Wave detail.
* Selected **6 Waves, out of which 2 have the same SO#**, (Please Note: **SO# is the Identifier of the Wave Detail** data).
* Now, schedule Export from the options.
* Fill in the required details.
* A checkbox has been added in the Job Scheduler, “***Split Files By Identifier***“.
**Please Note: This check box will only show in the case of exports.**
* If this checkbox is set to true, the file will be divided/split into multiple files based on the Identifier (SO# in this case).
* In the above example out of 6 Waves, 2 Waves belong to the same SO.
* Thus the total number of files exported will be 5.
 * The multiple files exported will be based upon the identifier on the FTP path and also for Emails.
### **8. Job scheduler: Ability the filter out CSV import files within a folder based on the file name pattern**
We have added an ability to import files with the specified filenames or a pattern for scheduled jobs in FTP integrations. This way the system will only fetch the targeted CSV files in the FTP folder matching the pattern specified in the job
**How does it work?**
* Navigate to any Batch upload module, for example, “Batch Upload Sales Order”.
* Schedule an Import.
* A new textbox called “***File Expression***” has been added to the Import job type.
* You can provide the file name pattern if required with the help of \* character. For example: abc\*.csv will pick the files starting from ABC and have an extension .csv.
* Fill in the details for the job scheduler.
* Enter the keywords specifying the name of the file to be imported in the File Expression box.
* For example, the name of the file to be imported is *SalesOrderImportTemplate(15).csv*
* If the user enters the expression: *Sal\*tem\*15\*.csv*, then only the file with the name starting with “*sal*“, ending with .*csv*, and that contains “*tem*” will be imported.
### **9. Batch Upload Modules: Implemented Item Identifier Codes**
The Item Identifier Code support has been provided in various Uploads modules in Xoro.
The Item identifier code column ***specifies, how the Item number field value of the file will be used to match the Item in the system.***
Below are the **valid identifier codes** to be used in the Batch upload modules:
**0** will represent Not Applicable.\
**1** will represent Item Number.\
**2** will represent Item UPC.\
**3** will represent Item Barcode.\
**4** will represent Alternate item number 1.\
**5** will represent Alternate item number 2.\
**6** will represent Alternate item number 3.
Item identifier support was previously provided in only the Upload Inventory module, now this feature is provided for the following uploads:
* Upload Wave (Ship confirmation file)
* Upload ASN receipt
* Upload Sales order
* Upload Purchase order
* Upload Create wave
* Upload Create ASN
* Inventory movement
**How does it work?**
* Navigate to, for example, the “Batch Upload Inventory movement” module.
* Scroll down and find Step# 6: “**Select Item Identifier Code”.**
* The multiple files exported will be based upon the identifier on the FTP path and also for Emails.
### **8. Job scheduler: Ability the filter out CSV import files within a folder based on the file name pattern**
We have added an ability to import files with the specified filenames or a pattern for scheduled jobs in FTP integrations. This way the system will only fetch the targeted CSV files in the FTP folder matching the pattern specified in the job
**How does it work?**
* Navigate to any Batch upload module, for example, “Batch Upload Sales Order”.
* Schedule an Import.
* A new textbox called “***File Expression***” has been added to the Import job type.
* You can provide the file name pattern if required with the help of \* character. For example: abc\*.csv will pick the files starting from ABC and have an extension .csv.
* Fill in the details for the job scheduler.
* Enter the keywords specifying the name of the file to be imported in the File Expression box.
* For example, the name of the file to be imported is *SalesOrderImportTemplate(15).csv*
* If the user enters the expression: *Sal\*tem\*15\*.csv*, then only the file with the name starting with “*sal*“, ending with .*csv*, and that contains “*tem*” will be imported.
### **9. Batch Upload Modules: Implemented Item Identifier Codes**
The Item Identifier Code support has been provided in various Uploads modules in Xoro.
The Item identifier code column ***specifies, how the Item number field value of the file will be used to match the Item in the system.***
Below are the **valid identifier codes** to be used in the Batch upload modules:
**0** will represent Not Applicable.\
**1** will represent Item Number.\
**2** will represent Item UPC.\
**3** will represent Item Barcode.\
**4** will represent Alternate item number 1.\
**5** will represent Alternate item number 2.\
**6** will represent Alternate item number 3.
Item identifier support was previously provided in only the Upload Inventory module, now this feature is provided for the following uploads:
* Upload Wave (Ship confirmation file)
* Upload ASN receipt
* Upload Sales order
* Upload Purchase order
* Upload Create wave
* Upload Create ASN
* Inventory movement
**How does it work?**
* Navigate to, for example, the “Batch Upload Inventory movement” module.
* Scroll down and find Step# 6: “**Select Item Identifier Code”.**
 * Click on the drop-down in front.
* Select what information you want to upload regarding the Item: Item Number, Item UPC, Item Bar Code, Alternate Item number, etc.
* If the Code value is empty in the Upload file, it will take the dropdown value else the File value will get uploaded.
* If both the Upload file and the dropdown values are not specified, the system will by default pick up “Item Number”.
* The system will give an error in upload if the “Item Number” column entry doesn’t match the valid “Item Identifier Code” value.
* Also if any other value other than 1-6 is provided in the upload file, an error will be received while uploading the Inventory.
***Please Note: The ItemUPC column has been removed from Upload Wave, and Upload ASN with the replacement of “Item Identifier Code”. Also, the related App Configs have been removed.***
### **10. Various Email Template Enhancements**
We have added the ability to set **Default Document Templates** where the Default **PDF Template**, **Email body,** and the **Send From Email** can be defined on the application or **customer/vendor** level.
With this, You will now have the ability to create multiple “Send from” email configurations to be used for different types of actions. For example, a different company email address can be used for **sending Invoices** vs **sending ship confirmation** emails and so on.
This new feature is currently available for the following templates
Customer
* Invoice
* Packing Slip
* Sales Order
* Estimate
* Credit Memo
* RMA
Vendor
* Purchase Order
* Item Receipt
* Bill
**What’s New?**
**1. Added the “*****Add Template*****” button on the “Email Template”**.
* Enter the template name and then save it.
* This will automatically get selected in the template dropdown and can modify the email sending template accordingly.
* Also provided the button to delete the email template.
The added Email Template will be available in the “Email Template Body” dropdown in the “Default Document Templates” module.
**Please Note:**
1. Only Admin can delete the ‘Application-level template.
2. The user-level template can only be seen by the User who created the template.
3. Roles other than Admin can only delete their User level template.
4. Application-level templates can only be created by the Admin.
5. Select template dropdown will be filtered according to User-level and Application-level templates.
**2. Added, “*****Add Template*****” on the “Company Email Configuration setup” module.**
* Multiple Company emails can be set up using the template names.
* **Added the “*****Set default template*****” button which will make the selected template the default template.**
* Added the “Delete” button which will delete the selected template.
**3.** Added the “***Select Email Template***” option on “**Add to email queue**” in the Centres. Here the email sending template can be selected.
* Click on the drop-down in front.
* Select what information you want to upload regarding the Item: Item Number, Item UPC, Item Bar Code, Alternate Item number, etc.
* If the Code value is empty in the Upload file, it will take the dropdown value else the File value will get uploaded.
* If both the Upload file and the dropdown values are not specified, the system will by default pick up “Item Number”.
* The system will give an error in upload if the “Item Number” column entry doesn’t match the valid “Item Identifier Code” value.
* Also if any other value other than 1-6 is provided in the upload file, an error will be received while uploading the Inventory.
***Please Note: The ItemUPC column has been removed from Upload Wave, and Upload ASN with the replacement of “Item Identifier Code”. Also, the related App Configs have been removed.***
### **10. Various Email Template Enhancements**
We have added the ability to set **Default Document Templates** where the Default **PDF Template**, **Email body,** and the **Send From Email** can be defined on the application or **customer/vendor** level.
With this, You will now have the ability to create multiple “Send from” email configurations to be used for different types of actions. For example, a different company email address can be used for **sending Invoices** vs **sending ship confirmation** emails and so on.
This new feature is currently available for the following templates
Customer
* Invoice
* Packing Slip
* Sales Order
* Estimate
* Credit Memo
* RMA
Vendor
* Purchase Order
* Item Receipt
* Bill
**What’s New?**
**1. Added the “*****Add Template*****” button on the “Email Template”**.
* Enter the template name and then save it.
* This will automatically get selected in the template dropdown and can modify the email sending template accordingly.
* Also provided the button to delete the email template.
The added Email Template will be available in the “Email Template Body” dropdown in the “Default Document Templates” module.
**Please Note:**
1. Only Admin can delete the ‘Application-level template.
2. The user-level template can only be seen by the User who created the template.
3. Roles other than Admin can only delete their User level template.
4. Application-level templates can only be created by the Admin.
5. Select template dropdown will be filtered according to User-level and Application-level templates.
**2. Added, “*****Add Template*****” on the “Company Email Configuration setup” module.**
* Multiple Company emails can be set up using the template names.
* **Added the “*****Set default template*****” button which will make the selected template the default template.**
* Added the “Delete” button which will delete the selected template.
**3.** Added the “***Select Email Template***” option on “**Add to email queue**” in the Centres. Here the email sending template can be selected.
 The priority sequence in which the templates will be picked is as below:
1. Customer
2. Default Document template
3. Document Template Centre
**4. Added the “*****Email Template*****” tab in the Customer/Vendor module.** Here you can define the following:
1. Document (PDF) that will be attached to the email,
2. The Email Template(Email Template Body) is to be used, and
3. The “Send From” Email (Company/user).
When emailing, the template (PDF, Email Body & Send from E-mail) that was provided to the Customer will take precedence.
* Similarly for the Vendor, the information can be defined.
**5. Created a new module *****Upload Email Template*****.**
Use this module to Batch upload the Default Document type, PDF Template, Email Template Dody, and Send from Email to the Customers or Vendors.
**The Priority flow: Sequence of usage of the PDF, Template Body, and the “Send From Email” in different cases.**
**Eg;** Sale Order Centre **(Add to Email Queue)**
* **PDF**
| **Document Template Centre (A)** | **Default Document Template (B)** | **Customer/Vendor (C)** | ***The Priority flow:*** |
| -------------------------------- | --------------------------------- | ----------------------- | ------------------------ |
| Defined | Defined | Defined | C->B->A |
| Defined | Defined | Not Defined | B->A |
| Defined | Not Defined | Not Defined | A |
* **Email Body**
| **Application Level template (Default) (A)** | **User Level Template (Default) (B)** | **Default Document Template (C)** | **Customer/Vendor (D)** | ***The Priority flow:*** |
| -------------------------------------------- | ------------------------------------- | --------------------------------- | ----------------------- | ------------------------ |
| Defined | Defined | Defined | Defined | D->C->B->A |
| Defined | Defined | Defined | Not Defined | C->B->A |
| Defined | Defined | Not Defined | Not Defined | B->A |
| Defined | Not Defined | Not Defined | Not Defined | A |
* **“Send From Email”**
The priority sequence in which the templates will be picked is as below:
1. Customer
2. Default Document template
3. Document Template Centre
**4. Added the “*****Email Template*****” tab in the Customer/Vendor module.** Here you can define the following:
1. Document (PDF) that will be attached to the email,
2. The Email Template(Email Template Body) is to be used, and
3. The “Send From” Email (Company/user).
When emailing, the template (PDF, Email Body & Send from E-mail) that was provided to the Customer will take precedence.
* Similarly for the Vendor, the information can be defined.
**5. Created a new module *****Upload Email Template*****.**
Use this module to Batch upload the Default Document type, PDF Template, Email Template Dody, and Send from Email to the Customers or Vendors.
**The Priority flow: Sequence of usage of the PDF, Template Body, and the “Send From Email” in different cases.**
**Eg;** Sale Order Centre **(Add to Email Queue)**
* **PDF**
| **Document Template Centre (A)** | **Default Document Template (B)** | **Customer/Vendor (C)** | ***The Priority flow:*** |
| -------------------------------- | --------------------------------- | ----------------------- | ------------------------ |
| Defined | Defined | Defined | C->B->A |
| Defined | Defined | Not Defined | B->A |
| Defined | Not Defined | Not Defined | A |
* **Email Body**
| **Application Level template (Default) (A)** | **User Level Template (Default) (B)** | **Default Document Template (C)** | **Customer/Vendor (D)** | ***The Priority flow:*** |
| -------------------------------------------- | ------------------------------------- | --------------------------------- | ----------------------- | ------------------------ |
| Defined | Defined | Defined | Defined | D->C->B->A |
| Defined | Defined | Defined | Not Defined | C->B->A |
| Defined | Defined | Not Defined | Not Defined | B->A |
| Defined | Not Defined | Not Defined | Not Defined | A |
* **“Send From Email”**
| **Default Send From Email (Implicit, Not defined anywhere) (A)** | **Default Document Template (B)** | **Customer/Vendor (C)** | ***The Priority flow:*** |
| ---------------------------------------------------------------- | --------------------------------- | ----------------------- | ------------------------ |
| Defined | Defined | Defined | C->B->A |
| Defined | Defined | Not Defined | B->A |
| Defined | Not Defined | Not Defined | A |
### **11. Pricing rule module: Ability to show Pricing Rules as Discount**
The Pricing Rule module has implemented an option to show/use a rule as a discount. A check box in the Pricing Rule module allows users to display the rule as a discount.
The rule will be implemented in the following modules.
* Estimate
* Sales Order
* Invoice
* Sales receipt
**How does it work?**
* Navigate to the Pricing Rule module.
* Create a Pricing Rule with **Percentage Price Adj type** and check the “***Show as Discount***” checkbox.
* The “Show as Discount” column has been added to the Pricing Rule Centre.
* When an Item is added while creating an SO, the **Discount** column will show how much percentage discount is applied and EUP will show the discounted price.
* Discounts can be applied to Orders as necessary according to the different Pricing Rules.
* The “**Show As Discounted Flag**” column has been added to the “Pricing Rule Import Template”.
### **12. Option to Disable Auto-filling of the Item-Qty in the Modules**
When entering the Item information in the modules like SO, PO, etc., this feature will allow you to disable the auto-population of the Item Quantity.
* An App Config setting **“*****Disable Default Quantity of Item on Add Item in Sales Order*****“** has been added under the Sales tab.
 * When enabled, it will blank the Quantity field while adding an Item to the Sales Order.
* This means that if this config is true, the “Quantity” input box of the “Item Detail” popup will be blank and the User has to enter the Qty manually.
* When enabled, it will blank the Quantity field while adding an Item to the Sales Order.
* This means that if this config is true, the “Quantity” input box of the “Item Detail” popup will be blank and the User has to enter the Qty manually.
 ### **13. Sales Order: Added column “Qty Remaining to Allocate”**
The Sales Order module now includes the “***Qty Remaining to Allocate***” column.
* This column **shows how much quantity is left to be Allocated.**
* Add this column from the nine dots option.
* The Qty remaining to Allocate column is also available on the **SO subview form.**
### **13. Sales Order: Added column “Qty Remaining to Allocate”**
The Sales Order module now includes the “***Qty Remaining to Allocate***” column.
* This column **shows how much quantity is left to be Allocated.**
* Add this column from the nine dots option.
* The Qty remaining to Allocate column is also available on the **SO subview form.**
 ####
### **14. Upload Wave Enhancements: Introduced BOL number, Master BOL number, Master Tracking Number**
Added BOL number, Master BOL number, Master Tracking Number, and new fields are included in the Waves Upload file. Also, included the ability to add Per Carton Cost for Freight and Carrier to the Shipment.
* The Shipment Info of an Order now includes three new fields:
1. BOL Number(Bill of Landing#)
2. Master Tracking Number
3. Master BOL Number
* Fields added in the Upload Wave Template:
1. BOL Number(Bill of Landing#)
2. Master Tracking Number
3. Master BOL Number
4. Carton Number
5. Serial Shipping Container Codes (SSCC) is used to identify shipments/cartons/logistics units as they travel through the supply chain.
6. Also, now the Per Carton Cost for Freight and Carrier can be calculated and added to the Shipment.
**How does it work?**
* Added BOL Number(Bill of Landing#), Master Tracking Number, Master BOL Number, SSCC, Carton Number fields in the **Upload Wave file.**
* Added BOL Number, Master Tracking Number, Master BOL Number columns in the **Invoice module, Invoice subform, Sales Receipt, and Sales Receipt** **subform.**
* Under the Shipping Tab of the Invoice.
* **Invoice Centre**
* **Invoice subform**
* Added BOL Number, Master Tracking Number, and Master BOL Number columns in the **Carton info tab of the Invoice Subform.**
* Added BOL Number, Master Tracking Number, Master BOL Number fields in **edit carton to create and update shipment.**
* When a Wave is uploaded with these values, it will auto-fill the Invoice, Invoice subform, and Carton info values.
* ***If uploaded Waves have different values than these fields then values of these fields will be entered separated by pipe operator “|”.***
**Calculating Shipping in case of multiple Cartons used in the Shipment when Ship API or File Upload is used.**
**Works with the App Config: *****Override Invoice Shipping with API Freight Amount.***
This Config Use the freight provided in API call during Ship API or File Upload.
**How does it work?**
**Let’s take an example of an SO with the Shipping Charges=100**
#### **The App Config: Override Invoice Shipping with API Freight Amount. = OFF**
**Case 1:**
* **SO with the Shipping Charges=100**
* **Freight add Carrier Cost = *****Available,***
* **Per Carton Cost = *****Not Available***
| **Item Number** | **Freight** | **CarrierCost** | **FreightPerCarton** | **CarrierCostPerCarton** |
| --------------- | ----------- | --------------- | -------------------- | ------------------------ |
| A | 10 | 151 | – | – |
| B | 20 | 152 | – | – |
| C | 30 | 153 | – | – |
| D | 40 | 154 | – | – |
**The result of the Invoice:**
* Shipping Cost (Shipment Info) = 100
* Carrier Cost (Shipment Info) = 151; Picks only First line
* Available Shipping = 100 (Picks the SO shipping cost as per App config)
* Charge to Customer = 100
* Shipping Cost in the Invoice shipping tab = 100
**Case 2:**
* **SO with the Shipping Charges=100**
* **Freight add Carrier Cost = *****Not*** ***Available,***
* **Per Carton Cost = *****Available***
| **Item Number** | **Freight** | **CarrierCost** | **FreightPerCarton** | **CarrierCostPerCarton** |
| --------------- | ----------- | --------------- | -------------------- | ------------------------ |
| A | – | – | 10 | 151 |
| B | – | – | 20 | 152 |
| C | – | – | 30 | 153 |
| D | – | – | 40 | 154 |
**Result:**
* Shipping Cost (Shipment Info) = 100
* Carrier Cost (Shipment Info) = 610; Sum-up of all lines
* Available Shipping = 100 (Picks the SO shipping cost as per App config)
* Charge to Customer = 100
* Shipping Cost in the Invoice shipping tab = 100
**Case 3:**
* **SO with the Shipping Charges=100**
* **Freight add Carrier Cost = *****Available,***
* **Per Carton Cost = *****Available***
| **Item Number** | **Freight** | **CarrierCost** | **FreightPerCarton** | **CarrierCostPerCarton** |
| --------------- | ----------- | --------------- | -------------------- | ------------------------ |
| A | 50 | 151 | 5000 | 500 |
| B | 60 | 152 | 6000 | 600 |
| C | 70 | 153 | 7000 | 700 |
| D | 80 | 154 | 8000 | 800 |
**Result:**
* Shipping Cost (Shipment Info) = 26000
* Carrier Cost (Shipment Info) = 2600; Sum-up of all lines
* Available Shipping = 100 (Picks the SO shipping cost as per App config)
* Charge to Customer = 100
* Shipping Cost in the Invoice shipping tab = 100
#### **The App Config: *****Override Invoice Shipping with API Freight Amount. = ON***
**Case 1:**
* **SO with the Shipping Charges=100**
* **Freight add Carrier Cost = *****Available,***
* **Per Carton Cost = *****Not Available***
| **Item Number** | **Freight** | **CarrierCost** | **FreightPerCarton** | **CarrierCostPerCarton** |
| --------------- | ----------- | --------------- | -------------------- | ------------------------ |
| A | 10 | 151 | – | – |
| B | 20 | 152 | – | – |
| C | 30 | 153 | – | – |
| D | 40 | 154 | – | – |
**Result:**
* Shipping Cost (Shipment Info) = 10
* Carrier Cost (Shipment Info) = 151; Picks only First line
* Available Shipping = 10 (Picked from the **Freight**)
* Charge to Customer = 10
* Shipping Cost in the Invoice shipping tab = 10
**Case 2:**
* **SO with the Shipping Charges=100**
* **Freight add Carrier Cost = *****Not*** ***Available,***
* **Per Carton Cost = *****Available***
| **Item Number** | **Freight** | **CarrierCost** | **FreightPerCarton** | **CarrierCostPerCarton** |
| --------------- | ----------- | --------------- | -------------------- | ------------------------ |
| A | – | – | 50 | 151 |
| B | – | – | 60 | 152 |
| C | – | – | 70 | 153 |
| D | – | – | 80 | 154 |
**Result:**
* Shipping Cost (Shipment Info) = 260
* Carrier Cost (Shipment Info) = 610; Sum-up of all lines
* Available Shipping = 260( sum-up the **FreightPerCarton)**
* Charge to Customer = 260
* Shipping Cost in the Invoice shipping tab = 260
**Case 3:**
* **SO with the Shipping Charges=100**
* **Freight add Carrier Cost = *****Available,***
* **Per Carton Cost = *****Available***
| **Item Number** | **Freight** | **CarrierCost** | **FreightPerCarton** | **CarrierCostPerCarton** |
| --------------- | ----------- | --------------- | -------------------- | ------------------------ |
| A | 50 | 151 | 5000 | 500 |
| B | 60 | 152 | 6000 | 600 |
| C | 70 | 153 | 7000 | 700 |
| D | 80 | 154 | 8000 | 800 |
**Result:**
* Shipping Cost (Shipment Info) = 26000
* Carrier Cost (Shipment Info) = 2600; Sum-up of all lines
* Available Shipping = 50(Picked from the **Freight**)
* Charge to Customer = 50
* Shipping Cost in the Invoice shipping tab = 50
### **15. Added new column “Location Zone” in Inventory By Location and Wave Centre**
A new column “***Location Zone***” is added in the “Inventory By Location” Centre and “Wave Centre” (Wave Detail Allocation).
*Note: Location Zones are created from the Location Zone module. Warehouses are divided into zones to help manage their operations, especially large ones.*
* **Inventory By Location**
####
### **14. Upload Wave Enhancements: Introduced BOL number, Master BOL number, Master Tracking Number**
Added BOL number, Master BOL number, Master Tracking Number, and new fields are included in the Waves Upload file. Also, included the ability to add Per Carton Cost for Freight and Carrier to the Shipment.
* The Shipment Info of an Order now includes three new fields:
1. BOL Number(Bill of Landing#)
2. Master Tracking Number
3. Master BOL Number
* Fields added in the Upload Wave Template:
1. BOL Number(Bill of Landing#)
2. Master Tracking Number
3. Master BOL Number
4. Carton Number
5. Serial Shipping Container Codes (SSCC) is used to identify shipments/cartons/logistics units as they travel through the supply chain.
6. Also, now the Per Carton Cost for Freight and Carrier can be calculated and added to the Shipment.
**How does it work?**
* Added BOL Number(Bill of Landing#), Master Tracking Number, Master BOL Number, SSCC, Carton Number fields in the **Upload Wave file.**
* Added BOL Number, Master Tracking Number, Master BOL Number columns in the **Invoice module, Invoice subform, Sales Receipt, and Sales Receipt** **subform.**
* Under the Shipping Tab of the Invoice.
* **Invoice Centre**
* **Invoice subform**
* Added BOL Number, Master Tracking Number, and Master BOL Number columns in the **Carton info tab of the Invoice Subform.**
* Added BOL Number, Master Tracking Number, Master BOL Number fields in **edit carton to create and update shipment.**
* When a Wave is uploaded with these values, it will auto-fill the Invoice, Invoice subform, and Carton info values.
* ***If uploaded Waves have different values than these fields then values of these fields will be entered separated by pipe operator “|”.***
**Calculating Shipping in case of multiple Cartons used in the Shipment when Ship API or File Upload is used.**
**Works with the App Config: *****Override Invoice Shipping with API Freight Amount.***
This Config Use the freight provided in API call during Ship API or File Upload.
**How does it work?**
**Let’s take an example of an SO with the Shipping Charges=100**
#### **The App Config: Override Invoice Shipping with API Freight Amount. = OFF**
**Case 1:**
* **SO with the Shipping Charges=100**
* **Freight add Carrier Cost = *****Available,***
* **Per Carton Cost = *****Not Available***
| **Item Number** | **Freight** | **CarrierCost** | **FreightPerCarton** | **CarrierCostPerCarton** |
| --------------- | ----------- | --------------- | -------------------- | ------------------------ |
| A | 10 | 151 | – | – |
| B | 20 | 152 | – | – |
| C | 30 | 153 | – | – |
| D | 40 | 154 | – | – |
**The result of the Invoice:**
* Shipping Cost (Shipment Info) = 100
* Carrier Cost (Shipment Info) = 151; Picks only First line
* Available Shipping = 100 (Picks the SO shipping cost as per App config)
* Charge to Customer = 100
* Shipping Cost in the Invoice shipping tab = 100
**Case 2:**
* **SO with the Shipping Charges=100**
* **Freight add Carrier Cost = *****Not*** ***Available,***
* **Per Carton Cost = *****Available***
| **Item Number** | **Freight** | **CarrierCost** | **FreightPerCarton** | **CarrierCostPerCarton** |
| --------------- | ----------- | --------------- | -------------------- | ------------------------ |
| A | – | – | 10 | 151 |
| B | – | – | 20 | 152 |
| C | – | – | 30 | 153 |
| D | – | – | 40 | 154 |
**Result:**
* Shipping Cost (Shipment Info) = 100
* Carrier Cost (Shipment Info) = 610; Sum-up of all lines
* Available Shipping = 100 (Picks the SO shipping cost as per App config)
* Charge to Customer = 100
* Shipping Cost in the Invoice shipping tab = 100
**Case 3:**
* **SO with the Shipping Charges=100**
* **Freight add Carrier Cost = *****Available,***
* **Per Carton Cost = *****Available***
| **Item Number** | **Freight** | **CarrierCost** | **FreightPerCarton** | **CarrierCostPerCarton** |
| --------------- | ----------- | --------------- | -------------------- | ------------------------ |
| A | 50 | 151 | 5000 | 500 |
| B | 60 | 152 | 6000 | 600 |
| C | 70 | 153 | 7000 | 700 |
| D | 80 | 154 | 8000 | 800 |
**Result:**
* Shipping Cost (Shipment Info) = 26000
* Carrier Cost (Shipment Info) = 2600; Sum-up of all lines
* Available Shipping = 100 (Picks the SO shipping cost as per App config)
* Charge to Customer = 100
* Shipping Cost in the Invoice shipping tab = 100
#### **The App Config: *****Override Invoice Shipping with API Freight Amount. = ON***
**Case 1:**
* **SO with the Shipping Charges=100**
* **Freight add Carrier Cost = *****Available,***
* **Per Carton Cost = *****Not Available***
| **Item Number** | **Freight** | **CarrierCost** | **FreightPerCarton** | **CarrierCostPerCarton** |
| --------------- | ----------- | --------------- | -------------------- | ------------------------ |
| A | 10 | 151 | – | – |
| B | 20 | 152 | – | – |
| C | 30 | 153 | – | – |
| D | 40 | 154 | – | – |
**Result:**
* Shipping Cost (Shipment Info) = 10
* Carrier Cost (Shipment Info) = 151; Picks only First line
* Available Shipping = 10 (Picked from the **Freight**)
* Charge to Customer = 10
* Shipping Cost in the Invoice shipping tab = 10
**Case 2:**
* **SO with the Shipping Charges=100**
* **Freight add Carrier Cost = *****Not*** ***Available,***
* **Per Carton Cost = *****Available***
| **Item Number** | **Freight** | **CarrierCost** | **FreightPerCarton** | **CarrierCostPerCarton** |
| --------------- | ----------- | --------------- | -------------------- | ------------------------ |
| A | – | – | 50 | 151 |
| B | – | – | 60 | 152 |
| C | – | – | 70 | 153 |
| D | – | – | 80 | 154 |
**Result:**
* Shipping Cost (Shipment Info) = 260
* Carrier Cost (Shipment Info) = 610; Sum-up of all lines
* Available Shipping = 260( sum-up the **FreightPerCarton)**
* Charge to Customer = 260
* Shipping Cost in the Invoice shipping tab = 260
**Case 3:**
* **SO with the Shipping Charges=100**
* **Freight add Carrier Cost = *****Available,***
* **Per Carton Cost = *****Available***
| **Item Number** | **Freight** | **CarrierCost** | **FreightPerCarton** | **CarrierCostPerCarton** |
| --------------- | ----------- | --------------- | -------------------- | ------------------------ |
| A | 50 | 151 | 5000 | 500 |
| B | 60 | 152 | 6000 | 600 |
| C | 70 | 153 | 7000 | 700 |
| D | 80 | 154 | 8000 | 800 |
**Result:**
* Shipping Cost (Shipment Info) = 26000
* Carrier Cost (Shipment Info) = 2600; Sum-up of all lines
* Available Shipping = 50(Picked from the **Freight**)
* Charge to Customer = 50
* Shipping Cost in the Invoice shipping tab = 50
### **15. Added new column “Location Zone” in Inventory By Location and Wave Centre**
A new column “***Location Zone***” is added in the “Inventory By Location” Centre and “Wave Centre” (Wave Detail Allocation).
*Note: Location Zones are created from the Location Zone module. Warehouses are divided into zones to help manage their operations, especially large ones.*
* **Inventory By Location**
 * **Wave Centre (WaveDetail Allocation)**
* **Wave Subview**
####
### **16. Custom Field Mapping Enhancements: New Centre was created along with the ability to Map Header to Detail Level Fields**
Now Users can make the **Mapping from Header to Detail level**. Before this, the mapping was only available from header to header and detail to detail.
* The User can make custom field mapping for the **Customer to SO header and also for SO Detail** (Same for Estimate and Invoice).
* **Wave Centre (WaveDetail Allocation)**
* **Wave Subview**
####
### **16. Custom Field Mapping Enhancements: New Centre was created along with the ability to Map Header to Detail Level Fields**
Now Users can make the **Mapping from Header to Detail level**. Before this, the mapping was only available from header to header and detail to detail.
* The User can make custom field mapping for the **Customer to SO header and also for SO Detail** (Same for Estimate and Invoice).
 * **Item can be mapped to SO Detail, Estimate Detail, and Invoice detail.**
 * Now User can also make a **mapping for Sales to invoice(header and detail or both).**
 Created a new ***Centre for Custom Field Mapping.***
 * The Description column shows “Mapping Type” of the Custom Fields, for example; SO to Invoice Detail, Customer to SO Header, etc.
* Added a new option “***Priority***” in the **Custom Field Mapping module**.
* If the User has made a mapping for the Customer to the SO detail (having Priority 1) and also for Item to SO Detail (having Priority 2) then the SO line will be mapped based on the minimum priority (Customer to SO line (Priority 1)).
* The “Priority” column is also included in the Custom Field Mapping Centre.
*Please Note: Custom field mapping has also been implemented in the Upload Sales Order.*
### **17. Reports: Dynamic Reports Enhancements**
The Report library module has been upgraded to be more efficient and user-friendly. There are several new features added to the Dynamic Reports and to the Reporting module.
Following are the upgrades:
* Able to save (***Save as New***) filters (dropdown, textbox values) along with the layout of the Dynamic Reports.
* This shows the original Component Name under the Saved Component Name while saving.
* The Description column shows “Mapping Type” of the Custom Fields, for example; SO to Invoice Detail, Customer to SO Header, etc.
* Added a new option “***Priority***” in the **Custom Field Mapping module**.
* If the User has made a mapping for the Customer to the SO detail (having Priority 1) and also for Item to SO Detail (having Priority 2) then the SO line will be mapped based on the minimum priority (Customer to SO line (Priority 1)).
* The “Priority” column is also included in the Custom Field Mapping Centre.
*Please Note: Custom field mapping has also been implemented in the Upload Sales Order.*
### **17. Reports: Dynamic Reports Enhancements**
The Report library module has been upgraded to be more efficient and user-friendly. There are several new features added to the Dynamic Reports and to the Reporting module.
Following are the upgrades:
* Able to save (***Save as New***) filters (dropdown, textbox values) along with the layout of the Dynamic Reports.
* This shows the original Component Name under the Saved Component Name while saving.
 * Provided the option to “Edit” the User added Report.
 * Able to update the Name, Description, and Report Group.
* Able to delete the New Report Component.
* Access level permissions can be defined to Save/Delete the new components by only the User who created them.
* Added the ***Search dropdown in the Report library.***
* For PDF Reports search, the search dropdown will show the Reports based upon the access granted to the User in the Access Manager.
* In the case of the Dynamic Reports, it will only show the Report if the User has access to the **R**eport Group in the Access Manager.
---
# Agent Instructions: Querying This Documentation
If you need additional information that is not directly available in this page, you can query the documentation dynamically by asking a question.
Perform an HTTP GET request on the current page URL with the `ask` query parameter:
```
GET https://docs.xorosoft.com/whats-new/release-notes/previous-releases/2021/september-2021-release.md?ask=
```
The question should be specific, self-contained, and written in natural language.
The response will contain a direct answer to the question and relevant excerpts and sources from the documentation.
Use this mechanism when the answer is not explicitly present in the current page, you need clarification or additional context, or you want to retrieve related documentation sections.
* Able to update the Name, Description, and Report Group.
* Able to delete the New Report Component.
* Access level permissions can be defined to Save/Delete the new components by only the User who created them.
* Added the ***Search dropdown in the Report library.***
* For PDF Reports search, the search dropdown will show the Reports based upon the access granted to the User in the Access Manager.
* In the case of the Dynamic Reports, it will only show the Report if the User has access to the **R**eport Group in the Access Manager.
---
# Agent Instructions: Querying This Documentation
If you need additional information that is not directly available in this page, you can query the documentation dynamically by asking a question.
Perform an HTTP GET request on the current page URL with the `ask` query parameter:
```
GET https://docs.xorosoft.com/whats-new/release-notes/previous-releases/2021/september-2021-release.md?ask=
```
The question should be specific, self-contained, and written in natural language.
The response will contain a direct answer to the question and relevant excerpts and sources from the documentation.
Use this mechanism when the answer is not explicitly present in the current page, you need clarification or additional context, or you want to retrieve related documentation sections.


